The following is a Guide for Anub’Rekhan the first raid boss of the spider wing.
Classic World of Warcraft Guides
The following is a Guide for Anub’Rekhan the first raid boss of the spider wing.

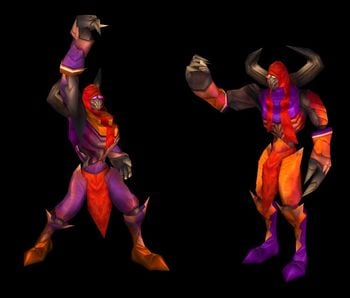
Garr is a large Obsidian elemental and the fourth boss of Molten Core. With him are eight Firesworn elites.
This text segment by Spoogen follows up on the video created by Raserisk
These are the 8 elementals surrounding Garr. These spicy bois dish out some nasty IMMOLATES. (MDEBUFF – Dispel/Cleanse) If you kill one, you better watch out because Martydom, is an understatement. The Firesworn will hit you with ERUPTION upon being killed. Which will knock all nearby players away….. if they survive the damage. (Make sure your raid communicates when these are going to die, or you will get blowededed up and wipe)
Firesworn deaths make Garr do more damage. Be smart with kill order, and get your Banishes on LOCK. (As many targets as possible)
Don’t move the firesworn too far away from Garr, this will make them activate SEPARATION ANXIETY, which is basically a tantrum, making them flex and become immune to CC.
Now to
cover Garr’s abilites. Garr is a basic boi and only has 2 abilites to watch out
for.
ANTIMAGIC PULSE is an AOE dispell.
So make sure you stack trash buffs (to be dispelled instead of the important
buffs) before the fight like underwater breathing….. because
breathing underwater, is not cool.
MAGMA SHACKLES is the 2nd ability to
consider. This is an AOE movement speed debuff for your party. (Lowered
to 40% of normal)
Step 1: Banish 3-4 Firesworn + Main tank hits Garr with ” What are those?” enraging him and pulling agro
Step 2: Off-Tanks will tank the rest
Step 3: Kill Firesworn in a spot that won’t wipe the raid
Step 4: Focus Garr after 3-4 Firesworn are dead
Step 5: Kill Banished Firesworn after
An Alt strat would be to kill all ADD’s first, however this will fully power Garr up. (Make sure your healers/Tank know what they’re doing if you pick this alt strat)
Step 1: Main tank holds all ADDs in corner (Heavy
heals are needed on tank to accomplish this)
Step 2: DPS
Burns Garr down first, then adds after
Use free action potions if needed, otherwise you’re off to Baron Geddon !
The following is a Guide about the Four Horsemen who service Kel’Thuzad in Naxxramas. They were originally Highlord Alexandros Mograine, Thane Korth’azz, Lady Blaumeux, and Sir Zeliek.
This encounter is one of the hardest encounters Pre-Burning Crusade. The only bosses that could be considered harder are Gothik the Harvester and Kel’Thuzad.
Using Aimed + Multi-Shot cycle
Multi-Shot is instant (close enough to the truth, very rarely delays Auto Shot with practice)
Disregarding mana, consumables negate mana issues
Disregarding haste buffs (Rapid Fire, Berserking, etc)
With 5/5 Improved Aspect of the Hawk, I add 4-5% damage, depending on weapon speed – Note: Working on better formula for iAotH
Every cycle consists roughly of:
1 Aimed Shot
1 Multi-Shot
x Auto Shot, depending on weapon speed and cycle lenght.
With most weapons, you’ll find something like the following happening:
Aimed Shot finishes cooldown. Auto Shot fired ~1 sec ago.
Should you clip your cycle (ignore the next Auto Shot and fire Aimed Shot immediately)? Or should you use a full cycle (wait for the Auto Shot before using Aimed Shot?
What would give the highest damage potential?
To answer this, you needed to compare both options, and see which one would yield the most damage.
THE AIMED SHOT CYCLE
Multi-Shot has the longest cooldown (10 sec), but since we stated Multi-Shot is an instant, the damage can be converted into any cycle lenght. For this reason, I’ll be using a default (clipped) cycle length of 9 seconds. While not being optimal for mana purposes, it is the one with the highest damage potential.
This is roughly what you’ll have to take into account:
If Multi-Shot does 1000 damage every 10 seconds, and the cycle is 5 seconds, the cycle damage for Multi-Shot becomes 500.
Likewise, if the cycle lenght is 20 seconds, the cycle damage would be 2000.
However, there are some things to keep in mind as well:
If the cycle is between 9 (minimum cycle length) and 10 seconds long, you have to include damage lost by conflicting cooldowns. For example, in a perfect 9 second cycle, you get to fire 6 Multi-Shots every 7 cycles. So, instead of using 9/10 of the Multi-Shot, I use 6/7 for this. As cycle lenght reaches 10, more of the Multi-Shot damage is included. So, don’t be alarmed if you’re not able to fire a Multi-Shot between each Aimed Shot.
The cooldown of Aimed Shot is 6 seconds, casting time is 3 seconds. During casting, Auto Shot cools down. This means that basically every weapon will get a free Auto Shot after Aimed Shot. The free Auto Shot comes after a delay of about 0.5 seconds after Aimed Shot is fired, regardless of weapon speed.
During the casting of Aimed Shot, no Auto Shots are fired.
Stats on weapons that affect damage (Agility, (Ranged) Attack Power, +crit%, +hit%) are taken into consideration for the rankings.
For the timestamps, I won’t include Multi-Shot. Every cycle basically has a “+ Multi-Shot”, which can be placed wherever it fits before Aimed Shot.
MISCONCEPTIONS
Cycles don’t exist
Arcane Shot and Aimed Shot have a linked cooldown. For raiding purposes, Aimed Shot is better than Arcane Shot in virtually every aspect. Although there are some exceptions, Aimed Shot is the best option for dealing ranged damage. Every time you use Aimed Shot, you’ve started a cycle. After Aimed Shot is completed, you have 6 seconds before Aimed Shot is ready again. Go clipped or full?
Cycles are impossible to use
They’re not. Performing them perfectly is practically impossible, and it’s harder with some weapons. However, getting as close as possible will be the most damaging thing you can do. Thus, the calculations I give you show the weapon with highest damage potential, and also how to deal the most damage with it. It’s up to you to maximize the potential. Practice, focus, and knowing the rhythm of your weapon helps a lot; you’re always able to improve. Additionally, a timer for your Auto Shots might help you a lot. Personally, I use ZHunterMod (http://curse-gaming….zhuntermod.html).
Clipped cycles are the easiest to use, since you can basically spam Aimed Shot and Multi-Shot, and the cooldowns will take care of the rest. Remember that latency might affect this a bit, making Aimed Shot ready just before Auto Shot fires (making you do a sub-optimal cycle). Spamming is rarely a good idea; paying attention is 😉
Lag and human reaction invalidate cycle calculations
Often you’ll hear people claiming cycles are useless because of reasons like lag, human reaction, etc. These settings vary from person to person; hunter A might have perfect conditions, performing at almost 100% of what he’s capable of, while hunter B might be experiencing lag, talking on the phone and feeding his parrot – of course he’ll perform worse. However, comparing the different weapons, using optimal conditions for everything is the fairest comparison. Although this has no influence on a weapon’s damage potential, if you know you suffer from lag or slow reaction times, take it into consideration when looking at what I write.
Look, Lactose, we’d rather you didn’t eradicate the whole human race.
– Sam & Max
LIST OF WEAPONS
This is the current list of weapons I’ve compared:
Ancient Bone Bow
Ashjre’thul
Blastershot Launcher
Blessed Qiraji Musket
Bloodseeker
Bow of Taut Sinew
Bow of the Four Horsemen
Carapace Spine Crossbow
Core Marksman Rifle
Crossbow of Imminent Doom
Dragonbreath Hand Cannon
Fahrad’s Reloading Repeater
Flawless Arcanite Rifle
Grand Marshal’s Bullseye / High Warlord’s Recurve
Grand Marshal’s Hand Cannon / High Warlord’s Street Sweeper
Grand Marshal’s Repeater / High Warlord’s Crossbow
Gryphonwing Long Bow
Gurubashi Dwarf Destroyer
Heartstriker
Hoodoo Hunting Bow
Huhuran’s Stinger
Larvae of the Great Worm
Mandokir’s Sting
Nerubian Slavemaker
Rhok’delar
Silithid Husked Launcher
Stoneshatter
Striker’s Mark
Toxin Injector
Weapons will be listed sorted by damage potential; highest = first.
All values listed are vs bosses (level 63 mobs –> 8.6% missrate), and before armor mitigation.
This is how the information is going to be shown:
1 – The Milk Makerâ„¢, 2.0 speed
Best cycle DPS: 657, Clipped
Worst cycle DPS: 649, Full
Auto Shot DPS: 419 (1st)
Auto Shot DPS is included mostly for mana reasons. If two weapons seem very equal, but you know you run out of mana alot, you might want to choose the one with highest Auto Shot DPS, even though it could have a slightly lower best cycle. Auto Shot DPS is the DPS a weapon would have using only Auto Shot, not Aimed Shot or Multi-Shot. Auto Shot DPS might work as a tool for selecting a weapon for encounters where you feel you can’t use standard cycles.
(1st) indicates the ranking of Auto Shot DPS. If it’s the best Auto Shot DPS weapon, it’ll be (1st), second best would be(2nd), etc.
Note that using average cycle DPS is not a good idea for comparing weapons. For example, if you know the best cycle for The Milk Makerâ„¢ is clipped, you wouldn’t make half your cycles full; you would try to use the best cycle whenever possible.
A full cycle is, in most cases, slightly harder to perform than a clipped one, since you can’t just spam the button and let the cooldowns take care of the rest.
WEAPONS TO COME
Dwarven Hand Cannon
Polished Ironwood Crossbow
If you want any more weapons added, let me know, and I’ll see what I can do.
Alternatively, you can use your own gear / setup, and compare weapons, etc directly by using my spreadsheet:http://forums.elitis…pic.php?id=7312
FORMULAE USED
Auto Shot damage: SlayingMod*(AmmoDPS*WeaponSpeed+RWSMod*(RAP/14*WeaponSpeed+Scope+AverageWeaponDamage))
Aimed Shot damage: SlayingMod*(AmmoDPS*WeaponSpeed+RWSMod*(RAP/14*2.8+Scope+AverageWeaponDamage+AimedShotBonus))
Multi-Shot damage: BarrageMod*GSMod*SlayingMod*MSCoEff* (AmmoDPS*WeaponSpeed+RWSMod*(RAP/14*2.8+Scope+AverageWeaponDamage+MultiShotBonus))
CritDamage (all shots): HitDamage*(2+MortalShotsMod)*SlayingMod
Factoring in crits (all shots): HitChance*HitDamage + CritChance*Critdamage
AimedShotBonus = 600
MultiShotBonus = 150
MortalShotsMod = 0.30
SlayingMod = 1.03 if Slaying Talent, 1 if not
RWSMod = 1.05 if MM spec, 1 if LR spec
BarrageMod = 1.15 if MM spec, 1 if LR spec
GSMod = 1.15 if 8/8 Giantstalker bonus, 1 if not
MSCoEff: Coefficient for Multi-Shot.
Since the cooldown of Multi-Shot is 10 seconds, it’s obvious that using cycles between 9 and 10 seconds will make you lose a Multi-Shot now and again. For example, using a 9 second cycle, due to the conflicting cooldowns of Multi-Shot and Aimed Shot, you’ll be able to fire about 6 Multi-Shots every 7 cycles. So, for 9 second cycles, I add 6/7 of the Multi-Shot damage listed.
As the cycle lenght reaches 10 seconds, more of the Multi-Shot damage is used.
MSCoEff = ROUNDDOWN(6/(10-CycleTime)) / ROUNDDOWN(1+6/(10-CycleTime))) for cycles not exceeding 10 seconds, 1 for cycles exceeding 10 seconds.
CONTACT INFORMATION
Talnivarr EU – Horde — Lactose or Label
If there’s anything you want to comment, ask, etc, feel free to log on and send me a whisper. Please respect if I’m busy though =)
I also check this forum frequently, so posting here or sending a PM should work as well 😉
The following is aimed at a hunter with good equipment, roughly equivalent to full tier 2 or better.
SETUP
1500 RAP
23.5% ranged crit
+8% hit
5/5 Improved Aspect of the Hawk
3/3 Barrage
5/5 Mortal Shots
5/5 Ranged Weapon Specialization
3/3 Slaying vs Target
+7 scope
15% quiver
Thorium ammo (17.5 DPS)
Link to example gear setup: http://ctprofiles.net/3044976
WEAPONS RANKING
All values listed are vs bosses (level 63 mobs –> 8.6% missrate), and before armor mitigation.
1 – Nerubian Slavemaker, 3.2 speed
Best cycle DPS: 599, Full
Worst cycle DPS: 503, Clipped
Auto Shot DPS: 304 (1st)
2 – Ashjre’thul, 3.4 speed
Best cycle DPS: 571, Full
Worst cycle DPS: 491, Clipped
Auto Shot DPS: 283 (9th)
3 – Larvae of the Great Worm, 3.0 speed
Best cycle DPS: 558, Clipped
Worst cycle DPS: 530, Full
Auto Shot DPS: 290 (3rd)
4 – Soulstring, 2.9 speed
Best cycle DPS: 551, Clipped
Worst cycle DPS: 534, Full
Auto Shot DPS: 293 (2nd)
5 – Crossbow of Imminent Doom, 3.1 speed
Best cycle DPS: 547, Clipped
Worst cycle DPS: 507, Full
Auto Shot DPS: 276 (13th)
6 – Grand Marshal’s Hand Cannon & Repeater / High Warlord’s Street Sweeper & Crossbow, 2.9 speed
Best cycle DPS: 538, Clipped
Worst cycle DPS: 521, Full
Auto Shot DPS: 285 (8th)
7 – Rhok’delar, 2.9 speed
Best cycle DPS: 534, Clipped
Worst cycle DPS: 517, Full
Auto Shot DPS: 282 (10th)
8 – Fahrad’s Reloading Repeater, 3.2 speed
Best cycle DPS: 530, Full
Worst cycle DPS: 447, Clipped
Auto Shot DPS: 261 (22nd)
9 – Bloodseeker, 3.3 speed
Best cycle DPS: 528, Full
Worst cycle DPS: 451, Clipped
Auto Shot DPS: 259 (23th)
10 – Huhuran’s Stinger, 2.7 speed
Best cycle DPS: 525, Full
Worst cycle DPS: 517, Clipped
Auto Shot DPS: 286 (6th)
11 – Blessed Qiraji Musket, 2.6 speed
Best cycle DPS: 525, Full
Worst cycle DPS: 506, Clipped
Auto Shot DPS: 286 (6th)
12 – Carapace Spine Crossbow, 3.3 speed
Best cycle DPS: 523, Full
Worst cycle DPS: 447, Clipped
Auto Shot DPS: 257 (26th)
13 – Dragonbreath Hand Cannon, 2.8 speed
Best cycle DPS: 521, Clipped
Worst cycle DPS: 516, Full
Auto Shot DPS: 281 (11th)
14 – Heartstriker, 2.6 speed
Best cycle DPS: 516, Full
Worst cycle DPS: 498, Clipped
Auto Shot DPS: 280 (12th)
15 – Flawless Arcanite Rifle, 3.0 speed
Best cycle DPS: 510, Clipped
Worst cycle DPS: 482, Full
Auto Shot DPS: 233 (28th)
16 – Striker’s Mark, 2.5 speed
Best cycle DPS: 509, Full
Worst cycle DPS: 480, Clipped
Auto Shot DPS: 274 (14th)
17 – Gurubashi Dwarf Destroyer, 2.8 speed
Best cycle DPS: 508, Clipped
Worst cycle DPS: 503, Full
Auto Shot DPS: 272 (16th)
18 – Blastershot Launcher, 2.6 speed
Best cycle DPS: 508, Full
Worst cycle DPS: 491, Clipped
Auto Shot DPS: 274 (14th)
19 – Toxin Injector, 2.0 speed
Best cycle DPS: 503, Clipped
Worst cycle DPS: 498, Full
Auto Shot DPS: 290 (3rd)
20 – Core Marksman Rifle, 2.5 speed
Best cycle DPS: 503, Full
Worst cycle DPS: 474, Clipped
Auto Shot DPS: 270 (18th)
21 – Mandokir’s Sting, 2.6 speed
Best cycle DPS: 502, Full
Worst cycle DPS: 484, Clipped
Auto Shot DPS: 270 (18th)
22 – Hoodoo Hunting Bow, 2.8 speed
Best cycle DPS: 499, Clipped
Worst cycle DPS: 493, Full
Auto Shot DPS: 265 (20th)
23 – Stoneshatter, 2.9 speed
Best cycle DPS: 499, Clipped
Worst cycle DPS: 482, Full
Auto Shot DPS: 258 (25th)
24 – Silithid Husked Launcher, 2.8 speed
Best cycle DPS: 496, Clipped
Worst cycle DPS: 490, Full
Auto Shot DPS: 263 (21st)
25 – Bow of Taut Sinew, 2.2 speed
Best cycle DPS: 496, Full
Worst cycle DPS: 445, Clipped
Auto Shot DPS: 272 (16th)
26 – Grand Marshal’s Bullseye / High Warlord’s Recurve, 1.8 speed
Best cycle DPS: 494, Full
Worst cycle DPS: 470, Clipped
Auto Shot DPS: 287 (5th)
27 – Ancient Bone Bow, 2.8 speed
Best cycle DPS: 490, Clipped
Worst cycle DPS: 484, Full
Auto Shot DPS: 259 (23rd)
28 – Gryphonwing Longbow, 2.7 speed
Best cycle DPS: 477, Full
Worst cycle DPS: 473, Clipped
Auto Shot DPS: 254 (27th)
The following is aimed at a hunter with good equipment, roughly equivalent to full tier 2 or better.
SETUP
1550 RAP
28% ranged crit
+9% hit
5/5 Mortal Shots
5/5 Lightning Reflexes
3/3 Slaying vs Target
+7 scope
15% quiver
Thorium ammo (17.5 DPS)
Link to example gear setup: http://ctprofiles.net/3045139
WEAPONS RANKING
All values listed are vs bosses (level 63 mobs –> 8.6% missrate), and before armor mitigation.
1 – Nerubian Slavemaker, 3.2 speed
Best cycle DPS: 566, Full
Worst cycle DPS: 474, Clipped
Auto Shot DPS: 311 (1st)
2 – Ashjre’thul, 3.4 speed
Best cycle DPS: 539, Full
Worst cycle DPS: 463, Clipped
Auto Shot DPS: 291 (9th)
3 – Larvae of the Great Worm, 3.0 speed
Best cycle DPS: 528, Clipped
Worst cycle DPS: 501, Full
Auto Shot DPS: 298 (3rd)
4 – Soulstring, 2.9 speed
Best cycle DPS: 521, Clipped
Worst cycle DPS: 505, Full
Auto Shot DPS: 300 (2nd)
5 – Crossbow of Imminent Doom, 3.1 speed
Best cycle DPS: 516, Clipped
Worst cycle DPS: 478, Full
Auto Shot DPS: 283 (13th)
6 – Grand Marshal’s Hand Cannon & Repeater / High Warlord’s Street Sweeper & Crossbow, 2.9 speed
Best cycle DPS: 509, Clipped
Worst cycle DPS: 493, Full
Auto Shot DPS: 293 (8th)
7 – Rhok’delar, 2.9 speed
Best cycle DPS: 506, Clipped
Worst cycle DPS: 490, Full
Auto Shot DPS: 289 (10th)
8 – Bloodseeker, 3.3 speed
Best cycle DPS: 501, Full
Worst cycle DPS: 427, Clipped
Auto Shot DPS: 267 (23th)
9 – Huhuran’s Stinger, 2.7 speed
Best cycle DPS: 498, Full
Worst cycle DPS: 492, Clipped
Auto Shot DPS: 294 (6th)
10 – Blessed Qiraji Musket, 2.6 speed
Best cycle DPS: 497, Full
Worst cycle DPS: 480, Clipped
Auto Shot DPS: 294 (6th)
11 – Carapace Spine Crossbow, 3.3 speed
Best cycle DPS: 497, Full
Worst cycle DPS: 424, Clipped
Auto Shot DPS: 264 (26th)
12 – Fahrad’s Reloading Repeater, 3.2 speed
Best cycle DPS: 497, Full
Worst cycle DPS: 419, Clipped
Auto Shot DPS: 266 (22nd)
13 – Dragonbreath Hand Cannon, 2.8 speed
Best cycle DPS: 495, Clipped
Worst cycle DPS: 489, Full
Auto Shot DPS: 289 (11th)
14 – Heartstriker, 2.6 speed
Best cycle DPS: 489, Full
Worst cycle DPS: 472, Clipped
Auto Shot DPS: 288 (12th)
15 – Gurubashi Dwarf Destroyer, 2.8 speed
Best cycle DPS: 482, Clipped
Worst cycle DPS: 477, Full
Auto Shot DPS: 280 (16th)
16 – Blastershot Launcher, 2.6 speed
Best cycle DPS: 482, Full
Worst cycle DPS: 466, Clipped
Auto Shot DPS: 281 (14th)
17 – Striker’s Mark, 2.5 speed
Best cycle DPS: 481, Full
Worst cycle DPS: 454, Clipped
Auto Shot DPS: 280 (14th)
18 – Flawless Arcanite Rifle, 3.0 speed
Best cycle DPS: 480, Clipped
Worst cycle DPS: 453, Full
Auto Shot DPS: 264 (28th)
19 – Toxin Injector, 2.0 speed
Best cycle DPS: 478, Clipped
Worst cycle DPS: 473, Full
Auto Shot DPS: 298 (3rd)
20 – Mandokir’s Sting, 2.6 speed
Best cycle DPS: 476, Full
Worst cycle DPS: 461, Clipped
Auto Shot DPS: 278 (18th)
21 – Hoodoo Hunting Bow, 2.8 speed
Best cycle DPS: 474, Clipped
Worst cycle DPS: 468, Full
Auto Shot DPS: 273 (20th)
22 – Core Marksman Rifle, 2.5 speed
Best cycle DPS: 474, Full
Worst cycle DPS: 448, Clipped
Auto Shot DPS: 276 (18th)
23 – Stoneshatter, 2.9 speed
Best cycle DPS: 472, Clipped
Worst cycle DPS: 455, Full
Auto Shot DPS: 265 (25th)
24 – Silithid Husked Launcher, 2.8 speed
Best cycle DPS: 471, Clipped
Worst cycle DPS: 465, Full
Auto Shot DPS: 271 (21st)
25 – Bow of Taut Sinew, 2.2 speed
Best cycle DPS: 471, Full
Worst cycle DPS: 423, Clipped
Auto Shot DPS: 280 (16th)
26 – Grand Marshal’s Bullseye / High Warlord’s Recurve, 1.8 speed
Best cycle DPS: 469, Full
Worst cycle DPS: 448, Clipped
Auto Shot DPS: 294 (5th)
27 – Ancient Bone Bow, 2.8 speed
Best cycle DPS: 466, Clipped
Worst cycle DPS: 460, Full
Auto Shot DPS: 267 (23rd)
28 – Gryphonwing Longbow, 2.7 speed
Best cycle DPS: 454, Full
Worst cycle DPS: 450, Clipped
Auto Shot DPS: 262 (27th)
Speed: 1.5 (Reduced to 1.30 with quiver)
Clipped Full 0.50 Free Auto 0.50 Free Auto 1.80 Auto 1.80 Auto 3.11 Auto 3.11 Auto 4.41 Auto 4.41 Auto 5.72 Auto 5.72 Auto 6.00 Start Aimed 7.02 Auto 9.00 Aimed 7.02 Start Aimed 10.02 Aimed
Speed: 1.6 (Reduced to 1.39 with quiver)
Clipped Full 0.50 Free Auto 0.50 Free Auto 1.89 Auto 1.89 Auto 3.28 Auto 3.28 Auto 4.67 Auto 4.67 Auto 6.00 Start Aimed 6.07 Auto 9.00 Aimed 6.07 Start Aimed 9.07 Aimed
Speed: 1.7 (Reduced to 1.48 with quiver)
Clipped Full 0.50 Free Auto 0.50 Free Auto 1.98 Auto 1.98 Auto 3.46 Auto 3.46 Auto 4.93 Auto 4.93 Auto 6.00 Start Aimed 6.41 Auto 9.00 Aimed 6.41 Start Aimed 9.41 Aimed
Speed: 1.8 (Reduced to 1.57 with quiver)
Clipped Full 0.50 Free Auto 0.50 Free Auto 2.07 Auto 2.07 Auto 3.63 Auto 3.63 Auto 5.20 Auto 5.20 Auto 6.00 Start Aimed 6.76 Auto 9.00 Aimed 6.76 Start Aimed 9.76 Aimed
Speed: 1.9 (Reduced to 1.65 with quiver)
Clipped Full 0.50 Free Auto 0.50 Free Auto 2.15 Auto 2.15 Auto 3.80 Auto 3.80 Auto 5.46 Auto 5.46 Auto 6.00 Start Aimed 7.11 Auto 9.00 Aimed 7.11 Start Aimed 10.11 Aimed
Speed: 2.0 (Reduced to 1.74 with quiver)
Clipped Full 0.50 Free Auto 0.50 Free Auto 2.24 Auto 2.24 Auto 3.98 Auto 3.98 Auto 5.72 Auto 5.72 Auto 6.00 Start Aimed 7.46 Auto 9.00 Aimed 7.46 Start Aimed 10.46 Aimed
Speed: 2.1 (Reduced to 1.83 with quiver)
Clipped Full 0.50 Free Auto 0.50 Free Auto 2.33 Auto 2.33 Auto 4.15 Auto 4.15 Auto 5.98 Auto 5.98 Auto 6.00 Start Aimed 7.80 Auto 9.00 Aimed 7.80 Start Aimed 10.8 Aimed
Speed: 2.2 (Reduced to 1.91 with quiver)
Clipped Full 0.50 Free Auto 0.50 Free Auto 2.41 Auto 2.41 Auto 4.33 Auto 4.33 Auto 6.00 Start Aimed 6.24 Auto 9.00 Aimed 6.24 Start Aimed 9.24 Aimed
Speed: 2.3 (Reduced to 2.00 with quiver)
Clipped Full 0.50 Free Auto 0.50 Free Auto 2.50 Auto 2.50 Auto 4.50 Auto 4.50 Auto 6.00 Start Aimed 6.50 Auto 9.00 Aimed 6.50 Start Aimed 9.50 Aimed
Speed: 2.4 (Reduced to 2.09 with quiver)
Clipped Full 0.50 Free Auto 0.50 Free Auto 2.59 Auto 2.59 Auto 4.67 Auto 4.67 Auto 6.00 Start Aimed 6.76 Auto 9.00 Aimed 6.76 Start Aimed 9.76 Aimed
Speed: 2.5 (Reduced to 2.17 with quiver)
Clipped Full 0.50 Free Auto 0.50 Free Auto 2.67 Auto 2.67 Auto 4.85 Auto 4.85 Auto 6.00 Start Aimed 7.02 Auto 9.00 Aimed 7.02 Start Aimed 10.02 Aimed
Speed: 2.6 (Reduced to 2.26 with quiver)
Clipped Full 0.50 Free Auto 0.50 Free Auto 2.76 Auto 2.76 Auto 5.02 Auto 5.02 Auto 6.00 Start Aimed 7.28 Auto 9.00 Aimed 7.28 Start Aimed 10.28 Aimed
Speed: 2.7 (Reduced to 2.35 with quiver)
Clipped Full 0.50 Free Auto 0.50 Free Auto 2.85 Auto 2.85 Auto 5.20 Auto 5.20 Auto 6.00 Start Aimed 7.54 Auto 9.00 Aimed 7.54 Start Aimed 10.54 Aimed
Speed: 2.8 (Reduced to 2.43 with quiver)
Clipped Full 0.50 Free Auto 0.50 Free Auto 2.93 Auto 2.93 Auto 5.37 Auto 5.37 Auto 6.00 Start Aimed 7.80 Auto 9.00 Aimed 7.80 Start Aimed 10.8 Aimed
Speed: 2.9 (Reduced to 2.52 with quiver)
Clipped Full 0.50 Free Auto 0.50 Free Auto 3.02 Auto 3.02 Auto 5.54 Auto 5.54 Auto 6.00 Start Aimed 8.07 Auto 9.00 Aimed 8.07 Start Aimed 11.07 Aimed
Speed: 3.0 (Reduced to 2.61 with quiver)
Clipped Full 0.50 Free Auto 0.50 Free Auto 3.11 Auto 3.11 Auto 5.72 Auto 5.72 Auto 6.00 Start Aimed 8.33 Auto 9.00 Aimed 8.33 Start Aimed 11.33 Aimed
Speed: 3.1 (Reduced to 2.70 with quiver)
Clipped Full 0.50 Free Auto 0.50 Free Auto 3.20 Auto 3.20 Auto 5.89 Auto 5.89 Auto 6.00 Start Aimed 8.59 Auto 9.00 Aimed 8.59 Start Aimed 11.59 Aimed
Speed: 3.2 (Reduced to 2.78 with quiver)
Clipped Full 0.50 Free Auto 0.50 Free Auto 3.28 Auto 3.28 Auto 6.00 Start Aimed 6.07 Auto 9.00 Aimed 6.07 Start Aimed 9.07 Aimed
Speed: 3.3 (Reduced to 2.87 with quiver
Clipped Full 0.50 Free Auto 0.50 Free Auto 3.37 Auto 3.37Auto 6.00 Start Aimed 6.24Auto 9.00 Aimed 6.24Start Aimed 9.24Aimed
Speed: 3.4 (Reduced to 2.96 with quiver)
Clipped Full 0.50 Free Auto 0.50 Free Auto 3.46 Auto 3.46 Auto 6.00 Start Aimed 6.41 Auto 9.00 Aimed 6.41 Start Aimed 9.41 Aimed
HUH, NORMALIZATION?
Quote from the patch-notes, regarding the normalization of melee weapon attacks. Bold emphasis my own:
The mechanics of most instant melee attacks have been modified to improve item balance. Previously, instant melee attacks did damage based on the damage range of the weapon, plus a bonus for the player’s attack power. This bonus was then multiplied by the speed of the weapon. As a result, slow weapons did more damage than was intended, and fast weapons were considered inferior by most players. We have changed the way the attack power bonus is calculated for instant attacks. This change does NOT affect attack power calculations for normal melee attacks. Instead of multiplying by the speed of the weapon, the attack power bonus is now multiplied by a fixed number pulled from the following table:
+ Two-handed weapons: 3.3
+ Daggers: 1.7
+ All other one-handed weapons: 2.4
As a direct result of this, many weapons have shifted position in their relative power. In particular, many Epic (purple) quality items are now more powerful than slower Superior (blue) weapons. This change was not made to reduce the power of instant attacks, but to correct the relative imbalance of weapon itemization. At a given level requirement, epic quality weapons should always be more powerful than superior quality weapons. Please also note that all normal weapon swings will be completely unaffected by this change. The following abilities are affected by the design change: Sinister Strike, Ambush, Backstab, Whirlwind, Mortal Strike, and Overpower.
For hunters, Multi-Shot and Aimed Shot now use 2.8 instead of weapon speed.
However, as we can see from the above posts, weapon speed is still too major an influence, with item quality and level being secondary; while it should be opposite. Bloodseeker (item level 63, rare quality) has a slightly higher damage potential than Huhuran’s Stinger (item level 78, epic quality).
Basically, I believe the normalization should have lead to [Epic with higher DPS] > [Rare with lower DPS], regardless of weapon speed. In addition, the following should also be true in most cases: [Epic with higher item level] > [Epic with lower item level]. However, I do think that weapon speed should have some influence, like it has for other classes.
I believe normalization in its current form failed.
With gear attainable at the moment, by varying weapon speed only, the total DPS output might change by almost 80 DPS. With a 50 DPS weapon, that’s about 1.6 times what the weapon’s raw DPS is. While this is with optimal cycle timing (meaning in real gameplay the difference most likely would be reduced slightly), the values are from a talent spec that isn’t the most optimal for raiding. It does not include 5/5 Improved Aspect of the Hawk; I’m not satisfied with my current formula for it.
Using the values from this post, Unahorn made a graph showing total DPS relative to weapon speed: http://media.wow-pra…ponSpeedDPS.jpg
To support my claim, I’ll use a fairly standard Marksman spec (let’s say 0/31/20), and show the damage potential a weapon would have, with DPS being constant, and weapon speed changing.
I use the stats of a tier 3 hunter, since this makes the problem. It’s important to remember the same principles also apply to lower tiered hunters. I am not considering Slaying talents, since they don’t work against all mobs, with very few mobs in Naxxramas (where the gear needed for this setup is collected) being valid targets.
While all this also due to some itemization flaws (adding fast weapons are, in a raid setting, mostly useless), I think that’s a seperate issue. Itemization was an issue before the normalization patch, the normalization should have taken current (and upcoming) weapons into account, allowing for future upgrades in better way than what we currently have. A big factor, I think, for implementing normalization, was a level 23 green weapon. Pre-normalization, it was, due to its 3.4 speed, better than most ranged weapons including Molten Core gear.
Post-normalization, this is no longer the case.
However, with better gear being added, and tier 2 becoming more accessible than ever before, we can yet again see the flaws of the ranged combat system.
Short summary of results:
Worst optimal cycle: 489.32 DPS (1.5 weapon, 1.30 quiver speed, full)
Best optimal cycle: 568.6 DPS (3.4 weapon, 2.96 quiver speed, full)
Difference: 79.28 DPS
THE ARROW AND YOU
Here is a few guidelines/tips/tricks you can use in order to improve yourself as a Hunter in vanilla.
If you feel the need to chime in and cover some ground, of which I’m sure that I’ve missed, feel free to do so! I’m open-minded to all questions and suggestions regarding the guide and I will gladly hear them out.
Table Of Contents
1. Main Attributes & Stat Values
1.1 Main Attributes
1.2 Stat Values
2. BIS Gear & Enchants
2.1 Horde BIS List – Current Patch
2.2 Alliance BIS List – Current Patch
3. Consumables & Buffs
3.1 World Buffs
3.2 Damage Increasing Consumables & Buffs
3.3 Damage Increasing Pet Consumables & Buffs
3.4 Sustainability Consumables & Buffs
3.5 Situational Consumables & Buffs
4. Races & Racial Abilities
4.1 Racial Stats
4.2 Racial Abilities
4.3 Race Of Choice
5. Talent Builds
5.1 Recommended Talent Builds
5.2 Experimental Talent Builds
6. Pets & Pet Abilities
6.1 Pet Of Choice
6.2 Pet Abilities
7. Rotations & Cooldowns
7.1 Simplified Rotation
7.2 Explanation Of The Hunter Rotations
7.3 “Cycles Are Impossible To Use”
7.4 Lag And Human Reaction Invalidate Cycle Calculations
7.5 Aimed Shot Will Be Catching Up To Your Multi-Shot
7.6 Cooldown Management
8. Addons
9. Macros
10. Links & Downloads
_____ MAIN ATTRIBUTES & STAT VALUES ______
1.1 – Main Attributes
Agility
Increases attack power with melee weapons by 1 and ranged weapons by 2
Increases your crit chance by 0.0189% (1% crit per 52.91 Agility)
Increases Armor by 2 and Dodge by 0,0377% (1% dodge per 26.5 Agility)
Strength
Increases attack power with melee weapons by 1.
Stamina
Increases health points by 10 per point.
Intellect
Increases mana points by 15 per point and the rate at which weapon skills improve.
Spirit
Increases health & mana regeneration rates.
1.2 – Stat Values
The stat values below will differentiate depending on your current stats, talents and target defensive stats so because of that I’ve made 4 examples that you can use.
The examples are all specced as 20/31/00 and are fully buffed except for world buffs and shaman/paladin buffs. The gear can be viewed in the spreadsheet linked in the BIS section. The target is a lvl 63 dragonkin mob type with 5 sunder armor debuffs.
Patch 1.5 BIS (T1)
10 AP = 1.38 DPS
1 Crit = 3.72 DPS
1 Crit = 26.95 AP
1 AP = 0,0371% Crit
Patch 1.9 BIS (T2)
10 AP = 1.44 DPS
1 Crit = 4.58 DPS
1 Crit = 31.80 AP
1 AP = 0,0349% Crit
Patch 1.9 BIS (R13)
10 AP = 1.44 DPS
1 Crit = 4.67 DPS
1 Crit = 32.43 AP
1 AP = 0,0308% Crit
Patch 1.12 BIS (T3 + R12 Gloves)
10 AP = 1.37 DPS
1 Crit = 4.8 DPS
1 Crit = 35,03 AP
1 AP = 0,0285% Crit
I’ve used the hunter simulator spreadsheet linked in the “Links & Downloads” section to get these results, using the exact same method as Surelynotdhorn did
_________ BIS GEAR & ENCHANTS _________
This BIS list is based on Crestfall’s item progression which isn’t completely like retail vanilla, so because of that I’ve included some items to the earlier patches (Almost only pre 1.5) that other private servers tend to release before their original release date because most likely it’ll be the same for Crestfall (Not 100% confirmed yet, I will update whenever I know more).
These are the items which has been included for patches prior to their original release (The patches in parentheses are their original release date):
Epic PvP gear will not be considered because it’s extremely time consuming to get and not everyone have the time needed to be able to grind it however the post-rework PvP set is BIS until Naxxramas.
Link to the pre-rework PvP set
Link to the post-rework PvP set
2.1 – Horde BIS List – Current Patch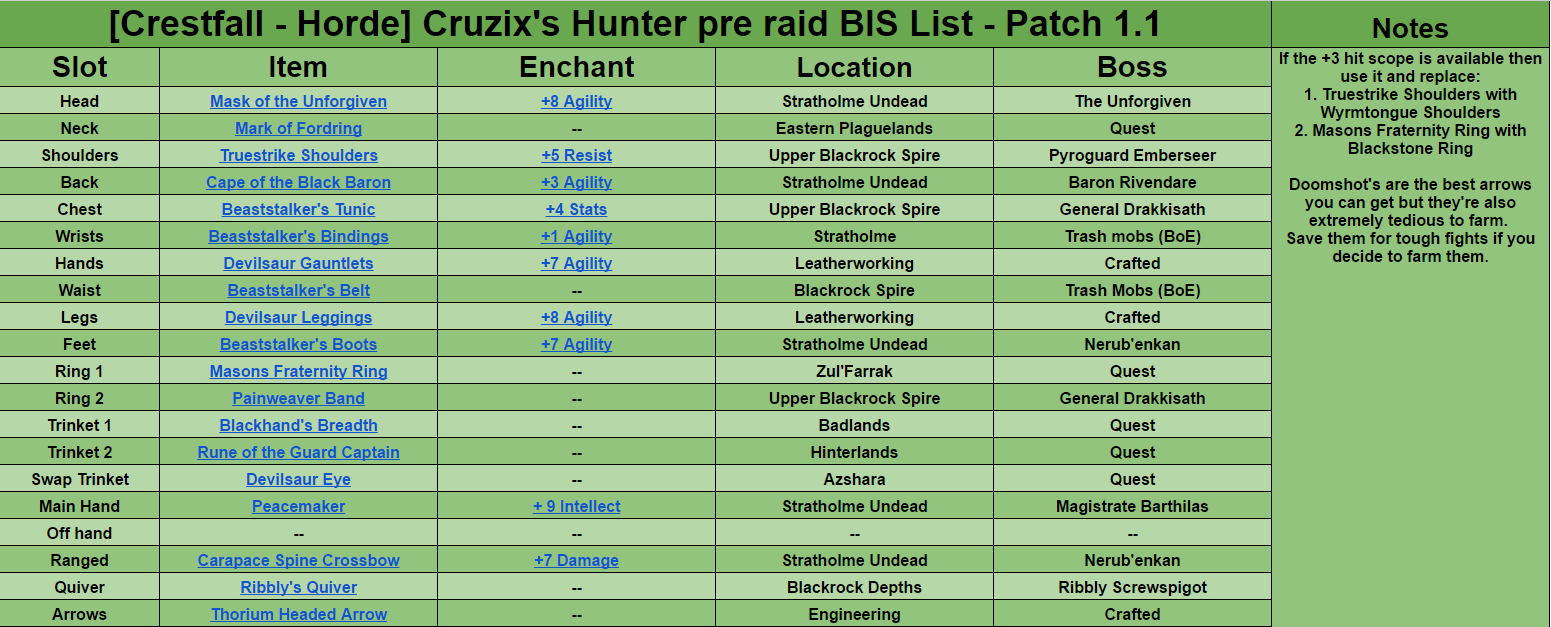
Link to Horde BIS list spreadsheet (Patch 1.1 – 1.12)
2.2 – Alliance BIS List – Current Patch
Link to Alliance BIS list spreadsheet (Patch 1.1 – 1.12)
_________ CONSUMABLES & BUFFS _________
Let’s face it, it’s not expensive to raid as a hunter since we have feign death to save our buffs if the raid wipes, so there’s no reason to go cheap on consumables.
Here’s all the consumables & buffs that are useful to hunters. (Class buffs not included)
3.1 – World Buffs
3.2 – Damage Increasing Consumables & Buffs
Engineers only:
3.3 – Damage Increasing Pet Consumables & Buffs
3.4 – Sustainability Consumables & Buffs
3.5 – Situational Consumables & Buffs
_________ RACES & RACIAL ABILITIES _________
This section will be covering all relevant information about the races that can be played as a Hunter.
4.1 – Racial Stats

4.2 – Racial Abilities
Dwarf:
Night Elf:
Orc:
Tauren:
Troll:
4.3 – Race Of Choice
Horde PvE race ranking:
Horde PvP race ranking:
Alliance PvE race ranking:
Alliance PvP race ranking:
_________ TALENT BUILDS _________
5.1 – Recommended Talent Builds
PvE:
1. http://db.vanillagaming.org/?talent#cZViohthtIbbV0h
Use this spec if you’re at 8 hit or below. You can swap talent points from Surefooted to Improved Aspect of the Hawk if you’re only missing 1-2% hit.
2. http://db.vanillagaming.org/?talent#ce0M0xxZViohtht
Use this spec if you’re at 9 hit or above
PvP:
For PvP it’s a bit of a personal preference, however these are the ones I can recommend
1. http://db.vanillagaming.org/?talent#cZgVohthtcbimoh
2. http://db.vanillagaming.org/?talent#cZtVohtZcbiik0ux
I highly recommend moving the points from Improved Wing Clip into Entrapment if you’re going to play premade BG’s as it will benefit you a lot more.
Leveling:
For leveling it’s bit of a personal preference, however this is the spec I can recommend
http://db.vanillagaming.org/?talent#ca0GztxRttVohx
I didn’t put points into Spirit Bond because this talent will give the hunter threat every time it heals so if your pet miss pulls a mob then the Hunter will get aggro whenever the talent heals.
5.2 – Experimental Talent Builds
PvE 00/21/30 vs 20/31/00 when above 500 agility:
On paper the 20/31/00 spec seems to be doing a lot better however in reality there will be some fights where you won’t be able to utilize your pets’ DPS properly as well as other situational stuff in which case the 00/21/30 spec could potentially be better even when considering the DPS Trueshot Aura provides for your group when using the 20/31/00 spec. I’m gonna have to test this once I get the gear requirements on Crestfall to be able to confirm anything.
Keep in mind that mentioning results from other servers will not prove anything since talent and ability formulas etc could’ve been completely different on the other server.
_________ PETS & PET ABILITIES _________
6.1 – Pet Of Choice
Short answer: Lupos for PvE, Broken Tooth for PvP.
PVE:
Lupos is the best PvE pet because it does Shadow Damage instead of Physical Damage, thus ignoring armor and will benefit from +Shadow Damage debuffs such as Curse of Shadows, Improved Shadow Bolt and Shadow Weaving.
After patch 1.9 you should instead be using Deathmaw if you want a wolf or Broken Tooth if you want a cat because Lupos will no longer be doing Shadow Damage after that patch.
Something you often will hear people say about Lupos is that “it will lower your raids DPS because it consumes Warlock’s Improved Shadow Bolt debuffs” however that is completely nonsense even if Lupos truly should be consuming ISB (I haven’t seen a single proof of Lupos consuming ISB in retail vanilla so please share if you have proof) due to various reasons:
PVP:
Broken Tooth is the best PvP pet, and potentially the best PvE pet after patch 1.9.
The reason why Broken Tooth is the best PvP pet is because it’s the only cat that is able to do 1 attack per sec, which is the fastest you can get.
The fast attack speed is very useful in PvP as it makes it nearly impossible for casters to get a spell off because of the cast time push back from Broken Tooth’s melee attacks.
There’s only 2 other pets in the game which has similar attack speed and that is the ZG bat’s, however since they’re bats they cannot learn Prowl and Claw which both are great abilities in PvP and bats also does 4% less damage from auto attacks.
When Lupos no longer does Shadow Damage (post patch 1.9), then Broken Tooth can potentially be the superior pet to use in PvE depending on how good you are at pet micro managing.
Broken Tooth (Cats) do not have Furious Howl like Wolfs do which means you can no longer benefit from having your pet by your side just to buff you with Furious Howl, so you’ll need to be great at micro managing your pet and make sure it doesn’t die as well as not fuck up your own rotation.
If you’re not capable of that, then Broken Tooth will not be a DPS boost.
Leveling:
Use any cat for leveling, it doesn’t matter which one because they’re all be normalized, i.e. all pets of the same pet family does similar DPS regardless of attack speed (unless they’re buffed, which in that case fast attack speed pets does more DPS). Also make sure to tame a new cat every now and then so you can get new pet ability ranks.
Use the hunter pet beastiary linked in the “Informative Hunter Links” section to figure out which pets you should tame to get new pet ability ranks.
6.2 – Pet Abilities
PVE:
1. Teach your pet max rank Bite and Claw/Furious Howl.
2. Teach your pet max rank Great Stamina.
3. Teach your pet rank 3 resistance. Choose the resistance that would benefit you for the content you’re currently raiding.
4. Teach your pet rank 1 Dash (You do not need higher rank for raiding)
5. If done correctly you should now have 5 points left, use them on any rank 1 resistance you want or whatever else you can spend it on.
PVP:
1. Teach your pet max rank Bite, Claw and Prowl.
2. Teach your pet rank 9 Great Stamina.
3. Teach your pet rank 3 Frost Resistance.
4. Teach your pet rank 3 Dash.
5. Teach your pet rank 1 Nature Resist.
Leveling:
Assuming you’re using a Cat for leveling which I highly recommend, then this is the priority of which you should be teaching your pet it’s abilities.
1. Growl
2. Dash (Only need rank 1)
3. Claw
4. Bite
5. Greater Stamina/Natural Armor
_________ ROTATIONS & COOLDOWNS _________
7.1 – Simplified Rotation
Auto-shot->Aimed Shot->Auto-shot->Multi-Shot->Auto-shot->Repeat
See the pattern? Always use Aimed Shot immediately after you’ve fired an Auto-shot, weave Multi-Shot in between Auto-shots.
7.2 – Explanation Of The Hunter Rotations
There’s 2 rotations that you should know of. These are known as the “Clipped” and the “Full” rotation.
Every rotation cycle consists roughly of:
1 Aimed Shot
1 Multi-Shot
x Auto Shot
With most weapons, you’ll find that Aimed Shot finishes cooldown and Auto Shot fired ~1 sec ago. This makes you choose between:
A. (Clipped) Use Aimed Shot right when its cooldown is finished.
B. (Full) Delay Aimed Shot until after your next Auto Shot.
A. (Clipped) makes you lose an Auto Shot, but your cycle time is shorter than in B.
B. (Full) adds an Auto Shot, but extends your cycle time.
This is important because the cooldown of Aimed Shot is 6 seconds, casting time is 3 seconds. During casting, Auto Shot cools down.
This means that basically every weapon will get a free Auto Shot after Aimed Shot.
The free Auto Shot comes after a delay of about 0.5 seconds after Aimed Shot is fired, regardless of weapon speed.
During the casting of Aimed Shot, no Auto Shots can be fired.
This list will tell you what rotation you should use for all end game weapons, the list is also sorted from best to worst:
http://imgur.com/I1Mk8Xw
You can read a far more in depth explanation of clipped vs full rotation here and here
7.3 – “Cycles Are Impossible To Use”
They’re not. Performing them perfectly is practically impossible, and it’s harder with some weapons. However, getting as close as possible will be the most damaging thing you can do.
Thus, the calculations shows the weapon with highest damage potential, and also how to deal the most damage with it.
It’s up to you to maximize the potential. Practice, focus, and knowing the rhythm of your weapon helps a lot; you’re always able to improve.
Additionally, a timer for your Auto Shots will help you a lot. Personally, I use YAHT.
Clipped cycles are the easiest to use, since you can basically spam Aimed Shot and Multi-Shot, and the cooldowns will take care of the rest.
Remember that latency might affect this a bit, making Aimed Shot ready just before Auto Shot fires (making you do a sub-optimal cycle). Spamming is rarely a good idea; paying attention is.
7.4 – Lag And Human Reaction Invalidate Cycle Calculations
Often you’ll hear people claiming cycles are useless because of reasons like lag, human reaction, etc.
These settings vary from person to person; hunter A might have perfect conditions, performing at almost 100% of what he’s capable of, while hunter B might be experiencing lag, talking on the phone and feeding his parrot – of course he’ll perform worse. However, comparing the different weapons, using optimal conditions for everything is the fairest comparison.
Although this has no influence on a weapon’s damage potential, if you know you suffer from lag or slow reaction times, take it into consideration when looking at what I write.
7.5 – Aimed Shot Will Be Catching Up To Your Multi-Shot
Eventually your Aimed Shot will catch up to your Multi-Shot due to Aimed Shot having “9 sec CD” (6 CD + ~3 sec cast time) and Multi-Shot having a 10 sec CD.
When this happens then using Aimed Shot first will yield the most DPS, unless:
A. You’re able to consistently cleave on targets with Multi-Shot.
B. The targets you could’ve been cleaving on by casting Multi-Shot first would be dead by the time Multi-Shot is ready if you casted Aimed Shot first.
7.6 – Cooldown Management
Trinkets:
You should activate your swap trinket just as you start DPSing the boss and when the trinket effect wears off then you swap to your static trinket immediately.
Rapid Fire/Berserking:
Usually you want to use Rapid Fire/Berserking together with your trinket on your opener unless you need to save your cooldowns for a specific boss mechanic.
However using Rapid Fire/Berserking early has the added benefit of you being able to use them multiple times during an encounter depending on the fight duration.
Do not save Rapid Fire/Berserking for Aspect of the Hawk procs since there’s literally no reason in doing so when there’s only a 5% proc chance.
If you’re lucky to get a hawk proc while all your other cooldowns are active then make sure you watch your threat so you don’t over aggro.
_________ ADDONS _________
YAHT – Yet Another Hunter Timer
This addon gives you an auto shot timer which is crucial if you want to maximize your DPS. It also comes with a Tranquilizing Shot announcer which can be toggle on and off.
Highlights:
1. Aimed Shot & Multishot castbars for oCB, eCastingBar and default castbar that recognize all effects that modify castspeed
2. Tranquilizing Shot announcer
3. Highly customizable looks
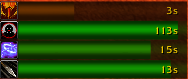
Visual:

The white bar is the “cooldown” time of your auto shot
The red bar is the draw time of your auto shot

Configuration: /yaht
Download Link: https://github.com/Aviana/YaHT
——
TrinketMenu (Fixed Version)
This addon lets you queue trinkets to auto swap for whenever you get out of combat (Feign Death) and is a must have addon if you want to maximize your DPS.
How to use TrinketMenu:
Have an activate trinket equipped at the start of an encounter, use it on your opener and then queue a static trinket by hovering TrinketMenu and choose a static trinket – after the activate trinket’s buff expires you feign death and the addon will auto equip the static trinket that you selected.
Visual:

Configuration: /trinketmenu options
Download Link: https://github.com/satan666/TrinketMenu-Fix
——
SHunterTimers
This addon makes it easier for you to track your trinket duration, debuff durations, procs, personal CC duration and boss frenzy timer it also makes your cast bar track aimed shot. Every feature can be enabled/disabled through the in game settings.
Visual:
Configuration: /sht menu
Download Link: http://addons.us.to/addon/shuntertimers
——
ClassicSnowFall
This addon accelerates key bindings so that they are activated by key press rather than key release. This allows you to activate your abilities faster than you could otherwise.
there’s no visual or in game configurations options for this addon.
Download Link: http://www.classicwow.com/forum/topic/13899-introducing-classic-snowfall/
——
Modified Power Auras
This addon is the vanilla version of “WeakAuras” which makes it possible to track every aura/ability/trinket in the game.
Examples of what to track:
Aspect of the Hawk procs
Rapid Fire duration
Trinket(s) duration
Important boss debuffs such as Baron Geddon’s Living Bomb, Vaelastrasz’s Burning Adrenaline.
Visual:


Configuration: /mpowa
Download Link: https://github.com/Geigerkind/ModifiedPowerAuras
——
SimpleFeignHealth
This addon makes it possible for you to see your health while you’re in feign death.
Configuration: /sfh
Download Link: http://addons.us.to/addon/simplefeignhealth
_________ MACROS _________
Auto Shot
This macro makes it so your auto shot no longer can be accidentally toggled off.
it WILL NOT WORK properly if this line doesn’t correspond with your Auto Shot hotkey: IsAutoRepeatAction(3)
If your Auto Shot ability is placed on hotkey 3, that means it should be (3) in the macro.
To figure out what hotkey your Auto Shot is on, refer to this image http://i.imgur.com/VGArn.jpg and change it accordingly within the macro.
/run if not IsAutoRepeatAction(3) then CastSpellByName("Auto Shot") end
——
Scatter Shot
This macro will prevent your pet from breaking Scatter Shot CC.
If you use the Scatter Shot macro on target A and your pet is attacking target B, your pet will continue to attack target B.
If you use the Scatter Shot macro on target A and your pet is attacking target A, your pet will go passive so it doesn’t break Scatter Shot CC.
/script if UnitExists("pettarget") and UnitIsUnit("target", "pettarget") then PetPassiveMode(); else end
/cast Scatter Shot
——
Frost, Immolation and Explosive Trap
This macro will prevent you from using feign death if you’re already out of combat but if you’re in combat it will feign death first and then trap if pressed twice.
Simply change the first line of the macro to whatever trap you want it for.
/cast Immolation Trap
/script if UnitAffectingCombat("player") then CastSpellByName("Feign Death") end
——
Freezing Trap
This macro will prevent you from using feign death if you’re already out of combat but if you’re in combat it will feign death first and then trap if pressed twice.
In addition to the other trap macro, this one will put your pet on passive to prevent breaking CC.
/cast Freezing Trap
/script if UnitAffectingCombat("player") then CastSpellByName("Feign Death") end
/script PetPassiveMode()
——
Revive/Mend Pet
This macro will use Revive Pet if your pet is dead and Mend Pet if your pet is alive.
/script if not UnitExists(“pet”) then CastSpellByName(“Revive Pet”); else if UnitIsDead(“pet”) then CastSpellByName(“Revive Pet”);else CastSpellByName(“Mend Pet”);end;end
——
Call/Dismiss Pet
This macro will use Call Pet if your pet is missing and Dismiss Pet if your pet is already called.
/script if PetCanBeAbandoned() then CastSpellByName(“Dismiss Pet”) else CastSpellByName(“Call Pet”);end
——
Melee Attacks
This is just a basic macro to lump all of your offensive melee skills onto one bind.
/cast Raptor Strike
/cast Counterattack
/cast Mongoose Bite
——
Wing Clip
This is a fall-through macro for Wing Clip. If you happen to be super low on mana for some reason and can’t use maximum rank Wing Clip, a lower rank will be used instead. Counterattack is a priority over all ranks of Wing Clip.
/run if 1==0 then CastSpellByName("Wing Clip");end
/cast Counterattack(Rank 1)
/cast Wing Clip
/cast Wing Clip(Rank 2)
/cast Wing Clip(Rank 1)
——
Hunter Tracking
This macro will use Track Beasts if you hold down CTRL and press the hotkey you bound it to, Track Humanoids if you hold down SHIFT + press hotkey and Track Hidden if no modifiers are held down when pressing the hotkey.
These are the only important tracking abilities that you should have bound, the rest you can leave in your spell book. Track Beasts is useful to track down Druid flag carriers in BGs, Track Humanoids to track down players, and Track Hidden to increase your stealth detection.
/script c=CastSpellByName if IsControlKeyDown() then c("Track Beasts"); else if IsShiftKeyDown() then c("Track Humanoids"); else c("Track Hidden");end;end
——
Nefarian Hunter Class Call
First of all, this macro will require you to have 2 ranged weapons, 1 equipped and 1 in bag slot 1.
All this macro does is to equip the ranged weapon which is in bag slot 1, this will be useful versus Nefarian because of the hunter class call mechanic that will break our current equipped weapon, however we have no way of knowing if its gonna be our class call or others.
So switching to a secondary ranged weapon before the class call timer hits will put us out of risk for our main weapon to break, meanwhile were still able to DPS.
/script SpellStopCasting()
/run local p,s="player",18 if GetInventoryItemLink(p,s)then PickupContainerItem(0,1)EquipCursorItem(s)end
——
One button Viper/Scorpid Sting
This macro will use Viper Sting if the target is a mana class, if its not then it’ll use Scorpid Sting instead.
/script if UnitPowerType(“target”)==0 then CastSpellByName(“Viper Sting”) else CastSpellByName(“Scorpid Sting”); end
_________ LINKS & DOWNLOADS _________
Horde BIS List Spreadsheet Patch 1.1 – 1.12 [LINK]
Alliance BIS List Spreadsheet Patch 1.1 – 1.12 [LINK]
Hunter Damage Cycles Breakdown 1.0 [LINK]
Hunter Damage Cycles Breakdown 2.0 [LINK]
TKA Something – A Hunter Site From Retail Vanilla [LINK]
Hunter Simulator [DOWNLOAD]
You can upload the simulator to google sheets if you don’t have excel

C’Thun is one of the hardest raid encounters in Vanilla World of Warcraft.!

Phrophet Skeram is the Gatekeeper and First boss of Ahn’Qiraj 40!
The Twin Emperors are unique in that they share abilities while having unique one’s of their own.

Fankriss the Unyielding is a sand reaver, the brother of Kurinnaxx, and the third boss of Ahn’Qiraj.
This text segment by Spoogen follows up on the video created by Raserisk
Ironically, the most threatening thing about this fight is everything BUT Fankriss. Lets cover some of his abilities though –
Mortal Wound is a stackable debuff place on your main Tank. Reducing healing by 10% per stack. (It’s important to force Fankriss to face AWAY from the rest of the raid party to avoid wiping) Rotate tanks when the %’s start becoming too high to compensate heals.
Vekniss Hatchlings are scarab beatles that are spawned periodically throughout the fight from nearby bug tunnels. You will need one or two off tanks to take aggro with AOE taunts to avoid wipes. (Wait for your raid leader to give the signal to clear them out)
Entangle periodic ability where a nearby player will be teleported to one of the bug tunnels. This occurs on a new wave of bugs spawning. (Healers need to be cognizant of this to make sure your raid members aren’t getting picked off by the newly spawned wave.)
Spawn of Fankriss will periodically spawn in groups between 1-3. It is important that these are focused ASAP due to their Enrage mechanic. These mobs are vulnerable to stun effects.
Depending on the version of Vanilla, the safe spot may vary.
Step 1: Find your safespot
Step 2: Have your main tank get full aggro of Fankriss and spin him around, facing away from the rest of the raid.
Step 3: The rest of the raid will group up at Fankriss’s tail.
Step 4: Off-tanks will be responsible for taking aggro of scarabs as they spawn.
Step 5: DPS/Ranged DPS will focus on Fankriss. Switching to the “Spawn of Fankriss” as they come in. Only killing side scarab waves if the raid leader calls for it.
Tank Note: Be ready to swap out main tanks due to the “Mortal Wound” debuff.
Make sure your healers are properly watching your main tanks health, as well as anyone being teleported by “Entangle“.
If all goes well, CONGRATS, YOU’VE DONE IT!

Phrophet Skeram is the Gatekeeper and First boss of Ahn’Qiraj 40!
This text segment by Spoogen follows up on the video created by Raserisk
Unlike Skeram, Sartura is much more strait forward. So lets cover some of their abilities.
is more of a representation of the unpredictable nature of this entire fight. You will experience occasional aggro resets, where Sartori and her ADDS will chase random targets for up to 5 seconds. After which they will return to their highest threat target. (Make sure your Warriors rotate Taunts, Challenging Shouts, and Mocking Blows appropriately.)
is an ability of the Royal Guards to send their target flying back.
is Sartura’s signature ability. Thus successfully turning herself into a BeyBlade and resulting in a redonk amount of AOE damage. (2000-3000 on Cloth, 1000-1500 on Plate)
is Sartura’s Royal Guards being peer pressured into starting a BeyBlade sequal. They successfully deal AOE damage, however, it is significantly less than Sartura. (Use limited Invulnrability potions if you’re ever in a tight spot during this fight)
is an after effect of Sartura’s whirlwind, dealing slight damage and reducing your armor. This ability also is AOE.
So long as Sartura and her Royal Guards are not using Whirlwind, they can be stunned.
(Don’t forget about DMR’s and rotate stuns properly)
occurs when Sartura is at 20% health. At this point, focus all attention and cc’s onto her and burst her down ASAP.
After 10 minutes of being enraged Sartura will enter Kaioken X100 and will likely wipe your raid. Be sure to burst her down quickly to avoid this stage of enrage.
Due to the unpredicatable nature, positioning is….difficult and not set in stone. Avoid the scarab room entrence, and play smart. However here is a rough explanation of what should be done.
Wait until Sartura is at the farthest point of her room before sending your main Thicc boi (Warrior) in to tank.
Everyone needs to start spreading out to their assigned targets. At this point the other Warriors should be splitting up the ADD’s before the unpredictable behavior starts.
Focus ADD’s first, cycling CC properly between targets.
Finish off Sartura
CONGRATS you’ve done it !!! Onto the next boss !


Questie Downloads 238561 | |
Deadly Boss Mods (DBM) (CATA Classic) Downloads 115767 | |
Bagnon Downloads 103228 | |
Details! Damage Meter (Wotlk) Downloads 102390 | |
AtlasLootClassic Downloads 90529 |