Classic
 Burning Crusade
 Lich King
WotLK Hunter Guide (Level 80)
Wrath Hunter Guide
Hello,
Some of you might know me and some of you might not. I’m known as Pyro and I’ve been playing a Hunter for a good ammount of time on the Ragnaros Realm, Horde Side. My hunter is known as Gesuz / Excuses / Hate. I’ve decided to give my share of knowledge to the class that I’ve been having more fun playing in the last months and one of the classes that is able to push a good chunk of the damage table by herself.
Table of Contents
- Top Priority Stats
- Talents & Glyphs
- Enchanting & Gems
- Rotation
- Macros
- Pet
- Random Questions (FAQ)
- Gear List
- Credits
Hunters are a “direct translation” to Agility. Agility is what makes us move and it’s also our biggest friend for all of our damage. For a short explanation here’s what Agility gives you:Agility: Attack Power + Critical Strike + Dodge + Small chunk of Armor
As you can imagine, Attack Power and Critical Strike are two majors stats that increase our damage. So that’s one of the main reasons why all of our gear and even gemming prioritizes Agility once we hit the Armor Penetration Cap in end game content.
Armor Penetration: As the name state, it reduces the armor resistance of our target.
One really important stat for a Hunter in end-game: The ArP Value. Some people don’t know when to focus their attention thowards the so called “Armor Penetration Cap” and I will explain that in detail further in this guide.
Hit Rating: CRUCIAL STAT that most of the hunters that I’ve seen like to ignore. No hit rating = No Damage. No Damage = You’re being a bad huntard.
Critical Strike Rating: All we want is Criticals! Seeing all of basic attacks and all of our core abilities going out as crits it’s beautiful. We have to be glad that Agility gives us such benefit!
People don’t keep in mind their Hit Rating most of the times and they tend to ignore it since it’s easy to obtain the hit rating percentage that you need as a hunter. You want to land on the 5% Hit Rating (if you have a specific Talent – I will explain this further in the guide as well) and if you don’t have it you want 8% Hit Rating.
For Talents & Glyphs we have several situations. Let’s explain them here;
Fresh 80
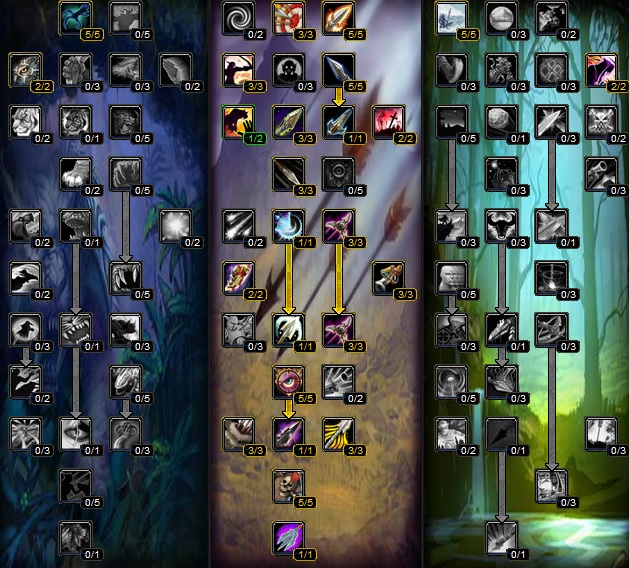
The spec that I like to call as “Fresh 80” is a spec that focuses in increasing your damage through the resources that you have available as a “low geared” hunter. Since, as a low geared hunter, we still lack the Armor Penetration Value to have a proper physical damage output we’re going to rely in our Arcane Damage to compensate the lack of Armor Penetration. That’s why, as you can see, we have ![]() Improved Arcane Shot with 3/3 since it increases the damage done by that same shot for 15%. We also have
Improved Arcane Shot with 3/3 since it increases the damage done by that same shot for 15%. We also have ![]() Improved Barrage to boost by 12% our critical chance for our
Improved Barrage to boost by 12% our critical chance for our ![]() Multi-Shot and
Multi-Shot and ![]() Aimed Shot abilities. This 12% & 15% might not seem a lot in percentage values but when we actually look to our Skada / Recount table we’ll notice the difference really quick.
Aimed Shot abilities. This 12% & 15% might not seem a lot in percentage values but when we actually look to our Skada / Recount table we’ll notice the difference really quick.
Semi-Geared Hunter
After going through the pain of doing some RDF’S and after starting to get familiar with the class – We’re ready to change our spec. Remember; The Fresh 80 spec is missing a REALLY IMPORTANT talent on purpose since I believe some hunters need to go through that spec in order to perfect their rotation priority. And this is where we start to change our Spec; We’re making a direct trade of ![]() Improved Arcane Shot with
Improved Arcane Shot with ![]() Piercing Shots. Piercing Shots it’s one bleed effect that we’re able to deliver as a Hunter; It gives 30% of the damage dealt after a 8 second bleed. I’ve used this Spec for a good chunk of time until I was ready to do end game raiding. That’s where our third spec kicks in. In my personal opinion it’s the spec you want to have all the time;
Piercing Shots. Piercing Shots it’s one bleed effect that we’re able to deliver as a Hunter; It gives 30% of the damage dealt after a 8 second bleed. I’ve used this Spec for a good chunk of time until I was ready to do end game raiding. That’s where our third spec kicks in. In my personal opinion it’s the spec you want to have all the time;
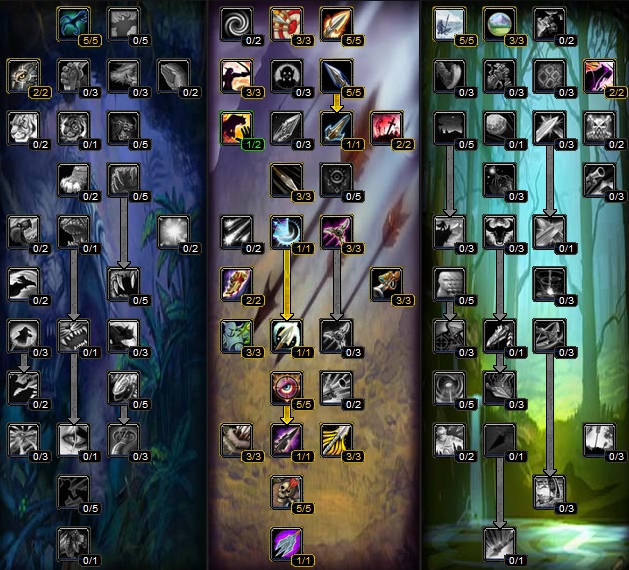
Long Range Spec
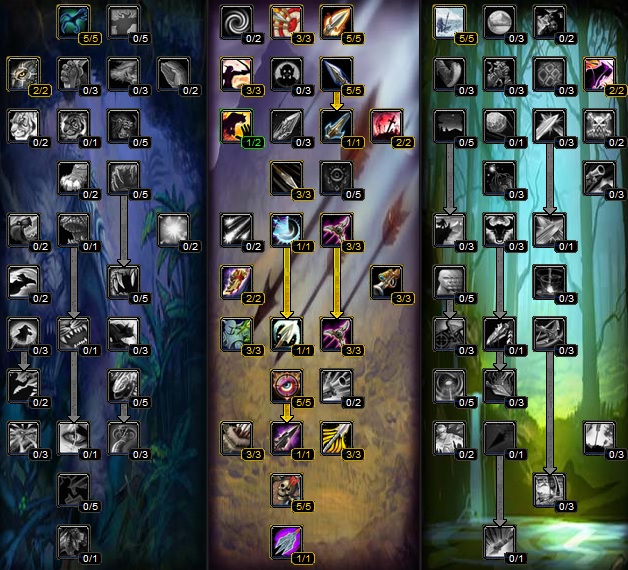
As the name points out – This is our long range spec. Now you may ask;
But why would I want a longe range spec?
The answer is simple. You want to be that douchebag pushing big numbers. Let me give you multiple examples of why you want this spec once you’re approaching the end game content:
• Lich King Fight: Let’s say that your raid doesn’t need you to touch the Orbs or the Raging Spirits. It’s your time to shine! Hit the Lich King with your Long Range Spec and make the other DPS’ers look bad. It also improves your positioning for Defiles & Vile Spirits since you can be on an edge of the platform most of the time. That also means that you’re forced to make less movements which is an important thing for a hunter since you WANT TO AVOID THE MAXIMUM MOVEMENT POSSIBLE.
• “Kiting Issues”: Most people don’t recognize this but this is one important thing: You’re able to kite a mob from a bigger distance than usual. Let’s say that your tank dies while doing an encounter and the raid needs someone to kite the boss; Use your Distracting Shot while you’re in a max range and the travel time from the NPC to you will ALWAYS be superior while compared to other classes. To make it extra fun: Nitro Boots!
• Positioning: Positioning in general improves with this. You’ll always be able to place yourself in a “safe spot” no matter what. You’ll start to understand where you can find a “safe spot” in each boss with the experience. I’ll try to post some screenshots with examples in the future.
The specific talent that we swap is ![]() Improved Barrage for
Improved Barrage for ![]() Hawk Eye. Why you might ask? Once you start gearing up and starting to get a good ammount of gear you’ll notice that your crit chance, by himself, is already really high (specially while buffed in a raid group). We’re also only swapping a direct crit chance for a specific spell for a DPS Increase in overall since we have more range (which, automatically forces us to do less movement while fighting a boss or mob) to damage our target. With this said, this is the spec you want to use once you start approaching end game content – Such as Lich King 25 Normal kills and so on.
Hawk Eye. Why you might ask? Once you start gearing up and starting to get a good ammount of gear you’ll notice that your crit chance, by himself, is already really high (specially while buffed in a raid group). We’re also only swapping a direct crit chance for a specific spell for a DPS Increase in overall since we have more range (which, automatically forces us to do less movement while fighting a boss or mob) to damage our target. With this said, this is the spec you want to use once you start approaching end game content – Such as Lich King 25 Normal kills and so on.
As for Major Glyphs go it’s really straight forward.
MAIN GLYPHS
![]() Glyph of Steady Shot
Glyph of Steady Shot
![]() Glyph of Serpent Sting
Glyph of Serpent Sting
![]() Glyph of Kill Shot
Glyph of Kill Shot
MINOR GLYPHS
![]() Glyph of Revive Pet
Glyph of Revive Pet
![]() Glyph of Mend Pet
Glyph of Mend Pet
(Third one I consider optional)
Now let me explain why we use this glyphs;
![]() Glyph of Steady Shot
Glyph of Steady Shot
Self explanatory. It increases our damage with Steady Shot by 10% while Serpent Sting is active. Since Serpent Sting needs to have a 100% of uptime while fighting a boss we always have a 10% increased damage on Steady Shot. No need to give further explanations in this one.
![]() Glyph of Serpent Sting
Glyph of Serpent Sting
Here’s the tricky question; Why do we want our Serpent Sting duration raised? The answer is really simple: Because of our Chimera Shot. Our Chimera Shot, when landed with Serpent Sting properly applied on the boss, gives an instant 40% damage done by our Serpent Sting. So what does this mean? It means that by adding more time to our Serpent Sting we’re also increasing the damage done by the ticks of Serpent Sting – That also means that the damage reflected in those extra ticks also have an impact on the 40% value represented by the Chimera Shot hit. It’s one really nice DPS increase that CANNOT be overlooked.
![]() Glyph of Kill Shot
Glyph of Kill Shot
Also self explanatory. Reduces the cooldown of our Kill Shot ability so that means that we’re going to be able to spam it more often that we would be able to. Trust me: You will want to spam this on CD as soon your target hits 20% HP :p
For the Minor Glyphs I Highly Suggest (See the Suggest there? I’m not saying that they’re mandatory – It’s only a Tip!) using these two (indicated above) since we might have a case of distraction or pure RNG where we lose our pet. Not having a pushback means we’re going to have a faster cast time in our Revive Pet ability. As for the Mend Pet minor glyph goes as soon as ressurect our pet we might have the bad luck of his happiness be lowered – We can just bring her up with the use of 2 or 3 Mend Pet’s. It’s a GCD Loss (Global Cooldown) but sometimes you actually have the time to do it so, why not?
[Definition of Passive Armor Penetration Cap: We don’t have the Armor Penetration Value that we need to gem Armor Penetration. We get that first value through gear ONLY].
*QUICK NOTE*If we’re sitting in a low gear that doesn’t allow us to touch the passive Armor Penetration Cap That means that we’re going to waste stats by increasing our Armor Penetration Cap since we’re not able to reach the cap that we need to see a huge difference in our Damage performance. This is why and where you gem straight Agility. Agility, in this specific state, is your best friend and you should hold on to it UNTIL you get a number that rounds the 800 to 850 Armor Penetration through the gear that you have.Once this happens, we’re going to start to gem Armor Penetration instead of Agility. We’re going to use and abuse of it as soon as we hit that Passive ArP cap. Remember: Only when we got that 800 to 850 value. Other than that you’re losing damage doing otherwiseAnother major point: Always check your RANGED HIT RATING. Do NOT allow it to go below 5% with the talent
Armor Penetration Cap: We want to reach the 1400 number for our hard cap. With this said, once you achieve that number through your gear and gemming – You need to gem yourself with Agility gems again (in order to increase our damage) keeping our Hit Rating steady on the cap
Now here’s the list of gems we use;
Meta: ![]() Relentless Earthsiege Diamond
Relentless Earthsiege Diamond
Red Gems: ![]() Fractured Cardinal Ruby &
Fractured Cardinal Ruby & ![]() Delicate Cardinal Ruby . Use them according to the stats you need. Remember to not go overcap or rush the cap for Armor Penetration. That’s your major concern while gemming.
Delicate Cardinal Ruby . Use them according to the stats you need. Remember to not go overcap or rush the cap for Armor Penetration. That’s your major concern while gemming.
Yellow Gems: ![]() Rigid King’s Amber ONLY IF YOU’RE LACKING HIT RATING!
Rigid King’s Amber ONLY IF YOU’RE LACKING HIT RATING!
Prismatic Gem: ![]() Nightmare Tear – You’ll need it in order to active your Meta Gem. Try using this in your chest piece gemming.
Nightmare Tear – You’ll need it in order to active your Meta Gem. Try using this in your chest piece gemming.
P.S: No, we do NOT use color coding. Do not follow the advice of using color code with hybrid gems in order to get socket bonus. Getting ArP + Stamina (as example) is NOT worth. If you actually do the math properly, you’ll see that as well.
As for Enchanting goes, we have several possible options.
Head: ![]() Arcanum of Torment
Arcanum of Torment
Shoulders: ![]() Greater Inscription of the Axe or
Greater Inscription of the Axe or ![]() Master’s Inscription of the Axe if you have the Inscription Profession.
Master’s Inscription of the Axe if you have the Inscription Profession.
Back: ![]() Scroll of Enchant Cloak – Major Agility or
Scroll of Enchant Cloak – Major Agility or ![]() Flexweave Underlay if you have Engineering.
Flexweave Underlay if you have Engineering.
Chest: ![]() Formula: Enchant Chest – Powerful Stats
Formula: Enchant Chest – Powerful Stats
Bracers: ![]() Formula: Enchant Bracers – Greater Assault or
Formula: Enchant Bracers – Greater Assault or ![]() Fur Lining – Attack Power if you have Leatherworking.
Fur Lining – Attack Power if you have Leatherworking.
Gloves: ![]() Hyperspeed Accelerators if you have Engineering or
Hyperspeed Accelerators if you have Engineering or ![]() Scroll of Enchant Gloves – Crusher
Scroll of Enchant Gloves – Crusher
Belt: ![]() Eternal Belt Buckle
Eternal Belt Buckle
Feet: ![]() Nitro Boosts if you have Engineering or
Nitro Boosts if you have Engineering or ![]() Formula: Enchant Boots – Greater Assault
Formula: Enchant Boots – Greater Assault
Rings: ![]() Enchant Ring – Assault if you have Enchanting.
Enchant Ring – Assault if you have Enchanting.
Weapon:![]() Enchant 2H Weapon – Massacre
Enchant 2H Weapon – Massacre
Crossbow/Gun/Bow: ![]() Heartseeker Scope
Heartseeker Scope
Here I will provide you my personal set of macros. Friendly reminder for racial. If you’re an Orc and you want to use your Blood Fury you need to change the line where it says: “/cast Berserking” and replace it for “/cast Blood Fury”
/cast !Berserking <- CHANGE THIS IF YOU’RE AN ORC FOR THE LINE /cast Blood Fury
/cast Rapid Fire
/cast !Kill Command
/cast Rabid
/cast Furious Howl
/cast Call of the Wild
/cast Serpent Sting
/petattack
/cast !auto shot
/cast !Rapid Fire
/cast !Berserking
/use 10
/cast !Kill Command
/cast Serpent Sting
/petattack
/cast !silencing shot
/run UIErrorsFrame:Clear()
/cast !auto shot
/cast !Rapid Fire
/cast !Berserking
/use 10
/cast !Kill Command
/cast Chimera Shot
/petattack
/cast !silencing shot
/run UIErrorsFrame:Clear()
/cast !auto shot
/cast !Rapid Fire
/cast !Berserking
/use 10
/cast !Kill Command
/cast Aimed Shot
/petattack
/cast !silencing shot
/run UIErrorsFrame:Clear()
/cast !auto shot
/cast !silencing Shot
/cast Steady Shot
/cast !Kill Command
/run UIErrorsFrame:Clear()
/cast !auto shot
/cast !Rapid Fire
/cast !Berserking
/use 10
/cast !Kill Command
/cast Kill Shot
/petattack
/cast !silencing shot
/run UIErrorsFrame:Clear()
/stopmacro [noexists]
/run for i=1,GetNumTrackingTypes() do local n, t, a, c = GetTrackingInfo(i); if string.find(n, UnitCreatureType(“target”)) then if t~=GetTrackingTexture(i) then SetTracking(i); end end end
/cast Hunter’s Mark
/cast [@focus,exists][@pet,exists] Misdirection
/startattack
/petattack
/cast !Volley
/run UIErrorsFrame:Clear()
Here’s how it works; You place your mouse on the target that you know that will need to be “tranquilized”. Leave your mouse cursor there and as soon as you need to use tranq, you just need to press the macro. Voilá. It’s really useful for fights like Lich King where you don’t want to drop your main target.#showtooltip Tranquilizing Shot
/cast [@mouseover,harm][harm] Tranquilizing Shot
/cast Readiness
/cast !Berserking
Our rotation is really simple and it’s one of the classes that more buttons smashes. There are two different rotations and I’ll want you to keep in mind you gear while using them.
The encounter is about to start. Here’s what you need to do;
First: Remember to apply your ![]() Hunter’s Mark . Do not let it fall off your target since it provides you attack power. (Use the macro I provided in order to help you with your Tracking since it’s one important issue as a hunter. It’s a 5% bonus DPS. )
Hunter’s Mark . Do not let it fall off your target since it provides you attack power. (Use the macro I provided in order to help you with your Tracking since it’s one important issue as a hunter. It’s a 5% bonus DPS. )
Second: Remember to be a friend of your tank and help your raid with the threat table by using ![]() Misdirection in your Main Tank. You can pop Misdirection 24 seconds before the fight start so there’s no excuse to forget about it. (Macro provided in order to help you out).
Misdirection in your Main Tank. You can pop Misdirection 24 seconds before the fight start so there’s no excuse to forget about it. (Macro provided in order to help you out).
Third: Here is when you damage starts. Use your Opener Macro (You can use the one I provided as example); That will cast all your CD’s (Such as ![]() Rapid Fire , Racial Passive and so on) and your
Rapid Fire , Racial Passive and so on) and your ![]() Serpent Sting will be applied on your target. Afer this, immediatly cast this order:
Serpent Sting will be applied on your target. Afer this, immediatly cast this order: ![]() Chimera Shot – Serpent >
Chimera Shot – Serpent > ![]() Aimed Shot >
Aimed Shot > ![]() Arcane Shot > 3x
Arcane Shot > 3x ![]() Steady Shot >
Steady Shot > ![]() Chimera Shot – Serpent >
Chimera Shot – Serpent > ![]() Aimed Shot >
Aimed Shot > ![]() Readiness > Repeat.
Readiness > Repeat.
You’re going to stick with the rotation of: ![]() Chimera Shot – Serpent >
Chimera Shot – Serpent > ![]() Aimed Shot > 4x
Aimed Shot > 4x ![]() Steady Shot > Repeat – Until your target hits 20% HP. Once he hits that value, you’re going to replace a Steady Shot for
Steady Shot > Repeat – Until your target hits 20% HP. Once he hits that value, you’re going to replace a Steady Shot for ![]() Kill Shot . Also DO NOT FORGET to refresh your Misdirection every single time he’s out of cooldown. Don’t be a bad hunter!
Kill Shot . Also DO NOT FORGET to refresh your Misdirection every single time he’s out of cooldown. Don’t be a bad hunter!
Why do I tell you to cast Readiness only after the second Chimera Shot and Aimed Shot? That’s an easy explanation. After the first sequence of your rotation your rapid fire is still up for more 3 seconds and that means you still have at least two auto-shots going out. With this said, you want to take the maximum damage output that you can so you can do this (this is a tip) in order to push your DPS a little bit more.
Also remember to RE-APPLY your Serpent Sting once you pop Readiness – Why you might ask? Most likely you’ll be with your Set Piece Bonus up, Trinket Procs up and your Serpent Sting – Also your pet procs – WILL scale with them. Make sure you do not allow that second “drugged” Serpent Sting fall off. It’s one huge DPS increase right there.
Since you’re already above the passive ArP cap we change our rotation. We’re dropping ![]() Arcane Shot out of our rotation and here’s how it’s going to work from now on;
Arcane Shot out of our rotation and here’s how it’s going to work from now on;
First: Remember to apply your ![]() Hunter’s Mark . Do not let it fall off your target since it provides you attack power. (Use the macro I provided in order to help you with your Tracking since it’s one important issue as a hunter. It’s a 5% bonus DPS. )
Hunter’s Mark . Do not let it fall off your target since it provides you attack power. (Use the macro I provided in order to help you with your Tracking since it’s one important issue as a hunter. It’s a 5% bonus DPS. )
Second: Remember to be a friend of your tank and help your raid with the threat table by using ![]() Misdirection in your Main Tank. You can pop Misdirection 24 seconds before the fight start so there’s no excuse to forget about it. (Macro provided in order to help you out).
Misdirection in your Main Tank. You can pop Misdirection 24 seconds before the fight start so there’s no excuse to forget about it. (Macro provided in order to help you out).
Third: Here is when you damage starts. Use your Opener Macro (You can use the one I provided as example); That will cast all your CD’s (Such as ![]() Rapid Fire , Racial Passive and so on) and your
Rapid Fire , Racial Passive and so on) and your ![]() Serpent Sting will be applied on your target. Afer this, immediatly cast this order:
Serpent Sting will be applied on your target. Afer this, immediatly cast this order: ![]() Chimera Shot – Serpent >
Chimera Shot – Serpent > ![]() Aimed Shot > 4x
Aimed Shot > 4x ![]() Steady Shot >
Steady Shot > ![]() Chimera Shot – Serpent >
Chimera Shot – Serpent > ![]() Aimed Shot >
Aimed Shot > ![]() Readiness > Repeat.
Readiness > Repeat.
You’re going to stick with the rotation of: ![]() Chimera Shot – Serpent >
Chimera Shot – Serpent > ![]() Aimed Shot > 4x
Aimed Shot > 4x ![]() Steady Shot > Repeat – Until your target hits 20% HP. Once he hits that value, you’re going to replace a Steady Shot for
Steady Shot > Repeat – Until your target hits 20% HP. Once he hits that value, you’re going to replace a Steady Shot for ![]() Kill Shot . Also DO NOT FORGET to refresh your Misdirection every single time he’s out of cooldown. Don’t be a bad hunter!
Kill Shot . Also DO NOT FORGET to refresh your Misdirection every single time he’s out of cooldown. Don’t be a bad hunter!
Why do I tell you to cast Readiness only after the second Chimera Shot and Aimed Shot? That’s an easy explanation. After the first sequence of your rotation your rapid fire is still up for more 3 seconds and that means you still have at least two auto-shots going out. With this said, you want to take the maximum damage output that you can so you can do this (this is a tip) in order to push your DPS a little bit more.
Also remember to RE-APPLY your Serpent Sting once you pop Readiness – Why you might ask? Most likely you’ll be with your Set Piece Bonus up, Trinket Procs up and your Serpent Sting – Also your pet procs – WILL scale with them. Make sure you do not allow that second “drugged” Serpent Sting fall off. It’s one huge DPS increase right there.
We have multiple options to use as a Pet but the best kind of Pets you have for this content and for raiding situation are the Ferocity type pets. Why you might ask? Certain beautiful abilities make them our top choice;
![]() Call of the Wild is where our attention needs to be stuck at. It increases your pet melee attack power and your ranged attack power by 10%. It’s a BEAUTIFUL talent to use. You need to make sure you use a talent point on it. Here’s how you should use your pet talents;
Call of the Wild is where our attention needs to be stuck at. It increases your pet melee attack power and your ranged attack power by 10%. It’s a BEAUTIFUL talent to use. You need to make sure you use a talent point on it. Here’s how you should use your pet talents;

This is the part of the post that will suffer the biggest edits. I’ll try to fill it with several points as soon as I remember them.Let’s start through this;
What ring is the better one for a hunter?
![]() Signet of Twilight or
Signet of Twilight or ![]() Frostbrood Sapphire Ring ?
Frostbrood Sapphire Ring ?
A: Well, this is a really debatable topic. To make it really easy to understand; When we’re watching both rings we see a trade-off; Armor Penetration per Hit. We also see a slight increase of Agility, Attack Power and Stamina for Signet of Twilight while compared to Frostbrood. Here’s the difference though;
In LONGER ENCOUNTERS Frostbrood is superior to Signet of Twilight because of the Armor Penetration Value that you’re able to get through that. This also messes with your gemming and your balance of stats that shows up through the gear you’re using. Signet of Twilight is an awesome right for short fights – Let’s say that you’re overgearing an ICC 10 Normal – Signet of Twilight is a better option in this field. But if you’re doing a long fight like a Lich King fight in an ICC 25 HC, the Frostbrood Ring will allow you to sustain your damage in a better way.
Why do we incorporate Silencing Shot in almost every single macro?
A: We do it because it is (numbers confirm it) a DPS increase. Besides not sharing a proper GCD with your core abilities it also gives an extra number to add to your damage table. It’s a MUST to have it macro’ed in every single ability.
I’m going to use all of my CD’s while clearing thrash?
A: No. You should use two sets of bars. One with the macros and other without any macros. You should only use the one with macros when you’re going to start a boss encounter. For thrash do not waste your cooldowns.
Why is Marksmanship Hunter considered the best spec?
A: Marksmanship Hunter was not always considered the best spec. It started being considered the best spec in this specific patch (3.3.5) when ToC was released and you were able to start building up your Armor Penetration Cap. In overall performance, Marksmanship spec will bring more results to the table but keep in mind that Survival and Beast Mastery are quite efficient if properly played. They can also pull really interesting numbers.
Why didn’t you explain every single talent point that you use?
A: I could but I decided not to. I believe that you need to read the talents in order to understand your class properly and you will also learn what each and every single talent does by reading them. If you have doubts about them, I’ll be glad to explain them. Just leave a polite and proper question! 🙂
More to be added as soon as I can
This is where I’ll give my personal point of view of BiS for a hunter in this content.
Head: ![]() Sanctified Ahn’Kahar Blood Hunter’s Headpiece
Sanctified Ahn’Kahar Blood Hunter’s Headpiece
Neck: ![]() Sindragosa’s Cruel Claw
Sindragosa’s Cruel Claw
Shoulders: ![]() Sanctified Ahn’Kahar Blood Hunter’s Spaulders
Sanctified Ahn’Kahar Blood Hunter’s Spaulders
Cloak: ![]() Sylvanas’ Cunning
Sylvanas’ Cunning
Chest: ![]() Sanctified Ahn’Kahar Blood Hunter’s Tunic
Sanctified Ahn’Kahar Blood Hunter’s Tunic
Wrists: ![]() Scourge Hunter’s Vambraces
Scourge Hunter’s Vambraces
Hands: ![]() Sanctified Ahn’Kahar Blood Hunter’s Handguards
Sanctified Ahn’Kahar Blood Hunter’s Handguards
Belt: ![]() Nerub’ar Stalker’s Cord
Nerub’ar Stalker’s Cord
Legs: ![]() Leggings of Northern Lights
Leggings of Northern Lights
Feet: ![]() Returning Footfalls
Returning Footfalls
Ring 1: ![]() Frostbrood Sapphire Ring
Frostbrood Sapphire Ring
Ring 2: ![]() Ashen Band of Endless Vengeance
Ashen Band of Endless Vengeance
Trinket 1: ![]() Sharpened Twilight Scale
Sharpened Twilight Scale
Trinket 2: ![]() Deathbringer’s Will
Deathbringer’s Will
This is not an Elitist Guide. I’m here to provide help and answer your questions as soon my time allows it. Also there’s a hunter that I would like to mention – Dangerdan also known as Waffle since he was one of the persons that more help has given to me while understanding each aspect of this class. Thank you Mr. Waffaru!
Also this guide was initially done for the guild that I belong, <Darkness>, and I’ve decided to take the chance of sharing it with the rest of the community. You can find my guild in here: <Darkness>
I’ll be here to try to answer all of your questions. Please be polite – Do not make this thread toxic. I’ll try to provide every single answer that I can when I have the time. Cheers.

Patch: 3.3.5
Author: Darkness