Classic
 Burning Crusade
 Lich King
TBC Resto Druid Guide
TBC Druid Guide
Let’s start with the abbreviations you need to know when playing a Restoration Druid:
HoT – Heal over time. The phrase HoTs is used as a gathering umbrella for spells that include a Healing over Time component, after you have finished casting. Examples: Lifebloom, Rejuvenation, Regrowth.
FSR – Five Second Rule. Every time you finish casting a spell (except NS), you now have 5 seconds until your Spirit will regen as it does normally. Being “within the FSR” means that you have casted a spell, and now do not have full Spirit regen.
HPS – Heal per second. Means how much a healing spell heals per second. For example, your rejuvenation ticks for 999 every 3 seconds. The spell has a HPS of 333. If the spell is not a HoT spell, HPS is identical to HPSC.
HPSC – Heal per second casting. Means how much a healing spell heals in total, per second you spend casting. For example, a spell heals for 3000 and you spend 3 seconds casting. The spell has a HPSC of 1000.
HPM – Heal per mana. Means how much each mana point you spend on a spell, heals the target. For example, a spell costs 100 mana and heals for 1500. The spell has a HPM of 15.
HPT – Heal per tick. For example, your rejuvenation heals a target for 1200 over 4 ticks and 12 seconds. The HPT is 300.
GCD – Global Cooldown. Instant cast spells cause a 1.5 sec cooldown on all spells. This cannot be improved by spell haste rating, but can be improved by shaman Blood Lust.
Overhealing – How much of your healing done with one or several spells that “overheal”, ie lands on the target but does not do any good because it is already at full health. For example, a spell that heals a target for 3000. The target only needs 1000 healing done to be at full health. The Overhealing is 2000, or 66%.
Effective Healing – Raw healing minus Overhealing. In essence, how much you actually healed your targets.
Downranking – Generally refers to using lower ranks of a spell to get a higher HPM at the cost of a lower HPSC.
Restoration Druid – A druid healing using mainly the Restoration Tree, and most of the time Tree of Life (see The Talents).
Dreamstate Druid – A druid healing using a mix of the restoration and balance tree (see The Talents).
NS – Nature’s Swiftness. A 21point talent in the restoration that all full-time healing druids will have. It makes your next nature spell instant cast (All healing spells are nature).
NG – Nature’s Grace. A talent in the balance tree that, on a critical spell strike, reduces the cast time of your next spell with 0.5 seconds.
ToL – Tree of Life, a 41 point Shapeshift form in the restoration tree that disables Healing Touch and Abolish Poison and Remove Curse, decreases HoT mana costs by 20%, and gives an aura to your Party which increases healing on party members by up to 25% of your spirit. See Tips&Tricks for an exploit.
Stats
+Healing done by spells and effects – the single most wanted item stat for any Resto druid. It scales extremely well (see “The Skills”) and it is also hard to increase by Pots and buffs. This is the MAIN stat of your resto druid, and every upgrade should be considered from that viewpoint.
Spirit – only works when you are outside the FSR rule, or at 30% efficiency while you are thanks to a talent. Spirit also stacks well with Blessing of Kings (unlike +healing and mp/5s) and also buffs your ToL aura and your +healing if you have a priest doing Divine Spirit. Since 2.3 patch, it is overall better than mp5 when it comes to raiding. See addons for Fubar_Regenfu for measuring FSR.
Mp/5s is the third stat that any resto druid should look out for. As a resto druid, you will seldom find yourself outside the FSR rule – which means that mp5 (which always works) is a good way to regen mana. The best way to regen mana is in fact MP/5s (but Spirit wins overall due to blessing of kings, divine spirit and ToL aura). Usually, keeping a 10:1 ratio between +healing and mp/5s while casting (check your Character Info panel in game) is a good idea to have unbuffed.
Stamina – is not to be underestimated in any way. Many encounters require it, and you should have it. Either at all times, or on a separate, healing-gimped stamina set (like PVP items).
Stamina is not to be underestimated in any way. Many encounters require it, and you should have it. Either at all times, or on a separate, healing-gimped stamina set (like PVP items).
Intelligence – the waste stat. If I could take all my intelligence and convert it to something useful, I would. In boss encounters, you almost always regen so much mana, that any Int you have is so dwarfed that you may start to cry. DO NOT CONSIDER THIS A HEALING STAT (unless you refuse to leave the balance tree and stick with Dreamstate).
Damage – There is only one encounter in the TBC Endgame that needs you to do damage, and even then it can be bypassed. Any item with +damage instead of “+healing and damage”, is a bad item to heal in unless you cannot find anything better. +damage costs a LOT of “item points”, and will not work for healing in the long run.
Spell Haste – The bottom of the barrel. It does NOT affect global cooldown, and is almost completely wasted on a Resto druid.
Talents
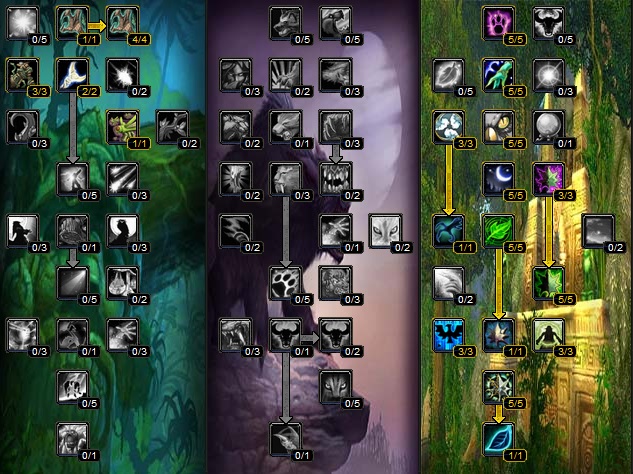
Dreamstate Build – Instead of relying on HoTs, this build focuses on giving Healing Touch all the boosts it can get, in order to spam it. This build also has better mana regen than a resto build due to Dreamstate, but in the end suffers from poor Mana efficiency and relies overly on slow antiquated heals. In other words this is a MT Healing Build. I don’t recommend this build in PvE situation due to missing a lot of good talents in the Restoration Tree.
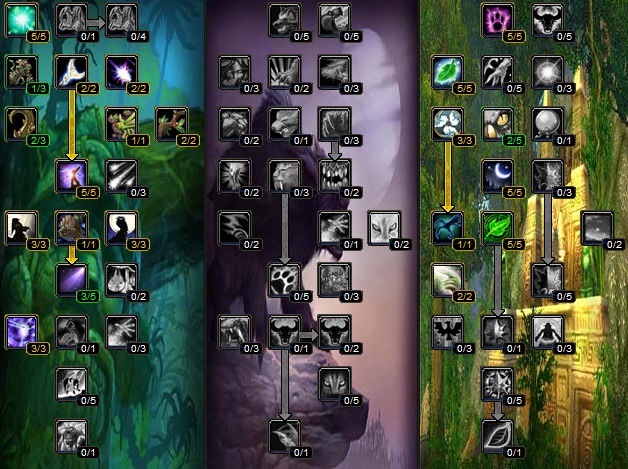
Restoration Build – Instead of relying on HT, this build focuses on giving HoTs all the boosts they can get, in order to spam it. This build also has better mana efficiency than a dreamstate build due to Tree of Life, but in the end suffers from poor measurable Overhealing and relies overly on slow Heal over Time spells.
Skills
Rejuvenation – The instant cast HoT ticks 4 times over 12 seconds, the first tick 3 seconds after the cast. Rejuvenation can be used up by Swiftmend.
Regrowth – A 2 second cast spell with a direct heal component and a 21 sec HoT ticking every 3 sec for a total of 7 ticks. The first tick is done 3 seconds after the direct heal has landed (5 seconds after you started casting). Gains a total of 53% crit from talents. Regrowth can be used up by swiftmend.
Swiftmend – An instant cast spell with a direct heal component. Requires a Regrowth or Rejuvenation on the target to work properly. Consumes the Regrowth or Rejuvenation on the target when used. Always chooses the HoT on the target with the least time remaining until it expires. For maths, remember that using Swiftmend has an additional cost in the HoT it consumes which will not tick. Healing done by Swiftmend is decided by your talents and healing, not by the one who casted the HoT.
Lifebloom – An instant cast spell with a 7 sec HoT duration, with ticks every second. At the end of the 7 seconds, a “bloom” heal is applied. Lifebloom also stacks up to 3 times. With 2 stacks, the ticks are doubled in strength. With 3 stacks, the ticks are tripled in comparison to 1 stack. The “bloom” heal is always the same, no matter how many stacks. The “bloom” heal’s crit rate is decided by your target’s chance to Critically Strike with spells. Recasting a Lifebloom on a target resets the Lifebloom duration. For Mathematical analysis, the “bloom” is always attributed to the first stack. Remember that (just as Swiftmend) recasting (stacking) Lifebloom before it has expired on a target has an additional cost in the ticks that will now not tick. For maximized mana efficiency, Lifebloom should be renewed after 6 seconds have passed on the HoT duration.
Healing Touch – A 3 second cast heal with only a direct heal component. Famous for “downranking” to gain mana-efficiency.
— Lifebloom stacking is by far the best way to gain mana efficiency and HPSC on a target that will keep taking damage
— A single Lifebloom is excellent (high HPSC, high HPM, moderate HPS) to restore health to targets that are lightly damaged. One Lifebloom is good. Two are bad.
— Rejuvenation isn’t good at anything, more of an all-rounder (slightly higher HPSC than one stack of lifebloom, but worse in all other aspects).
— Healing Touch scales very bad with +healing, and is left behind in all aspects as gear improves. It is purely for dealing with Spike damage on a single target.
— Regrowth has the highest HPSC of all healing spells (excempt Lifebloom stacks). However, it has a low HPS, and pays for its high HPSC by having a terrible HPM (almost as bad as HT!).
— Swiftmend remains a situational spell, to use only if a target has a consumable spell, and is in danger – however it does have a relatively high HPS and HPM (not included lost ticks from consumed spell)
— Out of all the spells, Lifebloom scales the best with improved gear, whether you stack or not.
Skills and when to use them
Given the information above , I can state that:
– If a raidtarget took a hit, use a single Lifebloom, and let the final heal Bloom.
– If you heal the tank, keep 3 stacks of Lifebloom at all times on MT
– If you need emergency healing or if many are low on health, I use Regrowth
– If I need emergency healing, I use Switfmend if possible
– if the target already has Lifebloom and I need a bit more punch, I use Rejuvenation if the bloom was just cast, or a 2nd stack if it is almost over.
Spell rotations
Spell rotations are mostly used in conjecture with Lifebloom rolling. Basically, it is a phrase to indicate that you now have a limited amount of GCD to use in order to keep Lifebloom up, and you wish to make the most of it. Given that Lifebloom rolls should be refreshed every 6-6.5 seconds, we are given a certain amount of GCD to use for other stuff. For example, if you are using Lifebloom rolls on two tanks, your spell rotation would look something like:
1st GCD (1.5 sec): Cast Lifebloom on tank 1
2nd GCD (3 sec): Cast Lifebloom on tank 2
3rd GCD (4.5 sec): Cast
Rejuvenation/Swiftmend/Lifebloom/NS+Regro on random target.
4th GCD (6 sec): Cast Rejuvenation/Swiftmend/Lifebloom/NS+Regro on random target.
And then you would start over, because by then the Lifebloom rolls are expiring on the tanks.
If you are only healing 1 tank, that leaves you with 3 GCD, or if you wish, a Regrowth and 1 GCD.
If you are only healing 2 tanks, it is common practice to spread your Rejuvenations to the 4th GCD and leave the 3rd open for Swiftmends/Raidtarget Lifeblooms. In your first rotation, you put a Rejuvenationon one of the tanks, and in the second rotation, you put it on the other.
If you are only healing 3 tanks, you basically have to refresh Lifebloom rolls most of the time, and only on the 4th GCD can you do anything else.
If you are healing 4 tanks, you will have no time to do anything except refresh the Lifebloom rolls.
These factors also need to be understood when it comes to dealing with Lifebloom rolls that accidentally expired before they should have. If you are healing 2 tanks, you can put up a 3 stack Lifebloomimmediately on the 2nd tank after you have refreshed the roll on the 1st. If you are dealing with 3 tanks, you will have to spread out the stacks over 2 rotations. If you are dealing with 4 tanks, you will have to spread out the stacks over 3 rotations. This is done so you do not get more expired rolls. Making new rolls of Lifebloom must also be considered from a trinket point of view, to make sure that you get the highest possible HPS and HPSC and HPM from your rotation.
Intentionally expiring the rolls is another point of discussion. Essentially, it depends on how many tanks you are rolling Lifeblooms on, as that will also determine the time it takes to reapply a full stack. If you are dealing with a 2 tank scenario, and one tank will not take damage for 20s or so, I recommend that you let his bloom expire. If healing 3 tanks, the same number would be somewhere around 30-40s.
Note that, unless you are healing 4 tanks, you don’t have to use every GCD for a spell. The GCDs put the upper limit on spell rotations, but the lower limit is determined by the amount of tanks (healing 2 tanks – then you MUST use at least 2 GCDs every rotation).
Gear Guide —————————————————-
This can be left to some debate with certain pieces out of date atm. But the best gear guide that I agree with I found here. http://druid.wikispaces.com/Healing+Gear+List
Simply Edit it for available content and raid needs.
Lifebloom Rolling is what you call it when you have one Lifebloom that you try to keep up as long as possible on a single target taking a lot of damage. The reason is Mana efficiency and Healing output over time weighted against GCD is EXTREMELY good. Lifebloom rolling means you start with 3 stacks, and then refresh it every time 6-6.5 seconds have passed.
Know when to use Regrowth, and when to use Lifebloom, and when to use Swiftmend, and when to use NS, and when to use Rejuvenation.
I cannot stress this enough. Regrowth = Expecting more incoming damage on the target, and he is already low.
Lifebloom = target moderately or lightly wounded (or Rolling, see above).
Swiftmend = You have a Rejuvenation or a Regrowth on a target that is almost dead, and you need instant healing.
Nature’s Swiftness = You are absolutely convinced that the target will die within the next second if you don’t save him.
Rejuvenation = only use if you expect a target to take damage over 12 sec instead of 7 sec (Lifebloom), and only use on tanks if they already have Lifebloom and Regrowth on them. The type of the fight is also of great concern – is it a fast fight? Then you don’t need mana. Is it a 10 minute enrage timer that you barely can manage? Then Lifebloom is king.
The experience of a healer matters.
The only way to really learn how to heal good, is to
1. Raid a lot.
2. Analyze how your raid healers behave, and fill in the gaps. That is all that HoTs can do. That is what druids can do better than anyone.
Bring consumables to all encounters that require it.
Gems & Enchants
Gems :
Meta – Bracing Earthstorm Diamond
Red – Teardrop Crimson Spinel 22 healing + 8 spell damage (No longer exists due to Cataclysm and changes to Wowhead)
Blue – Royal Shadowsong Amethyst (No longer exists in the game due to Cataclysm and changes to Wowhead) 11 healing + 4 spell damage + 2 mp5
Enchants
Head – Arcanum of Renewal (35 healing + 12 spell damage + 7 mp5 , requires Revered Reputation Level with Thrallmar)
Shoulders – Greater Inscription of the Oracle (6 mp5 + 22 healing)
Cloak – Enchant Cloak – Major Resistance
Chest – Enchant Chest – Major Spirit
Wrist – Enchant Bracer – Superior Healing (30 healing + 10 spell damage)
Hands – Enchant Gloves – Major Healing (35 healing + 12 spell damage)
Legs – Golden Spellthread (made by Tailoring – 66 healing + 22 spell damage + 20 stamina)
Feet – Enchant Boots – Vitality
Rings (Enchanters only) – Enchant Ring – Healing Power
Weapon – Enchant Weapon – Major Healing
Tips & Tricks
Use the right idol is something you cannot stress enough. Each idol available gets you an additional 2-3% on all healing spells you can use. Harold’s Rejuvenating Broach also buffs Swiftmend, if you are using it on a Rejuvenation spell.
Use Tree of Life aura as a tool, not as something you paid for but want to return. It has its uses. Find them. For example, it is a great aura on Gurtogg Bloodboil, or High Warlord Naj’Entus.
Ask the mages to buff Amplify Magic if someone won’t take magic damage. It adds +230 healing done to every spell on that target.
Innervate is not just a boss spell – use it to clear trash faster. The faster you clear trash, the more time you have on bosses. If you don’t need your innervate in a fight, then someone else can use it.
Rejuvenation+Swiftmend is usually not a good idea, but may be required if you are moving in a boss fight. Cast Rejuvenation and then immediately cast Swiftmend. Some 3k healing in 1.5 sec cast time (3 sec GCD).
NS and switching out of ToL usually works wonders
Macro :
/cancelform
/cast Nature’s Swiftness
/cast Healing Touch and spamclick. However, keep in mind that a NS+Regro+Swiftmend will cost less if you are going to switch back into ToL. Also remember to keep any interface modifications from automatically switching idols when you leave the ToL, causing a GCD.
Omen of Clarity and Thorns – use it. It costs nothing of the mana you use in combat, and even a few thousand extra threat points in combat may be the difference between a wipe and a kill. OoC is great for those times when you have a moment and not casting anything – throw a few melee swings, preferably with your staff. If your OoC procs clearcasting, your next spell is free and does not start FSR.
Professions are a great way to get healing gear – specifically Tailoring. Grind the mats in feral before you turn 70, and then purchase what you can to craft Whitemend and Primal Mooncloth. You will be hard pressed to replace it for stamina gear, but not before start of Hyjal Summit / Black temple. Yes, they really are that good.
Interface Options has a cool feature in the bottom right corner of the “Advanced Options” tab. It displays healing like damage is usually displayed on screen. The option is called “Show Healing”.
Credits go to :
-Druid Wiki
-<GetSmart>
-GuildLaunch

Patch: 2.4.3
Author: Kahunaz