Cataclysm Rogue Guide

Hello everyone!

For those, who know me – it’s been a long time, I didn’t fancy going Cata, but in the end I did and with it comes the hassle about specs, gear, gemming, reforging & etc. For those, who don’t know me – as my signature suggests, I am the author of the two Combat 3.3.5a guides – PvP and PvE – and I am still updating these when I find time.

Enough trivia, this is going to be the COMBAT PVE CATA Rogue Guide, covering everything you need to know, explained in a simple and understandable matter.

__—Updated for 4.3—__

This Guide will cover:
1. Talents & Glyphs
2. Stat weight, enchanting, gemming & reforging
3. Rotation & priority
4. Relevant Molten situation (bugs)
5. FAQs

A big credit is handed to ieatpaperbag from EJ team, whose Guide is the basis of mine (link at bottom)
A Changelog is posted at the bottom of the guide.

Abbreviations:
CP – Combo Point
SS – Sinister Strike
RvS – Revealing Strike
FoK – Fan of Knives
SnD – Slice and Dice
Evi – Eviscerate
Rup – Rupture
AR – Adrenaline Rush
BF – Blade Flurry
KS – Killing Spree
BG – Bandit’s Guile
RB – Restless Blades
MG – Main Gauche
TotT – Tricks of the Trade
IP – Instant Poison
DP – Deadly Poison
AoE – Area of Effect
Go# – Glyph of #

——————————————————————————————————————-

1. Talents & Glyphs

[7/31/3]
This is the basic Combat PvE spec. The points in Blade Twisting and Improved Sprint are simply a filler and a means to get to the bottom of the tree. Imp Sprint can prove particularly effective in some raid situations, where you are snared and need to run away quickly. Therefore you can put those 2 point in other talents, in example Improved Recuperate, which will increase your survivability a fair deal if you use it in a smart way (air phases or other times where you take a lot of damage, which you cannot prevent, and cannot DPS in the meantime).

The Glyphs that you should be using are:

Prime:
– Adrenaline Rush
Sinister Strike
Slice and Dice OR Revealing Strike

Major:
Blade Flurry
Tricks of the Trade
Feint

GoAR and GoSS are must-haves for Combat, there is no doubt about that. GoSnD is considered the best choice for your third Glyph, but you could as well get GoRvS, which will result in a total +45% increased effectiveness of your offensive finishers (Eviscerate & Rupture).

GoBF & GoTotT are must-haves. Both of these greatly increase your Energy effectiveness. So does the third glyph, which effectively removes the energy cost of Feint – an extremely useful ability in many raid encounters (remember Whiteout on Toravon and Bonestorm on Marrowgar), which will save you and your healers a lot of trouble.

None of the minor glyphs affects your performance in any way worthwhile. Choose whatever you like.

——————————————————————————————————————-

2. Stat weight, enchanting, gemming & reforging

Stat weight

First of all, you need to hit the two caps – Hit and Expertise. The hit cap is 2% or 241 hit rating for yellow attacks, which is as far as you need to get. The expertise cap is 23 or 691 expertise rating with racial bonus and 26 or 781 without racial bonus. As you will notice when you mouse over Exp, this will eliminate Dodge, but not Parry, because of the way boss mechanics work, so you should still aim to always be behind your target, capped or not. However, you should not gem or enchant for Hit or Expertise (only reforge), as they are not worth it. Agility has the highest priority!

After Hit and Expertise have been capped, the most important stats for you are Agility and Haste. Agility is by far the best stat you have and you need to have as much of it as possible – it adds attack power and crit. Haste increases your attack speed, which passively increases your Combat Potency and MG procs, and also directly increases your energy regeneration rate.

Your least valuable stats are Crit and Mastery, Crit being the weakest one. If you take a good look at the talents and the gameplay of Combat, it just doesn’t gain much from Crit. Mastery gives you a chance (16% base) for your MH attacks to cause you to do an extra MH attack, increased by 2% for every point of mastery you have (179.28 rating). MH attacks include both autoattacks and specials. The MG attack can proc Combat Potency. The MG attack can also proc poisons.

STAT WEIGHT: Agility>Hit(cap)>Expertise(cap)>Haste>Hit(excess from gear)>Mastery>Crit

Enchanting

Enchanting your gear is pretty straightforward and logical, so I am not going to go in-depth with that. You should enchant both of your weapons with Landslide or Hurricane in case you find Landslide too expensive.

Gemming

Basic:
Red
Yellow
Blue

In-depth:
Deriving from the stat weight for Combat, the gemming is self-explanatory. When looking at socket bonuses, you are looking after Agility. If the socket bonus is NOT Agility, gem +50 Agi no matter the socket colors, if it is Agility and the sockets are Red + Yellow – stick with the socket bonus, if it is Agility, but the sockets are Red + Blue (hit-capped) or Yellow + Blue, gem full +50 Agi. This will yield the maximum amount of useful stats you can have from your gear.

Reforging

Once you have reached the Hit & Expertise cap, you should aim to remove all your useless stats and gain as much from the useful ones as possible. You should reforge Crit and Mastery (and possibly extra Hit & Expertise) to Haste. If you have to choose between reforging Crit or Mastery, choose Crit – it is the weakest stat for you.

——————————————————————————————————————-

3. Rotation & Priority

Starting with Poisons, as a Combat Rogue, you should have IP on your slow MH and DP on your fast OH. For your Thrown, you should use Wound Poison. Explanation provided below in the Multi-target section.

Rotation

Single

Unlike Subtlety or Assassination, Combat doesn’t really care about opening, because it doesn’t have the temporary buffs the others have (Overkill, Master of Subtlety) and it does not need an initial opening setup. It makes very little difference for Combat if you start the fight with Garrote or just straight with SS. Your main goal as Combat is to keep SnD up at all times. Once SnD is up, you should just keep a 5-CP Rup on the target and use Evi as a filler. Use RvS in order to enhance your finishers’ DMG. Keep in mind that RvS generates one CP. RvS should be applied exactly at 4 CPs – no sooner and no later. If you are at 3 CPs, then use SS. If you get an extra CP from the glyph, simply use finisher. If you are at 5 CPs but without RvS up – screw RvS and use finisher regardless. The reasons are simple – SS>RVS in DMG and the amount of damage, Energy and CP lost is greater than the damage gain from an RvS + Evi/Rup. It is a bit hard to resist the urge to RvS + finisher, but you must get used to thinking about maximum damage output, not just big numbers. Your SnD doesn’t need to be 5-CP, it just needs to be up all the time – as long as it’s up, you have time for a damaging finisher and another SnD to refresh the old one, you are doing well. If for some reason you have RvS up and you have 4 CPs, use SS and not Shiv. Shiv does very low damage, because of your fast OH and is unable to crit, because of the mechanic of the skill.

Regarding Expose Armor – Fury and Prot Warrs, Assassination Rogues and Feral Druids will already apply the 12% armor debuff through glyphed Collosus Smash, Devastate, talented Expose Armor or Faerie Fire(Feral). If all those are absent in your raid, you should apply it after SnD. It is a personal loss of DPS for you, but a raid-wide increase depending on the raid composition.

Multi

For multiple targets, you should turn BF on and aim to position yourself in such a way so that you can strike your targets without putting yourself in danger. Prior to Cata, BF is now a self-aura with a 10sec cooldown instead of a timed active ability with a 2min cooldown. You can toggle BF off while the cooldown is still going. You should not use Rup while “cleaving” but Evi, because Rup does not affect other nearby targets, unlike Evi. As of Cata, BF no longer affects FoK. In addition, FoK does relatively low damage for Combat Rogues, even having in mind Ambidexterity, so in a multi-target situation you should not use FoK, except the targets are more than 7-8. The poison on your thrown weapon should be WP, because it takes around 30 seconds to make DP worthwhile. WP is better than IP, because WP’s proc chance is higher enough than IP’s to make it better in a short big-mob fight.

Bandit’s Guile
A lot of people misunderstand how BG works. BG has 3 levels of insight – Shallow, Moderate and Deep. Each of these provides a 10% bigger bonus in damage dealt to the target you are currently attacking (respectively 10, 20 and 30%). Insight is gained by executing any combination of four SSes or RvSes until you reach Deep Insight. Deep Insight cannot be refreshed and will fade after 15sec, which will begin the cycle anew. Switching to another target and striking it with SS/RvS will also reset BG, unless you use Redirect, which transfers not only the CPs but also the Insight. Keep in mind that Redirect’s cooldown IS affected by RB.

——————————————————————————————————————-

4. Relevant Molten situation (bugs)

Blade Flurry – Right now Blade Flurry does too low damage. The second target hit by BF is dealt lower damage than the main target by around 30-35%.

Killing Spree + FoK bug – While in KS, you will very often end up beind Energy capped (100 energy). Being Energy capped means that you’re doing something wrong and are losing potential DPS. While in KS, you are unable to use any kind of items or abilities, except FoK. However, this does not work on Molten.

Hit & Exp cap bug (General) – it is well known that the Molten hit & exp caps are lower than they should be. The exact amount however is still a matter of debate. So far it seems that 5% is enough hit for melee specials (down from 8%) and 16-17 Expertise is enough for melee attacks (down from 21). I have intentionally not adjusted the guide towards these bugs for several reasons – 1) they are somewhat unclear; 2) they are only valid for BOSSES, not trash mobs or boss adds; 3) they will get fixed eventually, since they’re affecting all classes.

Note: I have personally tested all of these bugs on Neltharion & Frostwolf and I confirm them!

——————————————————————————————————————-

5. FAQs

1. Why not use GoFoK?
As explained above, FoK does too low damage for Combat and is generally not used, thus also not glyphed.

2. When to use AR?
AR effectively doubles your Energy regeneration and also increases your attack speed by 20%, which combined with Combat Potency means an even higher energy regen. Very often during AR you will suffer energy-capping. Thus AR should not be used when your group has used BL/Hero/TW, since you will be energy-capped and will be effectively wasting energy. AR should be used in phases where the target is not moving and/or takes extra damage (pinned Magmaw, sun-phased Rajh) or when you have powerful procs up (Deep Insight, trinkets). You should never use KS while in AR, which is a total waste of energy. You should not use AR prior to executing a finishing move, because you will immediately become energy-capped, because of Relentless Strikes. The best way to use AR that I have found is after executing a finisher and spamming SS until I get low on energy (2-3 SSes). This way you will make use of RS’s energy spike and you will not waste energy from the GCD following the AR.

3. When to use KS?
KS is your highest burst ability. KS’s cooldown is affected by RB and can be glyphed for an additional 10% damage. Similarly to AR, you should try to use KS in phases where the target is not moving and/or takes extra damage or when you have powerful procs up (Deep Insight, trinkets). Since KS places you behind the target, you need to be very careful of your surrounding when using it – you could get heavily injured, die or even wipe the entire raid if you do not pay attention to specific boss mechanics. KS should be used when you are low on energy, because during it your energy will surely regenerate to full – Combat Potency can proc from KS. Also, I have found that because of the massive number of Eviscerates that you are executing during AR, it is best to use KS before AR. After AR, your KS will be already halfway off its cooldown.

4. Is Precision included in the Hit Rating tooltip on my character stat sheet [C]?
Yes, it is. This is why you only need 2% hit to reach the special attacks (yellow) cap. You can check it by simply looking at your hit rating while your character is naked – it will be 6% with 3/3 Precision.

5. Why should I use Hurricane over Avalanche, having in mind that MG procs can proc enchants?
Because Avalanche is a Procs-Per-Minute and not a Chance-On-Hit enchant.

6. What kind of weapons should I use? Axes, swords, maces, fists or daggers?
It doesn’t matter if you choose maces, fists, swords, axes or daggers, unless you have a racial bonus to one of these. The MH needs to be slow and the OH – fast.

7. When should I use RvS?
Revealing Strike should be used at 4 Combo Points – no sooner and no later. Using it sooner than 4 CP means you’re not using SS instead, which is a loss of DPS. Using it later than 4 CP means you’re wasting CPs, Energy and GCD for slightly bigger finisher damage, which is a loss of DPS.

——————————————————————————————————————-

This covers everything you need to know about Cata Combat Rogue PvE. If you have any suggestion or friendly feedback, I will be happy to receive them.

I will try to keep this thread up-to-date, stressing on the Bug & FAQ sections.

Changelog:
27AUG12 – Confirmed & changed RvS not affecting Rupture. Updated Wound Poison for FoK.
27AUG12 – Edited to Mastery>Haste. Credit to Soulsseeker (Rec). Added in FAQ.
29AUG12 – Edited talent link to mmo-champ with MoP live. Glyphs included.
29AUG12 – Added FAQ regarding Ruthlessness 1/3.
17SEP12 – Added Savage Combat bug. Updated bug status.
30OCT12 – RB + Rup bug fixed.
15JAN13 – Savage Combat bug fixed.
15JAN13 – Multiple FAQs added and updated. When to use RvS added and explained at the end of Single-target Rotation.
15JAN13 – Added Expose Armor in Single Target.
26JAN13 – RvS + Rup reported. Rup low dmg reported. Main Gauche (finally) reported. All bugs posted in section [4.]
04MAY13 – Major 4.3 update. Links fixed from wowhead to openwow. Updated Bug section, FAQ section & stats weights after Mastery fix.
16JUN13 – Updated Bug Section with links to the new reports. Hope they won’t get dismissed this time…
19JUN13 – Updated Bug Section after bug fixes and report dismissals.
21JUN13 – Updated Bug Section with a new RvS + Rup report and a DP report.
06OCT13 – Updated the talent build link. The new one is in German though, until the community finds / makes something available in English. Also, a lot of bug fixes.
28OCT13 – Replaced the German talent build link with an available English one. Thanks to MyRevolution.
16OCT14 – Updated Single-target Rotation section to better reflect the current state of Combat Rogues. Added #7 FAQ. Added explanation about hit & exp cap bugs on Molten in the Bug Section.
04DEC14 – Bandit’s Guile fixed after update. Also, changed gem links from wowhead to openwow.

Source: ieatpaperbag’s Combat Guide for Cata

I would also like to express my gratitude to all the Molten members (Rec, Ryu, misams, Griefel and more), who have supported me throughout the making and improvement of this guide.

Cataclysm Hunter Guide

Intro

I’m not good at these guides so don’t blame me / flame me, also if you’re here for just the talents / BiS gear then SHOO! away with you! I’m putting a lot of effort into these. Anyways, this guide is / will be based around the Marksman specialization for a hunter (a.k.a. MM hunter) focusing on the PvE aspect of the game.
Note: I’m sorry for any mistakes, bad English as I suck at English and I’ll never be good at anything that’s important in my life;_; (rip)

Hunters

Hunters are a Physical ranged DPS class capable of dishing out quite some DPS and especially the MM spec, which we will learn today, is welcome in lots of raids because of the AoE attack power buff from Trueshot Aura. Hunters mainly attack from a range and use bows, crossbows and guns as their ranged weapons although they can use melee weapons if an enemy gets too close.

Changes

Basically this will be a short section for people who have played WoTLK hunter (like myself) and are now playing on Cata. In cata a new resource was introduced for hunters – focus.
Focus – basically the same as energy (rogues, feral druids) but with a slower regeneration rate.
Arcane shot – our beloved arcane shot has no more 4 second cooldown *yay*
No more volley
And a lot of other changes i won’t go too in-depth now because they won’t really matter for the guide.

The basics – talents

So, a lot of players do the copy talents thing, i don’t like that. I know a lot of people will still do it but i’m going to post 2 trees here anyways.

The 7-31-3 talent tree

Takes 7 points in the beast mastery tree:

for pet focus rengeneration and stacking attack speed + additional damage from your aspect of the hawk

Takes 31 points in the marksmanship tree:

Efficiency 3/3 – Reduces focus costs of 3 of your abilities – Chimera shot (most importantly), Arcane shot (not bad as that’ll the your filler) and killing shot (not very useful but you’ll be using it from time to time so why not?)
Go for the throat 2/2 – generates focus for your pets (always useful)
Sic ‘Em! 2/2 – another focus talent for your pet (once again – useful!)
Improved steady shot 3/3 – increases your ranged attack speed and as you’ll be using steady shot a lot this talent is really good for any MM hunter
Careful aim 2/2 – i take this basically to get forward with the talent tiers this is not very useful as it only affects targets who are above 90% health but it’s a nice dps boost when you start your rotation on a raid boss.
Piercing shots 3/3 – MOAR DAMAGE!
Bombardment 2/2 – helps your focus when dealing with ads, thrash
Trueshot aura 1/1 – the talent that every physical dps will love you for. More damage for the whole raid, including yourself!
Termination 2/2 – more focus regeneration from steady shot, though it’s only after the boss is below 25% health
Rapid recuperation 2/2 – Useful talent on bosses as you’ll be using rapid fire a lot. You can never have enough focus regen.
Master marksman 3/3 – The best passive MM talent, in my opinion, as it gives you a free aimed shot without a cast time from time to time greatly increasing your DPS.
Readiness 1/1 – it’s basically to reset your rapid fire, you want to use this as soon as you hit your rapid fire button
Posthaste 2/2 – reduces the CD of rapid fire by 2 min – great talent as you want your rapid fire up for every boss
Marked for death 2/2 – 2nd Hunter’s mark ftw. a.k.a. more DPS.
Chimera shot 1/1 – One of your most important ability as an MM hunter, resets your serpent sting on the target and does a lot of damage without a cast time.

Takes 3 points in the survival tree:
for increased ranged haste

The 2nd talent tree:

5-31-5

5 in beast mastery basically for the same purpose as in the first talent tree minus the attack speed for your pets
31 in marksman basically for the same reasons as the first talent tree (there are no differences)
5 in survival for:
Pathing 3/3 – increases your ranged haste (same as in the other tree)
Improved serpent sting 2/2 – does 30% of the DoT damage instantly (more burst) and has a 10% increased chance to crit.
Note: from my expirience whenever you cast chimera shot to refresh the serpent sting effect it won’t trigger the 30% instant damage, it only triggers if you use serpent sting.

Conclusion: right now i run with the 2nd tree as i have a slight dps increase when i use this one.
Note: These talent trees are here to give you an example on what talents you should consider (that’s why all the explainations below the images) and you should consider editing these talents to your playstyle / needs.

Rotations

As much as i like the word “rotation” you won’t get that with this class. I will try to give you something similar to a rotation for this guide. Also before you skip this section because this looks like a total mess – read through it a few times and try it yourself on a training dummy you’ll realize it’s not as messy as it looks.

Single target rotation:

a)you want to pop all your cd’s (rapid fire + readiness) and any potions or other stuff you might have
b)Serpent sting
c)chimera shot
d)1 steady shot
e)2 arcane shots
f)steady shots until your chimera shot is off CD or you have 5 master marksman procs
If:
your chimera shot is off CD
a)you use chimera shot to reset the cooldown of serpent sting
b)1 Steady shot
c)2 Arcane shots
d)Steady shots until your chimer shot is off CD or you have 5 master marksman procs
If:
you have 5 master marksman procs
a)you use aimed shot
b)use chimera shot (it should be off cd by that time, if it’s not then spam steady shots until it is)
c)arcane shots until you can’t cast them anymore (below 22 focus)
d)spam steady shots until chimera shot is off CD
e)chimera shot
f)1 steady shot
g)2 arcane shots
h)steady shot until you have 5 master marksman procs or your chimera shot is off CD
When:
When your rapid fire runs out you should refresh instantly because if you used readiness your rapid fire should be off cooldown instantly.

Multi-target:

Spam dat multi-shot (dps on thrash is not that important)

That’s the basic hunter rotation. You can adjust this to your playstyle / needs once you’ve learned the basics.

BiS (best in slot / best gear

I suck at linking things and doing all that fun stuff so i’ll just add the names and you’ll have to search for the gear yourself, SORRY!

  • Head: Wyrmstalker’s headguard
  • Neck: Choker of the vanquished lord
  • Shoulders: Wyrmstalker’s spaulders
  • Back: Dreadfire drape
  • Chest: Wyrmstalker’s Tunic
  • Wrist: Bracers of looming darkness
  • Hands: Sporebeard gauntlets
  • Waist: Belt of the belowed companion
  • Legs: Wyrmstalker’s legguards
  • Feet: Treads of dormant dreams
  • Ring 1: Seal of primordial Shadow
  • Ring 2: Signet of grasping mouths
  • Trinket 1: Vial of shadows
  • Trinket 2: Wrath of unchaining
  • Main Hand: Kiril, fury of beasts
  • Ranged: Vishanka, jaws of the earth

Gemming / enchanting

Gems:

Meta: 1x Agile shadowspirit diamond
Red: 19x Glinting shadow spinel 1x Delicate Queen’s garnet
Yellow: 1x Deadly lava coral
Prismatic: Glinting Shadow spinel (i added the prismatic ones to the red so you shouldn’t buy more then 19 Glinting shadow spinel’s)

These are my gems and the exact number of gems i use in my current gear (look at the BiS list) If you need a general idea of what gems to use or you don’t have BiS then:
Red:
a)if hit cap: Delicate Queen’s garnet
b)if not hit capped: Glinting shadow spinel
Blue:
a)Delicate Queen’s garnet
Yellow:
a)Deadly lava coral

Enchants

  • Head: Arcanum of the Ramkahen
  • Shoulders: Greater Inscription of Shattered Crystal
  • Back: Enchant Cloak – Major Agility
  • Chest: Enchant Chest – Peerless Stats
  • Wrists: Enchant Bracer – Agility
  • Hands: Enchant Gloves – Major Agility
  • Waist: Ebonsteel Belt Buckle
  • Legs: Dragonscale Leg Armor
  • Feet: Enchant Boots – Assassin’s Step
  • Rings: Enchant Ring – Agility (if you have enchanting)
  • Main hand: Enchant 2H Weapon – Mighty Agility
  • Ranged: Flintlocke’s Woodchucker

Stats priority

  1. 1.Hit rating until you reach 8% hit cap
  2. 2.Agility
  3. 3.Critical Strike Rating
  4. 4.Haste Rating
  5. 5.Mastery Rating

Pets

I use a raptor. You can use any pet but i suggest you look for a pet that has the ferocity talent tree.
Ferocity talents:

Macros

I use a few macros which are used by most hunters usually as i feel like there’s no need for any specific macros for MM.

The macros:

1.Rapid fire + Call of the Wild (RF + CotW)

#showtooltip Rapid Fire
/cast Rapid Fire
/cast Call of the Wild

Use this only if you have a pet with Call of the Wild

Deterrance

#showtooltip Deterrence
/cast Deterrence
/cancelaura Deterrence

Misdirection

#showtooltip Misdirection
/cast [target=mouseover,help,nodead][target=focus,help,nodead][]Misdirection

It’ll cast misdirection on the target you are currently mousing over

That’s it.

Addons

There’s literally only 1 addon i use specifically for MM

-Serenity ( http://www.wowinterface.com/downloads/info20019-Serenity.html#info )
It provides you with an easy to see focus bad as well as ability cooldowns.

The hunter and the Hunted:

The difference between a mlg hunter and a mediocre hunter are:
-the timing of chimera shot. As you should know by now chimera shot refreshes the cooldown on serpent sting so a good hunter won’t just spam it whenever it comes off cooldown but he will use it to refresh the DoT on serpent sting on the very last moment.
-Focus management. Focus is an endless resource (means you’ll never need to refresh it like mana provided you don’t have 999999999 mana regen) but that doesn’t mean you can’t run out of it mid-fight and mess up your whole rotation. So generally you should pay close attention to your focus bar (that’s what serenity addon is there for) and make sure you don’t run below 40 Focus when your main abilities are about to come off cooldown. The reason i included do x many arcane shots in the rotation is so you don’t spam 50 arcane shots after every steady shot messing up your rotation completely. In the best case you shouldn’t use arcane shot at all when any of your main ability cd’s is below 5 sec. Another thing is overcapping your focus (having 100 focus) having 100 focus is bad because:
a) you are not regening focus (losing out on potentional vaule)
b) you are missing out on extra DPS as you could have used that focus for casting arcane shots
Your focus should be from 20-80 at all times (except when out of combat)
-20 after a full rotation (all your main abilities just went on cd)
-80 when your main abilities are coming up (around 3 sec cd left)

Glyphs

  • 1.Prime:
  • -Glyph of Arcane Shot
  • -Glyph of Rapid Fire
  • -Glyph of Steady Shot
  • 2.Major:
  • -Glyph of Disengage
  • -Glyph of Mending
  • -Glyph of Trap Launcher
  • 3.Minor:
  • -Glyph of Feign Death
  • -Glyph of Lesser Proportion
  • -Glyph of Revive Pet

Note: important glyphs are: Glyph of Arcane Shot, Glyph of Rapid Fire, Glyph of Steady Shot, Glyph of Mending. Any other glyphs can be changed/adjusted to your playstyle

The end

So, that’s about it. If you feel like i missed anything important or i should add something, you disagree with something, want to discuss about something – feel free to comment below as i’ll be happy to respond to your questions / suggestions.

Cataclysm Mage Guide – Inferno

Talents

I would recommend using the following build:

http://www.wowhead.com/talent#o0hZfchrkbRRsfoc

Talents I would consider optional are:

Master of Elements [2/2] – Your spell criticals will refund 30% of their base mana cost.
Over a long fight, this talent will give you a nice chunk of your mana back. That being said, if you think you won’t run low on mana and plan on using Fire Blast, you can drop this talent for Improved Fire Blast instead.

Cauterize [2/2] – In short, this is like a personal battle res.
Although, I don’t recommend dropping this talent, you could drop it for a different one if you really wanted to. Just keep in mind two things, it can save the use of a battle res and a dead dps is a useless dps.

Improved Scorch [2/2] – Reduces the mana cost of your Scorch spell by 100%.
Very nice for high movement fights. If you are moving and don’t need to refresh Living Bomb or dont have a Hotstreak proc to use or a Flame Orb/Mirror Images, you’re going to be spamming Scorch. Without this talent, Scorch can drain your mana pretty fast. That being said, if you don’t think you will be moving that much or think your mana can last without it, you can drop it for something else.

The rest of the talents I consider mandatory for maximizing dps.

Glyphs

Prime

Glyph of Fireball – Best

Glyph of Pyroblast – Best

Glyph of Molten Armor – Best

Major

Glyph of Blink – I recommend this for raiding. Gives you more distance on your blink to escape deadly boss mechanics you might get caught up in.

Glyph of Evocation – I also recommend this for raiding because it allows you to heal a bit of damage and even evocate to heal through a Cauterize for increased survivability.
??? – I’ll leave this one to you.

Minor

Glyph of Mirror Image – Mirror Images will cast Fireball instead of Frost Bolt. Why not?

Glyph of Slow Fall – Removes the reagent requirement from Slowfall. Take this unless you want to go around with light feathers in your bags.

Glyph of Arcane Brilliance or Glyph of Conjuring – Brilliance is good because it saves you mana if you have to spot buff someone who was just battle ressed. Really up to you.

Stats & Reforging

Intellect – Intellect is by far your best stat, no amount is too much. Intellect gives you mana, spell crit, and spell power.

Hit – Reduces the chance you will miss your target. We don’t want any of our spells missing. You want to get as close to your hit cap as possible without being under, if possible. It’s better to be slightly over the hit cap than slightly under.

Hit cap for Draenei is 1639 Hit rating because Draenei have 1% hit from their racial.

If not a Draenei your Hit cap is 1742 Hit rating or 17% hit.

If not yet geared enough for raiding and still running dungeons, you want a total of 6% hit to never miss in dungeons.

Haste – Increases spell casting speed. Also affects some of your dots, giving some dots an extra tick at certain haste points.

Haste points to know:
Extra tick on Living bomb & Pyroblast(dot) – 12.5% (+1 tick), 37.5% (+2 ticks)
Extra tick on Combustion(dot) – 5% (+1 tick), 15% (+2 ticks), 25% (+3 ticks), 35% (+4 ticks)

Crit – Increases the chance your spells have to crit. As a Fire Mage we want our spells critting a lot =). Definetally the best stat after Intellect and Hit cap.

Mastery [Flashburn] – Increases the damage done by all your periodic fire damage effects. Each point of mastery increases periodic damage done by an additional 2.8%.

There are two basic stat priorities you should go by when reforging:

Without t13 Time Lord’s Robes 2 set bonus:

Intellect>Hit to cap>Crit>Haste>Mastery

If you can get to 1181 Haste without losing too much crit, go for it. This will bring you to 12.5% haste self buffed, giving you an extra tick on Living Bomb and Pyroblast(dot).

With t13 Time Lord’s Robes 2 set bonus:

Intellect>Hit to cap>1505 haste>Crit>Haste>Mastery

When you are raid buffed(+5% haste) and have Stolen Time stacked up to 10, this will bring you to the 25% haste needed for the third tick on Combustion.

Gemming & Enchanting

Gems you should be using are:

Meta socket: Burning Shadowspirit Diamond

Red socket: Brilliant Inferno Ruby

Blue socket: Veiled Demonseye

Yellow socket: Reckless Ember Topaz or Potent Ember Topaz

When do you gem for the socket bonus? If the socket bonus is 20 Intellect or more, go for the socket bonus. If the socket bonus is 30 of another stat, go for the socket bonus. Otherwise, ignore the socket bonus and gem pure Intellect.

As a fire mage you will want to be using Potent Ember Topaz instead of Reckless Ember Topaz to match yellow sockets, unless you need the haste to reach a breakpoint. Of course, you can use the Epic equivalents if you have the gold.

Enchanting:

Helm: Arcanum of Hyjal – Requires you to be Revered with the Guardians of Hyjal. Vendor located in Mount Hyjal.

Shoulders: Greater Inscription of Charged Lodestone – Requires you to be Exalted with the Therazane. Vendor located in Deepholm. Best shoulder enchant unless you have Inscription.

Cape: Enchant Cloak – Greater Intellect – Best cape enchant unless you have Tailoring.

Chest: Enchant Chest – Peerless Stats – The best chest enchant for pve.

Enchant Chest – Mighty Stats – For the sake of 5 stats, a cheaper alternative.

Bracers: Enchant Bracer – Mighty Intellect – The best, but it’s expensive.

Gloves: Enchant Gloves – Haste – Although 65 mastery is the better enchant, you can choose this one if it’s the only way to reach a haste breakpoint.

Enchant Gloves – Greater Mastery – The best glove enchant available for pve.

Belt: Ebonsteel Belt Buckle – Technically not an enchant, but you should put that extra socket on your belt.

Legs: Powerful Enchanted Spellthread – The best pve enchant for legs. If you are a Tailor, you can pretty much get this for free.

Feet: Enchant Boots – Lavawalker – Commonly considered the best enchant for pve because of the movement speed increase.

Enchant Boots – Precision – A good choice if your having trouble getting to your hit cap.

Enchant Boots – Haste – The best choice if you don’t care for the movement speed increase on lavawalker and are at your hit cap.

Enchant Boots – Mastery – Almost as good as the haste enchant. Personal preference.

Weapon: Enchant Weapon – Power Torrent – The best weapon enchant by far.

Off-hand: Enchant Off-Hand – Superior Intellect – If you have an off-hand, toss this enchant on it.

Professions

I would recommend getting Tailoring as one of your professions. Mainly because of the cheap leg enchant and you get a nice cape enchant. You also get to make bags and armor you can use etc.

Enchanting is a nice profession to pair with Tailoring, but if you are looking for the best, I would probably go with Blacksmithing (the two extra sockets when paired with the epic gems add up to +100 int, thats +20 more than most other professions) or Engineering which has lots of useful items and a nice on-use glove enchant that you can use whenever you like, on a 1 minute cooldown (you can also have a regular enchant on your gloves in addition to this one).

If you really don’t care for the minimal dps difference in professions, just choose what you like or what you think will make/save more money.

Rotations

More of a spell priority list, but anywho. In order of most important to the least important.

Single Target:

1. Combustion When your dots are lined up. (more on this later)

2. Pyroblast – Hot streak proc.

3. Flame Orb – When off cooldown.

4. Living Bomb – Let it explode/expire before you re-apply.

5. Scorch – Only if there is no crit debuff on the target (to apply critical mass).

6. Fireball – Your main spam/filler ability if not moving.

7. Scorch – Only while moving.Remember, if you are moving you don’t need to go straight to scorch spamming. Still go by the priority list. If you have a Hot Streak proc, use it. There is also Flame Orb, Living Bomb and Mirror Images which have a higher damage per execute than scorch.

Multiple Targets:

There are a couple of ways to do aoe as a fire mage. Normally, you want to just follow your single target rotation and use Blast Wave to fish for impact procs and spread your dots. You can spread your Living Bomb with impact, which is a more mana efficient way to aoe, or you can manually put Living bomb on up to 3 targets, which will increase your haste by 10% while all three of them are still up. You don’t want to manually put up Living Bomb on 3 targets unless you know for sure they will last the full duration, letting them all explode for some nice damage.

The most effective way to aoe is to get a good Combustion up on a target and spread it with impact. Although it’s highly dependant on rng that you will get the chance to do this (depending on gear), it is a very good thing to aim for. Impact will not only spread the full Combustion to all targets in range, but it will also spread any existing Ignite, Pyroblast(dot) and Living Bomb(only up to 3 targets though) as well.

Impact can sometimes be a pain, getting it when you don’t need it, and not getting it when you do. Blast Wave is by far the best way to fish for an impact proc, but it’s not the only way. If Blast Wave is on cooldown, and you are in melee range, use Dragon’s Breath. Then, if you still dont have one you can continue with your single target rotation or try your luck with a Flamestrike.

Additional Info

Getting a good Combustion:

How exactly does Combustion work? It takes a snapshot of all of your fire dots on your target and combines them into one massive dot. This doesn’t remove the old dots, it simply creates a new one. Remember that Combustion is off of the gcd (global cooldown).

Getting a good Combustion is key to maximizing your dps. Always make sure you have an Ignite, Living Bomb and Pyroblast(dot) on your target before you use combustion. That being said, the main dot that affects the damage of your Combustion the most is your Ignite. Stacking your ignite before using combustion greatly improves combustions damage.

When trying to line up a Combustion, one trick is to refresh Living Bomb just after you cast Pyroblast via Hot Streak(instant cast). If that Pyroblast crits, you already have Living Bomb refreshed and you are ready to hit your Combustion. Another tip is to hit Combustion before your Ignite ticks, because every time the Ignite ticks, its total damage is reduced thus reducing the amount added to Combustion.

Practice with Combustion and learn to use it effectively.

Ignite:

Ignite is applied when you critically hit with a non periodic fire damage spell. 40% of the damage done by the crit is turned into an Ignite. So, if you crit for 100k, you put a 40k ignite on your target for 4s (4s is the initial duration). Ignite ticks every 2 seconds meaning a 40k ignite would tick for 20k damage after 2 seconds, and another 20k after it expires.

If you get lucky and crit with another spell that applies Ignite while the first Ignite is still up, those Ignites are combined into a stronger one. Due to “Ignite Munching” sometimes this glitches and you don’t always get the stacked Ignite that you would expect. If you stack an Ignite, the new one, and every stacked Ignite after will have a 6 second duration but still tick every 2 seconds(the first tick of a stacked Ignite usually goes off as soon as it is refreshed). A well stacked Ignite can lead to a very powerful Combustion.

For more detailed information on Ignite Munching and various bugs that can affect it(and other useful information), you can read through this thread:

http://elitistjerks.com/f75/t110326-cataclysm_fire_mage_compendium/

Cauterize:

Ok. You just got saved by Cauterize, but you are about to die if you don’t get a big heal. There are a couple of things you can do here. First, the most effective way to survive this is to hit Ice Block. It completely removes the dot left by Cauterize (you can cancel it right after or choose to stay in it until you get a heal or two). Another thing you can do is to Evocate through the dot (if you have Glyph of Evocation), Mage Ward and Mana Shield will also absorb some of the damage. Then there are your bandages, lock stones etc.

Preparing for a boss fight:

Always check and make sure you have a full 3 stack Mana Gem. You don’t want to be out of mana and go for something that’s not there. Most fights you shouldn’t need to evocate (usually only for Madness, DS). Use your Mana Gem as soon as you burn about 13k mana and use it on cd. For Madness(Dragonsoul last boss), don’t use your Mana Gem until after you use your first Evocate(and are 13k mana from full), this allows you to get the most out of your mana management abilities over such a long fight. (one Mana Gem between every Evocate)

Always make sure you are fully buffed and are full mana before the pull.

If there is going to be a countdown for the pull, you can hardcast a Pyroblast as your opener and follow with your rotation from there.

Staying Alive:

Lets face it. A dead dps is a useless dps.

Blink: Moves you 20 yards ahead (25 yards combined with Glyph of Blink). I know you can cast Scorch while moving but if you find yourself in the middle of something thats going to hurt. Blink out and dont risk the damage(if safe to do so).

Mirror Images: Although it is a high damage per execute, it is still a survival cooldown. If you pull threat, Images when popped will completely dump your threat for their duration, returning the boss back to the tank. It is a really good habit to save this for just such an occasion and gives time for the tank to build up threat again. Once it expires you get all of the threat back, but if the tank pulled enough threat, you shouldn’t pull again. To be safe you can pop Invisibility right after it to permanently drop the threat.

Ring of Frost and other cooldowns: Doing trash? Tank died and the mobs turn to you? Drop your ROF and kite them over it, use your Dragon’s Breath to disorient them into it or to gain distance. Frost Nova if they get too close or slow them with Blast Wave and kite. This just might buy some time to battle res a tank if your group chooses to do so.

Further Improving

Always be casting. Every second you spend not casting, you are losing dps. If you accidentally start casting a Fireball and realize you should have used Living Bomb, finish the cast anyways. If the target is going to die in a few seconds, it’s pointless to apply Living Bomb again unless most of it is going to tick off. When using the Heroic Will button on Ultraxion in Dragonsoul you can cast Fire Blast just as you hit the button for extra damage.

Knowing a fight well is a huge advantage for a dps. If you know you are going to have to move at a specific time or have to switch to an add that always spawns in the same spot, you can judge accordingly. For example, you are soaking crystals on Morchok and you know you have enough time for one Fireball but the second would be interrupted by the knockback half way through. You can cast a Scorch or something instead so that your global doesn’t go to waste (Scorch will not be interrupted by the knockback).

To get the most dps out of your Mage I suggest learning to use Rawr and Simulationcraft. This will help you get the most out of your toon in his/her current gear and maby learn ways to improve through the logs.

Macros:

Some of my favorite macros are:

#showtooltip combustion
/stopcasting
/cast combustion

Stops your casting and immediately activates Combustion. Good for when you just lined up the perfect Combustion but are in the middle of a cast.

#showtooltip ice block
/stopcasting
/cast ice block

Stops your casting and immediately Ice Blocks. Very nice for minimizing damage from Cauterize.

#showtooltip fireball
/cancelaura ice block
/cast fireball

By using this macro, your Fireball becomes a fast and easy way to remove your Ice block so you can get back to dpsing(once it is cancelled you are casting Fireball). You can link this to any ability you want, I chose Fireball because it just seemed easiest since Fireball is the filler.

#showtooltip counterspell
/stopcasting
/cast [target=focus] counterspell

Stops casting and Counterspells your focus target. Useful for when you have to interrupt a target without switching from your current one. Situational.

#showtooltip polymorph
/stopcasting
/cast [target=focus] polymorph

Stops casting and casts Polymorph on your focus target. Useful for keeping an enemy cc’d just in case it gets broken by damage or wears off. Avoids having to target them again if they are set to your focus.

/focus

Sets your current target to your focus. Faster than right clicking.

/clearfocus

Removes your focus target.

Cataclysm Warlock Guide

Welcome to our Cataclysm Warlock Guide. This guide has the Talents, Glyphs, Gems, Stats, Professions, and anything else you would need to play a Warlock in Cataclysm.

Spec/Talents

0/7/31 as a base spec, with 3 points at your disposal.

Destruction Talents :

1 Bane – Required 3/3

1 Shadow and Flame – Required 3/3

1 Improved Immolate – Required 2/2

2 Aftermath – Optional, as an added CC in dungeons. Raid bosses are immunte to this effect.

2 Emberstorm – Required 2/2

2 Improved Searing Pain – Skip

3 Improved Soul Fire – Required 2/2

3 Backdraft – Required 3/3

3 Shadowburn – Required 1/1. Useful execute spell that hits harder than your usual nuke, and generates 3 Soul Shards.

4 Burning Embers – Required 2/2

4 Soul Leech – Required 2/2. Steady mana regeneration.

4 Backlash – Optional. You shouldn’t get hit by physical attacks in PvE, but sometimes you get fail tanks, so this isn’t a bad option. You can skip this one for Nether Ward.

4 Nether Ward – Optional, but better than Backlash. You should get this one and Nether Protection instead of Backlash.

5 Fire and Brimstone – Required 3/3

5 Shadowfury – Optional, but a very good CC on fights with add-control. 1/1 Recommended.

5 Nether Protection – Optional, read Nether Ward above.

6 Empowered Imp – Required 2/2. Helps in keeping Improved Soul Fire up.

6 Bane of Havoc – Required 1/1

7 Chaos Bolt – Required 1/1

Demonology Talents:

1 Demonic Embrace – Optional. More stamina is nice for survival but there are better talents than this one for 3 points.

1 Dark Arts – Required 3/3. Your imp will account for about 10% of your total damage over a fight, and this talent has great synergy with Empowered Imp and Burning Embers.

1 Fel Synergy – Required 2/2. Keeping your pet alive is very important and this helps a lot with it.

2 Demonic Rebirth – Optional. Healers hate your pets. They won’t heal them. This talent will save you a lot of frustration. Recommended 2/2.

2 Mana Feed – Required 2/2. Another good mana regeneration tool.

2 Demonic Aegis – Optional. The extra healing would help with survival, but it’s not spectacular.

2 Master Summoner – Optional. Your pets will die because your healers hate them. This talent can save you some mana, but Demonic Rebirth is better.

Affliction Talents:

1 Improved Corruption – Optional. Corruption does very little of your total damage (about 5% with a 100% uptime with the talent for me so far, so I decided to skip it). These points are better spent in Demonic Rebirth.

1 Doom and Gloom – Optional. Again, Bane of Doom/Agony does not comprise a big enough part of your damage to justify 2 talent points.

Glyphs

Prime –

Glyph of Immolate

Glyph of Imp

Glyph of Conflagrate

Major –

User’s Choice, but Glyph of Soulstone, Glyph of Life Tap are recommended.

Minor –

They’re all awful, except for Glyph of Health Funnel.

Stats

Intellect > Spell Hit (1742 rating, 17%) > Haste > Mastery > Crit.

Gemming

Meta – Burning Shadowspirit Diamond

Red – Brilliant Inferno Ruby

Yellow – Reckless Ember Topaz

Blue – Veiled Demonseye

Professions

Blacksmithing, Enchanting, Alchemy, Leatherworking, Inscription all provide 80 Intellect.

Jewelcrafting allows you to use 3 epic gems with +67 Intellect each, which comes out to a little

more than the other professions.

Engineering Gloves Enchant provides 480 Intellect for 10 seconds every minute, which can be used

with other procs for a solid burst. Also includes other tinkers.

Tailoring provides 580 Intellect every minute for 15 seconds, which can be sync’d with your other

cooldowns for a very good burst, although you cannot always get the proc on-demand like with

Engineering.

Jewelcrafting + Blacksmithing or Tailoring + Engineering are the best combinations, depending on whether you prefer static stats gain or burst.

Race

Alliance – Worgens are best because of an extra 1% crit chance, Gnomes aren’t bad either. Rest of the races don’t affect DPS directly.

Horde – Trolls are a good race for any caster class because of Berserking, Goblins are a good option with 1% increased casting speed (though this is not the same as haste), Orcs are the best race with Blood Fury and Command.

Rotation/Priority

a) Keep Improved Soul Fire buff up at all times.

b) Keep Immolate up.

c) Keep Curse of the Elements up.

d) Keep as close to 100% uptime on Corruption.

e) If the target is going to survive at least 15 seconds, use Bane of Doom, otherwise use Bane of Agony.

f) Conflagrate

g) Shadowburn if the target is at less than 20% health.

h) Incinerate

i) Chaos Bolt

You will always want to keep the Improved Soul Fire buff up all the time. Either start casting Soul Fire when it has 3 seconds left on it or use a Soul Shard to make it instant.
Curse of the Elements, Corruption, Bane of Doom/Agony and Immolate should have as close to a 100% uptime as possible.
Conflagrate is your hardest hitting ability, use it on cooldown, even if it means letting Corruption drop for a second or two.
If you can get in melee range, use Shadowflame on cooldown.
After that you just spam Incinerate using the haste provided by Backdraft.
Chaos Bolt has a short cast time but it does less damage than Incinerate, so you should use it in the time when all 3 Backdraft charges have been used by Incinerate and Conflagrate is still on cooldown.
During sub-20% boss health stage, use Shadowburn on cooldown.
You can use Fel Flames to refresh Immolate when you’re moving and don’t need to Life Tap for mana.

Use Demon Soul on cooldown, or whenever a fight requires burst.

For AoE, Use Shadowfury, Shadowflame on cooldown and just put up as many dots on as many targets as you can, including CoE. Use Bane of Havoc on the mob that has most hp, or will live longest.

Also, you have to make sure the pet is alive throughout, or you lose a major chunk of your dps. DO NOT USE SOUL LINK (unless you intend to kill your pet).

Dark Intent

If your healers are geared enough, you should use it on a Shadow Priest, Fire Mage or Moonkin, otherwise a Resto Druid or Holy Priest are decent choices.

If you don’t have the choice, use it on any class that has any kinda dots, just make sure you have that precious 3%(9%) haste buff. (Anything other than Frost/Arcane Mage, Holy Paladin).

Refer to this post on mmo-champion for more details on DI.

Bane of Havoc

You can use BoH in raid settings to improve your dps.

Bastion of Twilight :

Halfus Wyrmbreaker – Use BoH on Halfus as you dps the drakes.

Double Dragons – Use BoH on the drake that is flying.

Ascendant Council – Use BoH on the boss that you are not dpsing.

Cho’gall – Use BoH on Cho’gall when the big add spawns.

Blackwing Descent :

Magmaw – Place BoH on Magmaw’s main body just before he goes down and place it on his exposed head just before he returns to normal phase.

Chimaeron – N/a.

Atramedes – N/a.

Maloriak – Use BoH on Maloriak when you’re killing the adds.

Omnitron – Use BoH on the tron with less than 50 energy, but do NOT use it on Magmatron.

One important point to note is that you always want to keep CoE on BOTH targets. BoH double dips into CoE. CoE affects the damage that BoH itself does and it buffs the damage that’s transfered via BoH. Also, never forget to switch back to BoD or BoA when you switch back to DPS’ing the target.

If you’re using BoH in an AoE situation, you should place it on the target that will live longest so as to not have to re-cast it often.

Hope you find the guide useful. Suggestions are welcome.

Cataclysm Enchanting Guide (1-525)

Welcome to our Cataclysm Enchanting Guide! This guide is a complete road map from level 1 to level 525 Enchanting in Cataclysm!

Leveling Enchanting 1-75

Level 5 Character required
Learn Apprentice Enchanting from an Enchanting trainer

Levels Formula Reagents
1 Runed Copper Rod 1 x Copper Rod
1 x Lesser Magic Essence
1 x Strange Dust
 
2-15 Disenchant green or better quality items
Enchant Bracer – Minor Health 1 x Strange Dust
16-50 Disenchant green or better quality items
Enchant Bracer – Minor Health 1 x Strange Dust
Enchant Chest – Minor Health 1 x Strange Dust
51-70 Enchant Bracer – Minor Health 1 x Strange Dust
Enchant Chest – Minor Health 1 x Strange Dust
71-75 Enchant Bracer – Minor Deflection 1 x Lesser Magic Essence
1 x Strange Dust

Leveling Enchanting 76-150

Level 10 Character required
Learn Journeymen Enchanting from an Enchanting trainer

Levels Formula Reagents
76-80 Enchant Bracer – Minor Deflection 1 x Lesser Magic Essence
1 x Strange Dust
81-100 Enchant Bracer – Minor Stamina 3 x Strange Dust
101 Runed Silver Rod 3 x Greater Magic Essence
1 x Runed Copper Rod
1 x Silver Rod
6 x Strange Dust
 
102-115 Enchant Bracer – Minor Agility 1 x Greater Magic Essence
2 x Strange Dust
116-130 Enchant Shield – Minor Stamina 1 x Lesser Astral Essence
2 x Strange Dust
1Enchant Cloak – Minor Agility 1 x Lesser Astral Essence
131-150 Enchant Bracer – Lesser Stamina 2 x Soul Dust

1Alliance purchase from: Dalria in Astranaar, Ashenvale
1Horde purchase from: Kulwia in Sun Rock Retreat, Stonetalon Mountains

Leveling Enchanting 151-225

Level 20 Character Required
Learn Expert Enchanting from an Enchanting trainer

Levels Formula Reagents
151-155 Enchant Bracer – Lesser Stamina 2 x Soul Dust
156 Runed Golden Rod 1 x Golden Rod
2 x Greater Astral Essence
1 x Iridescent Pearl
1 x Runed Silver Rod
2 x Soul Dust
 
157-165 Enchant Shield – Lesser Stamina 1 x Lesser Mystic Essence
1 x Soul Dust
166-180 Enchant Bracer – Spirit 1 x Lesser Mystic Essence
Enchant Chest – Greater Health 3 x Soul Dust
181-205 Enchant Bracer – Strength 1 x Vison Dust
206 Runed Truesilver Rod 1 x Black Pearl
2 x Greater Mystical Essence
1 x Runed Golden Rod
1 x Truesilver Rod
2 x Vision Dust
 
207-225 Enchant Cloak – Greater Defense 3 x Vision Dust
Enchant Cloak – Resistance 1 x Lesser Nether Essence

Leveling Enchanting 226-300

Level 35 Character required
Learn Artisan Enchanting from an Enchanting trainer

Levels Formula Reagents
226-230 Enchant Gloves – Agility 1 x Lesser Nether Essence
1 x Vision Dust
231-235 Enchant Boots – Stamina 5 x Vision Dust
236-245 Enchant Boots – Lesser Accuracy 1 x Lesser Nether Essence
4 x Vision Dust
Enchant Gloves – Strength 2 x Lesser Nether Essence
3 x Vision Dust
246-255 Enchant Bracer – Greater Strength 2 x Dream Dust
1 x Greater Nether Essence
2Enchant Bracer – Deflection 2 x Dream Dust
1 x Greater Nether Essence
256-265 Enchant Bracer – Greater Intellect 3 x Lesser Eternal Essence
266-290 Enchant Shield – Greater Stamina 5 x Dream Dust
291 3Runed Arcanite Rod 1 x Arcanite Rod
1 x Golden Pearl
4 x Greater Eternal Essence
10 x Illusion Dust
2 x Large Brilliant Shard
1 x Runed Truesilver Rod
 
292-300 3Enchant Cloak – Superior Defense 8 x Illusion Dust

2Alliance purchase from: Mythrin’dir in Craftsmen’s Terrace, Darnassus
2Horde purchase from: Banalash in Stonard, Swamp of Sorrows
3Purchase Formula: Runed Arcanite Rod and Formula: Enchant Cloak – Superior Defense from Lorelae Wintersong in Nighthaven, Moonglade

Leveling Enchanting 301-375

Level 50 Character required
Learn Master Enchanting from an Enchanting trainer

Levels Formula Reagents
301 Runed Fel Iron Rod 1 x Fel Iron Rod
4 x Greater Eternal Essence
6 x Large Brilliant Shard
1 x Runed Arcanite Rod
 
302-310 Enchant Bracer – Assualt 6 x Arcane Dust
311-320 Enchant Gloves – Assault 8 x Arcane Dust
321-330 Enchant Chest – Major Spirit 2 x Greater Planar Essence
331-340 Enchant Shield – Resilience 1 x Large Prismatic Shard
4 x Lesser Planar Essence
341-350 Enchant Gloves – Major Strength 12 x Arcane Dust
1 x Greater Planar Essence
351 4Formula: Runed Adamantite Rod 1 x Adamantite Rod
8 x Greater Planar Essence
8 x Large Prismatic Shard
1 x Primal Might
1 x Runed Fel Iron Rod
 
352-360 Enchant Cloak – Speed 6 x Infinite Dust
361-370 Enchant Bracers – Striking 6 x Infinite Dust
371-375 Enchant Chest – Super Stats 4 x Infinite Dust
2 x Lesser Cosmic Essence

4Alliance players purchase from: Vodesiin in Temple of Telhammat, Hellfire Peninsula
4Horde players purchase from: Rungor in Stonebreaker Hold, Terokkar Forest

Leveling Enchanting 376-450

Level 65 Character required
Learn Grand Master Enchanting from an Enchanting trainer

Levels Formula Reagents
376-380 Enchant Chest – Super Stats 4 x Infinite Dust
2 x Lesser Cosmic Essence
381 Runed Eternium Rod 6 x Arcane Dust
1 x Eternium Rod
6 x Greater Planar Essence
1 x Runed Adamantite Rod
 
382-390 Enchant Weapon – Greater Potency 2 x Infinite Dust
4 x Lesser Cosmic Essence
391-395 Enchant Boots – Icewalker 1 x Crystallized Water
8 x Infinite Dust
396-405 Enchant Cloak – Superior Agility 9 x Infinite Dust
406-415 Enchant Gloves – Expertise 12 x Infinite Dust
416-420 Enchant Boots – Greater Spirit 1 x Greater Cosmic Essence
10 x Infinite Dust
421-425 Enchant Shield – Defense 6 x Infinite Dust
6 x Eternal Earth
426 Runed Titanium Rod 8 x Dream Shard
12 x Greater Cosmic Essence
40 x Infinite Dust
1 x Runed Eternium Rod
1 x Titanium Rod
 
427-440 Enchant Boots – Earthen Vitality 2 x Hypnotic Dust
Enchant Chest – Mighty Stats 2 x Lesser Celestial Essence
Enchant Gloves – Mastery 1 x Hypnotic Dust
1 x Lesser Celestial Essence
441-450 Enchant Bracer – Speed 2 x Hypnotic Dust
1 x Lesser Celestial Essence
Enchant Cloak – Greater Spell Piercing 3 x Hypnotic Dust

Leveling Enchanting 451-525

Level 75 Character required
Learn Illustrious Grand Master Enchanting from an Enchanting trainer

Levels Formula Reagents
451-455 Enchant Bracer – Speed 2 x Hypnotic Dust
1 x Lesser Celestial Essence
Enchant Cloak – Greater Spell Piercing 3 x Hypnotic Dust
456-465 Enchant Gloves – Haste 4 x Hypnotic Dust
1 x Lesser Celestial Essence
466-475 Enchant Cloak – Intellect 6 x Hypnotic Dust
476-485 Enchant Chest – Mighty Resilience 9 x Hypnotic Dust
486-495 Enchant Shield – Blocking 9 x Hypnotic Dust
496-505 Enchant Bracer – Precision 12 x Hypnotic Dust
1 x Greater Celestial Essence
506-510 Enchant Boots – Precision 1 x Elixir of Impossible Accuracy
2 x Hypnotic Dust
2 x Greater Celestial Essence
511-515 Enchant Bracer – Exceptional Spirit 9 x Hypnotic Dust
3 x Greater Celestial Essence
516-525 Enchant Boots – Mastery 10 x Hypnotic Dust
3 x Greater Celestial Essence
5Runed Elementium Rod 1 x Elementium Rod
6 x Heavenly Shard
10 x Hypnotic Dust
6 x Greater Celestial Essence
1 x Runed Titanium Rod
 

Cataclysm Alchemy Guide (1-525)

Hey guys, I wrote an alchemy guide a while back after Leveling my 5th alchemist. I thought I would share it with you all.

This guide is maximized for as many orange skill ups as possible. Some sections are yellow or green. Extra mats have been factored in for this.

Herbs Needed and Gathering Locations

Northern Eastern Kingdoms

  • Peacebloom: 55 (Tirisfal)
  • Silverleaf: 55 (Silverpine)
  • Mageroyal x 55 (Silverpine/Hillsbrad)
  • Briarthorn x 105 (Hillsbrad)
  • Goldthorn x 50 (Arathi Highlands/Hinterlands)
  • Khadgar’s Whisker x 35 (Western Plaguelands)
  • Blindweed x 40 (Western Plaguelands)
  • Sungrass x 65 (Eastern Plaguelands)
  • Stranglekelp x 35 (Western Plaguelands or Stranglethorn)

Southern Eastern Kingdoms

  • Wild Steelbloom x 60 (Northern Stranglethorn)
  • Liferoot x 20 (Northern Stranglethorn)
  • Kingsblood x 20 (Northern Stranglethorn)
  • Gromsblood x 10 (Blasted Lands)
  • Dreamfoil x 45 (Blasted Lands
  • Mountain Silversage x 25 (Blasted Lands)
  • Golden Sansam x 30 (Swamp of Sorrows)

Outland

  • Felweed x 50 (Terokkar Forest)
  • Dreaming Glory x 25 (Terokkar Forest
  • Terocone x 15 (Terokkar Forest)
  • Netherbloom x 20 (Netherstorm)
  • Nightmare Vine x 5 (Shadowmoon Valley)

Northrend

  • Goldclover x 80 (Howling Fjord)
  • Talandra’s Rose x 35 (Zul’Drak)
  • Tiger Lily x 10 (Borean Tundra)
  • Icethorn x 40 (Icecrown)
  • Lichbloom x 50 (Icecrown)

Cataclysm

  • Cinderbloom x 83
  • Stormvine x 33
  • Azshara’s Veil x 24
  • Heartblossom x 15
  • Whiptail x 28
  • Twilight Jasmine x 32

Alchemist Stone

Alchemy 505-510 requires the individual to select an alchemist stone for their liking. These mats must be gathered as well.

Lifebound Alchemist Stone (Stamina)

  • Volatile Life x 50
  • Cinderbloom x 12
  • Azshara’s Veil x 12
  • Heartblossom x 12

Volatile Alchemist Stone (Strength)

  • Volatile Life x 50
  • Cinderbloom x 12
  • Heartblossom x 24

Quicksilver Alchemist Stone (Agility)

  • Volatile Life x 50
  • Cinderbloom x 24
  • Heartblossom x 12

Vibrant Alchemist Stone (Intellect)

  • Volatile Life x 50
  • Cinderbloom x 8
  • Azshara’s Veil x 20
  • Heartblossom x 8

Other Items Needed

  • Recipe: Super Mana Potion (Horde: Daga Ramba in Thunderlord Stronghold, Blade’s Edge Mountains for Horde, Alliance: Haalrun in Telredor)
  • Recipe: Major Dreamless Sleep Potion (Horde: Daga Ramba in Thunderlord Stronghold, Alliance:Leeli Longhaggle in Allerian Stronghold)
  • Glassfin Minnow x 10
  • Albino Cavefish x 5
  • Volatile Life x 5
  • Hessonite x 15
  • Nightstone x 9
  • Zephyrite x 6
  • Alicite x 15
  • Crystal Vials as needed.

Leveling

1-55

Minor Healing Potion (Save these):
Silverleaf x 55
Peacebloom x 55

55-90 (85-90 yellow, 10 spares to make)

Lesser Healing Potion:
Minor Healing Potion x 45
Briarthorn x 45

90-120

Elixir of Wisdom:
Mageroyal x 30
Briarthorn x 60

120-145

Lesser Mana Potion:
Mageroyal x 25
Stranglekelp x 25

145-155

Elixir of Defense:
Wild Steelbloom x 10
Stranglekelp x 10

155-175

Greater Hea ling Potion:
Liferoot x20
Kingsblood x 20

175-195

Elixir of Fortitude:
Wild Steelbloom x 20
Goldthorn x 20

195-215

Elixir of Greater Defense:
Wild Steelbloom x 20
Goldthorn x 20

215-230

Superior Healing Potion:
Sungrass x 15
Khadgar’s Whisker x 15

230-235

Superior Healing Potion (Yellow):
Sungrass x 10
Khadgar’s Whisker x 10

235-245

Elixir of Greater Intellect
Blindweed x 10
Khadgar’s Whisker x 10

245-255

Elixir of Greater Agility:
Sungrass x 10
Goldthorn x 10

255-260

Elixir of Detect Demon:
Gromsblood x 10

260-275

Superior Mana Potion:
Sungrass x 30
Blindweed x 30

275-290

Major Healing Potion:
Golden Sansam x 30
Mountain Silversage x 15

290-300

Greater Arcane Elixir:
Dreamfoil x 30
Mountain Silversage x 10

300-315

Adept’s Elixir:
Dreamfoil x 15
Felweed x 15

315-330

Elixir of Mastery:
Terocone x 15
Felweed x 15

330-340

Super Healing Potion
(Save 5 of these):
Netherbloom x 20
Felweed x 10

340-350

Super Mana Potion (Recipe)
(Save 5 of these):
Dreaming Glory x 20
Felweed x 10

350-360

Resurgent Healing Potion:
Goldclover x 20

360-365

Icy Mana Potion:
Talandra’s Rose x 10

365-375

Spellpower Elixir:
Goldclover x 10
Tiger Lily x 10

375-380

Ethereal Oil:
Glassfin Minnow x 10

380-385

Potion of Nightmares:
Goldclover x 5
Talandra’s Rose x 10

385-390

Elixir of Spirit:
Talandra’s Rose x 15

390-395

Elixir of Mighty Fortitude:
Goldclover x 20

395-415

Indestructable Potion:
Icethorn x 40

415-425

Runic Mana Potion
(Yellow to 422, last 3 Green):
Lichbloom x 50
Goldclover x 25

425-440

Draught of War:
Cinderbloom x 15

440-450

Draught of War (Yellow):
Cinderbloom x 30

450-455

Earthen Potion:
Stormvine x 10

455-460

Deathblood Venom :
Stormvine x 5

460-465

Volcanic Potion :
Cinderbloom x 5
Azshara’s Veil x 5

465-470

Elixir of the Cobra:
Azshara’s Veil x 5
Cinderbloom x 5

470-475

Deepstone Oil:
Albino Cavefish x 5

475-480

Elixir of Deep Earth:
Heartblossom x 10

480-485

Elixir of Impossible Accuracy:
Cinderbloom x 5
Heartblossom x 5

485-490

Potion of the Tol’vir:
Stormvine x 5
Whiptail x 5

490-495

Elixir of Mighty Speed:
Stormvine x 5
Twilight Jasmine x 5

495-500

Mythical Healing Potion:
Volatile Life x 5
Twilight Jasmine x 10

500-505

Flask of Enhancement:
Cinderbloom x 8
Stormvine x 8
Azshara’s Veil x 8
Whiptail x 8
Twilight Jasmine x 8

505-510

Lifebound Alchemist Stone (Stamina)
Volatile Life x 50
Cinderbloom x 12
Azshara’s Veil x 12
Heartblossom x 12
——-OR——-
Volatile Alchemist Stone (Strength)
Volatile Life x 50
Cinderbloom x 12
Heartblossom x 24
——-OR——-
Quicksilver Alchemist Stone (Agility)
Volatile Life x 50
Cinderbloom x 24
Heartblossom x 12
——-OR——-
Vibrant Alchemist Stone (Intellect)
Volatile Life x 50
Cinderbloom x 8
Azshara’s Veil x 20
Heartblossom x 8

This is the time to choose your Alchemy specialization.
Alchemy specializations are most easily learned by doing the Potion Mastery quest and paying to switch to either Elixir mastery or Transmute mastery.
The Potion quest requires 5 Super Healing and 5 Super Mana potions saved from before. It also requires 5 Major Dreamless Sleep potions.

Major Dreamless Sleep Potion:
Dreaming Glory x 5
Nightmare Vine x 5

Accept the quest from Lauranna Thar’well in Cenarion Refuge in Zangarmarsh and kill High Botanist Freywinn for the Botanist’s Field Guide in The Botanica.
If you want to stay with Potion Mastery then continue with the guide. If you want to be either an Elixir or Transmute Master then speak with Lauranna Thar’well again and pay the 150 gold to drop Potion Mastery.
Speak with Lorokeem in Shattrath for Elixir Mastery or Zarevhi in Stormspire, Netherstorm for Transmute Mastery.

510-515

Transmute: Ember Topaz:
Hessonite x 15
Cinderbloom x 15

515-518

Transmute: Demonseye:
Nightstone x 9
Twilight Jasmine x 9

518-520

Transmnute: Ocean Sapphire:
Zephyrite x 6
Azshara’s Veil x 6

520-525

Transmute: Amberjewel:
Alicite x 15
Whiptail x 15

Cataclysm Herbalism Guide (1-525)

Introducing myself

Hello all. My name is Yenoren and guides are something I’ve always liked. I think that it’s an awesome way to improve your gameplay for any kind of game. For a long time I’ve also wanted to make the best guides possible, so that I could be helping people to increase their gameplay. This is my first guide so please bare with me if it isn’t great, and feel free to comment on what I could make better for my future guides. Also please don’t think about miss spellings in the guide.

How does it work

Very simple! When you have learned herbalism you will automatically learn a new spell called Find Herbs. It allows you to see herbs nearby, on your mini-map. Then you just simply fly over by the herb and you right-click on the herb. It will then automatically begin to cast Herb Gathering. It’s a 2 second cast time ability and it let’s you herb the herb. You will then get a skill point in herbalism and you will recieve a loot of the kind that you just herbed.

Tips to make it go quicker

There are 2 simple tips that will increase the speed of leveling
Nr. 1: Check out the auction house for Scroll of Enchant Gloves – Gatherer. It will increase the leveling speed by a little.
For Horde
Nr. 2a: Set your Hearthstone to Orgrimmar, it will make it A LOT quicker that way.
For Alliance
Nr. 2b: Set your Hearthstone to Stormwind City, it will make it A LOT quicker as well.

Before you start

You’ll have to learn how to be a herbalist. You’ll do so by asking any guard in any of the capitals, just click the bubble with the text of “Profession” then select “Herbalism Trainer” (Or click here for a list of Herbalism Trainers). It’ll guide you to the nearest trainer. Learn the Herbalism profession and you’re ready to go!

Awesome! You’re now ready to begin you adventure to become max level in Herbalism


Horde

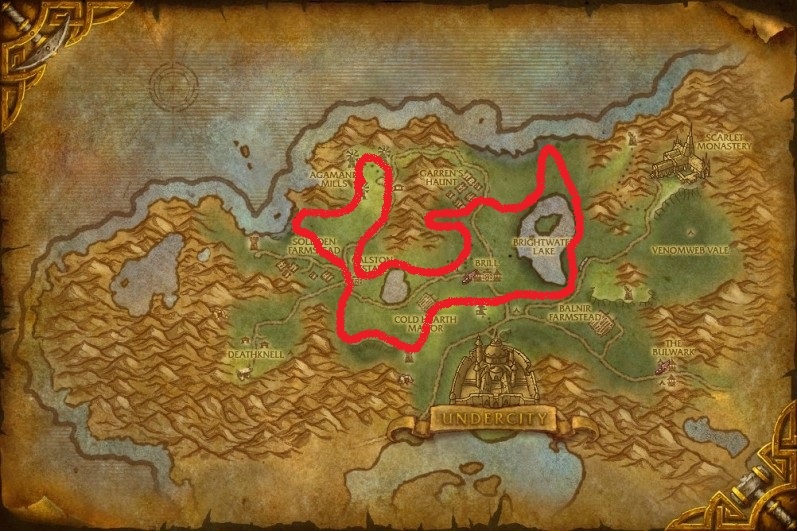
In this zone you will gather the following herbs: Peacebloom, Earthroot and Silverleaf

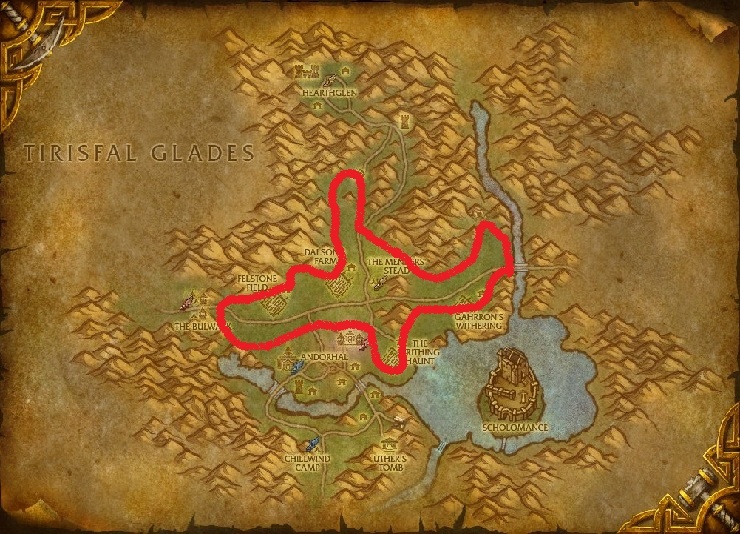
Tirisfal Glades

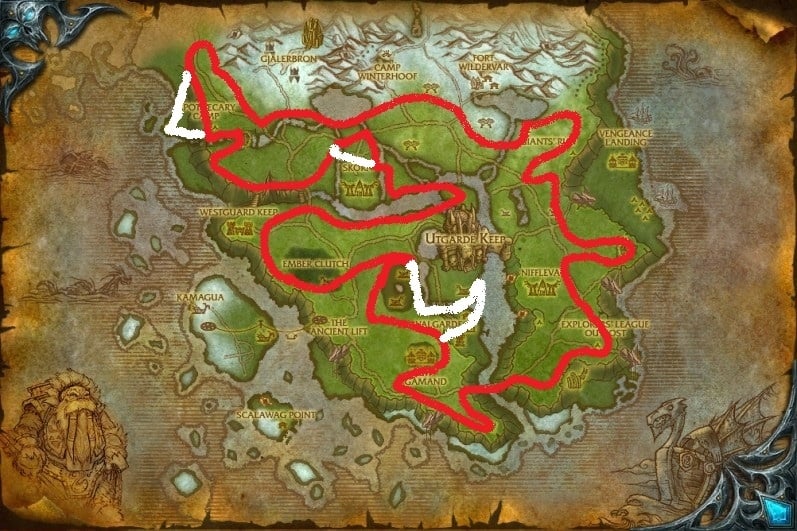
So first I’ll recommend going to Tirisfal Glades. This is the zone that is nearest the next zone that you’ll be going to. I’ve painted a route on the map, just fly/run that route and your herb cap will reach level 70 in no time 🙂


Alliance

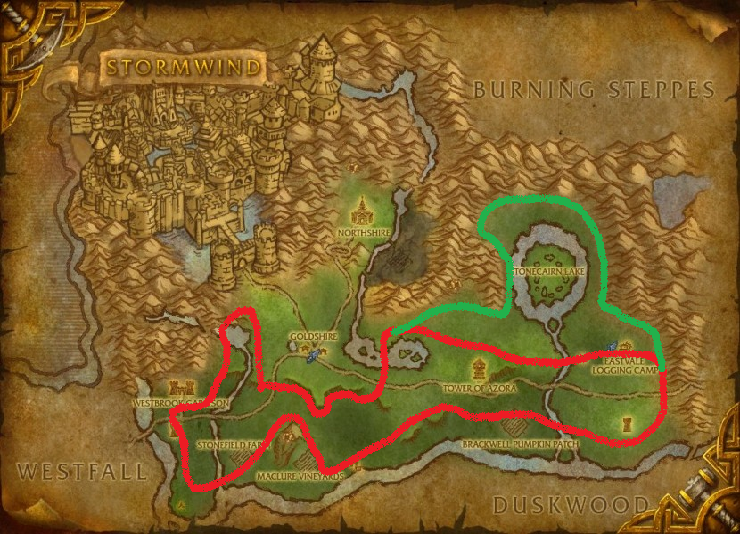
In this zone you will gather the following herbs: Peacebloom, Earthroot and Silverleaf

Elwynn Forest

So here I’ll recommend Elwynn forest to begin with. Follow the red route until skill level 15. When you reach skill level 15, keep following the red route, but when you are at the position to jump on the green route, do so, and then jump back to the red route again.

Congratulations on getting to level 70 in herbalism, you are now ready to take on the next step in your adventure To become an Illustrious Grand Master Herbalist!
Now you are only 5 skill points from reaching the cap of your possible skill level. That means that you will have to find a Herbalism Trainer to be able to get to level 150! I’d suggest that you’ll find the herbalism trainer in Undercity called Martha Alliestar, if you are horde.
If you’re alliance I’d suggest that you’ll go to the trainer just outside Stormwind called Herbalist Pomeroy and learn from her instead.
When you have learned Journeyman Herbalist you are ready to continue!


Horde

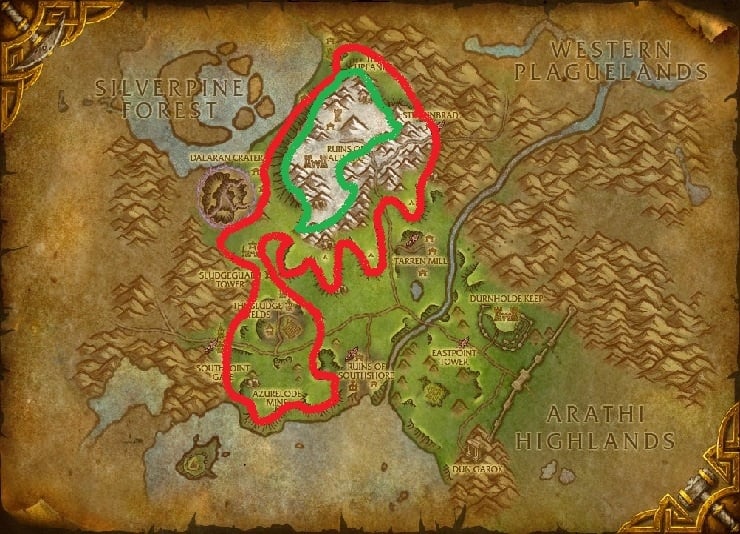
In this zone you will gather the following herbs: Mageroyal, Bruiseweed and Briarthorn

Hillsbrad Foothills

In this step I’d recommend that you go to Hillsbrad Foothills. It’s definetely the quickest way to get skill level 150! Also this route can be very hard to follow if you do not have a flying mount and do not have Flight Master’s License. Also as you see, there are two routes on this one map. You should be following the large red route from skill level 70 to 125 when you reach skill level 125 you go to the inner, smaller green route. There’s some higher level required herbs in that zone, which will make you increase in skill level quicker.
When you reach level 150 in herbalism you could choose to either find Aranae Venomblood in Tarren Mill and learn Expert Herbalist, or you can continue to the next zone immidietly. However if you choose to learn at Aranae Venomblood you can continue in the green route up to skill level 160 if not, you should continue to the next zone at 150 skill level.


Alliance

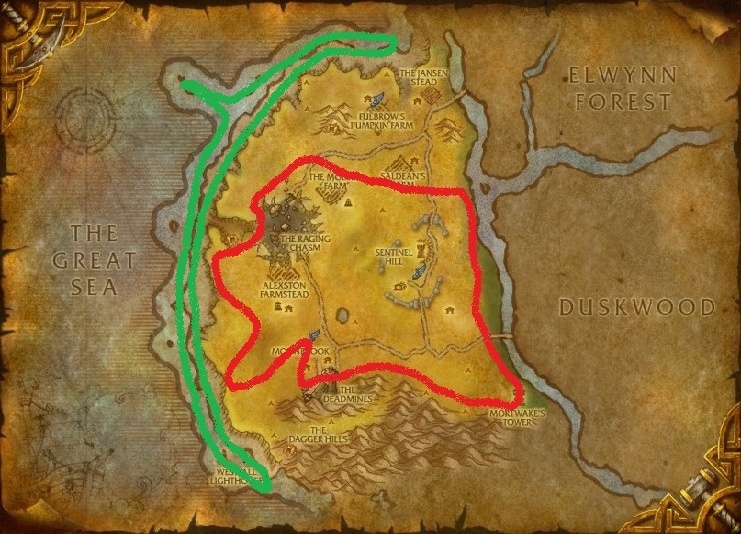
In this zone you will gather the following herbs: Peacebloom, Silverleaf, Mageroyal, Bruiseweed, Briarthorn and Stranglekelp.
You will also see some lower level herbs, If you want to get some more moneys, just herb ’em but you will not get skill points for herbs that are “gray” when you hold your mouse over it.

Westfall

For this part there is no good place for alliance players, if you have a flying mount I’d recommend flying to Hillsbrad Foothills (The horde part) and herb there. But the best alliance place that are nearby the place you’re already at, will be Westfall. Follow the red route until skill level 85, then follow the green route, you can choose to either swim or to run on the shore, NOTE: running on the shore will risk that you do not see all the herbs!

Great, you’re progressing fast! Now you are ready to take on the next zone!
For horde once again you have to find a herbalism trainer to become a Expert Herbalist unless you have already learned it from Aranae Venomblood, if you haven’t I’d suggest you to do so.
For alliance players seek out Flora Silverwind in Booty Bay as your next zone will be in The Cape of Strangletorn Vale.


Horde

In this zone you will gather the following herbs: Fadeleaf, Kingsblood and Khadgar’s Whisker

Western Plaguelands

For theese levels I’d recommend Western Plaguelands. It has a lot of herbs and are close to the places that we have already been at. If you haven’t leveled to 160 in Hillsbrad Foorhills you won’t be able to gather Khadgar’s Whisker for the first 10 levels untill 160. For all who uses a ground mount for farming in Azeroth, this zone will be a bit easier to complete than the previous zone. For once again you just follow the red route and keep running it, BUT there is one problem here. When you reach skill level 225 you have reached your skill cap. Therefore you will have to find a trainer to get to skill level 230. I’d suggest that you meet with Martha Alliestar once again when you reach skill level 200. From that off, you can farm on to skill level 230.


Alliance

In this zone you will gather the following herbs: Fadeleaf, Goldthorn and Khadgar’s Whisker

The Cape of Stranglethorn Vale

This zone only have one route for you to follow. It’s a quick, and efficient route. Just simply follow the route and herb what you can, BUT there is one problem here. When you reach skill level 225 you have reached the skill level. You’ll have to find a trainer and luckily there is one in Booty Bay, Flora Silverwind. Gather a few more herbs to skill level 230 and you’re ready to continue.

A small step for WoW, but a great step for yourself! Congratulations, skill level 230 is now reached!
This time you won’t have to visit the trainer, since you can get to skill level 300 from what you already have learned, in the previous step.


Horde and Alliance

In this zone you will gather the following herbs: Sungrass

Eastern Plaguelands

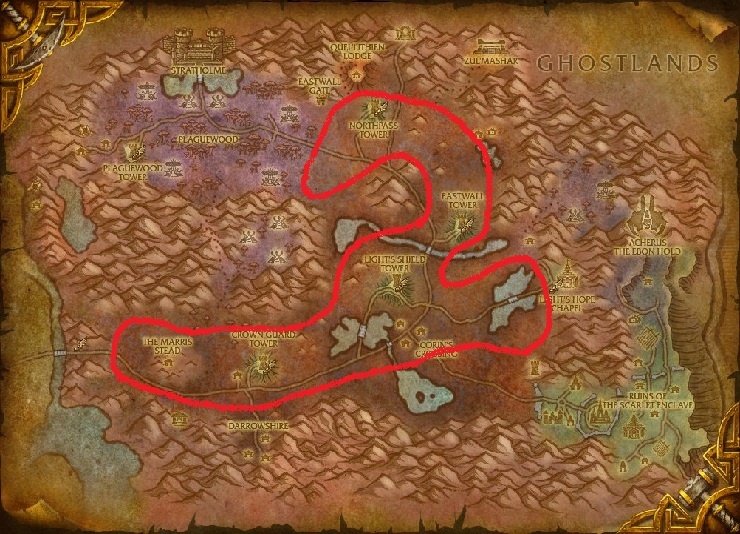
In this zone you will also find a lot of other herbs such as Liferoot, Khadgar’s Whisker and a few Arthas’ Tears. You should only herb all of thoose if they’re green or yellow when you hold your mouse over it. When it turns gray you should just continue flying and not stop up to herb it.
Also Alliance peeps, here’s your first long travel. Hope you have a flying mount or flight paths.

Cheers matey! 285 in herbalism, that’s awesome! Keep up the good work!
Now for the fifth time in your career as a herbalist you will have to seek a herbalism trainer!
For horde players I’d suggest to find your way to Orgrimmar (Use Hearthstone as it hopefully leads to Orgrimmar) at first and then find Muraga. She’s a kind lady and will teach you how to be a Master Herbalist for the change of a little tip 🙂 The reason I’d suggest going to Orgrimmar is because we’ll have to go to a zone pretty far away from the previous one.
For alliance players I’d suggest using Hearthstone back to Stormwind. Seek out Tannysa and learn the next level of herbalism.
This time we’ll be going to Swamp of Sorrows! The quickest way is; after you’ve learned the next level of herbalism, ask a guard (Stormwind Guard for alliance and Orgrimmar Grunt for horde) for directions to the mage trainer and run to the mage trainer. When you’re at the mage trainer there is a portal just next to them. It will lead to Blasted Lands, enter the portal. When you have entered the portal you are in Blasted Lands, run straight north and enter Swamp of Sorrows.


Horde and Alliance

In this zone you will gather the following herbs: Sorrowmoss and Golden Sensam

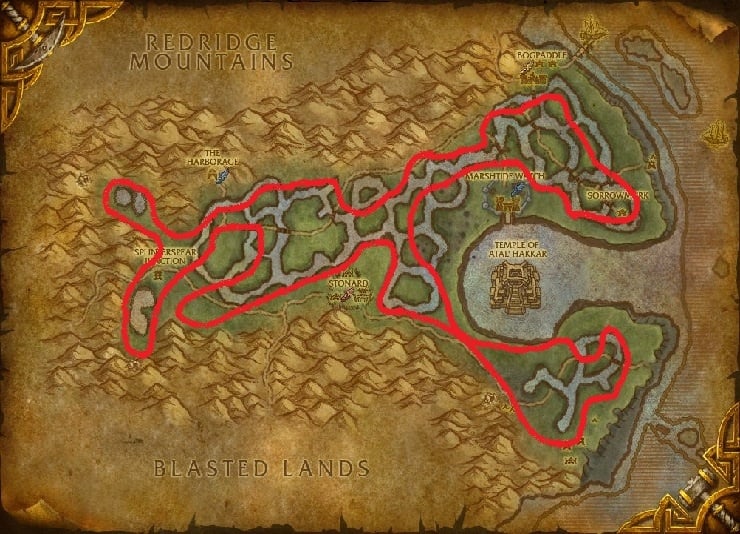
Swamp of Sorrows

NOTE: THIS ROUTE IS THE MOST EFFECCIENT ROUTE, BUT IT IS HARD TO FOLLOW DUE TO A LOT OF DIRECTIONS SHIFT!
As written above, this route is very hard to follow, therefore if you think it’s to hard, you could just fly/run Swamp of Sorrows dry in your own made up route, or just fly/run around and hoping for the best 🙂

Allrighty then, going to a new planet for new plants! Now you’re seeking out a whole new planet! Wauw, impressive how fast it goes. The quickest way to Outland would be through The Dark Portal, but. You’d have to go to Terokkar Forest. If you have the flight paths in Outland, or a flying mount yourself, I’d recommend going through the dark portal, and fly from The Dark Portal to Shattrat City. If you don’t I’d recommend going to a main city using your Hearthstone and ask for a mage to make a Portal to Shattrath City for you. When you then reach Shattrath City, seek out Botanist Alaenra to learn Grand Master Herbalism, now you’re ready to begin on Outland!


Horde and Alliance

In this zone you will gather the following herbs: Felweed, >Terocone and Dreaming Glory

Terokkar Forest

Easyzone! Just fly around chilling out max! For this zone you have nothing to worry about, besides a few creatures now and then. Theese few levels will take no more then a few minutes, if you have luck on your side.

Outland is a beautiful place, but it is already over and you’re ready to take on Northrend. First step will be coming to get back to Orgrimmar or Stormwind again (once again use Hearthstone if it’s set to Orgrimmar for horde and Stormwind for alliance). When you’ve found your way to Orgrimmar or Stormwind, go find a Herbalism Trainer (Muraga for horde and Tannysa for alliance) and ask if she’d like to teach you how to become a Grand Master Herbalist, and of course she’ll help you out, for a few pennies of course!
For Horde: When you’ve learned it, there is a zeppelin on the top floor of Orgrimmar that is flying Borean Tundra from there you’ll have to fly all the way to Howling Fjord (at this stage I presume you have a flying mount, though it is still possible to complete with a ground mount). From here you just do what you like most; HERBING 🙂
For Alliance: Get to Stormwind Harbor and find the ship that sails straight towards Howling Fjord, and then the fun begins 🙂


Horde and Alliance

In this zone you will gather the following herbs: Goldclover (and when you reach skill level 375 Tiger Lily)

Howling Fjord

On this map you will see some places with a white route, theese are for flying mounts only and are used to gather even more Tiger Lily. Besides that, this is a normal farming route as you’ve seen them many times before, no problems again, but some creatures now and then.

O well, that was Howling Fjord, the next one is Sholazar Basin. You’ll have to fly all the way over to Sholazar Basin, it takes some time, but it is worth it. Once again it’ll be hard to complete without a flying mount, it takes long time without and routes are harder to follow. When you reach Sholazar Basin, look at the map and follow the route 🙂


Horde and Alliance

In this zone you will gather the following herbs: Adder’s Tongue, Goldclover and Tiger Lily

Sholazar Basin

As I said above it’s getting hard to complete theese routes without a flying mount, if you don’t have a flying mount you won’t be able to follow the route completely, if you’re having trouble you should be finding an alternative route for yourself or try the best to follow the route.

Now that was the forsaken land of Northrend. Now you’re going to the Cataclysm zones! At this point it is required that you have learned to fly in Azeroth.
To complete this step it is required that you have, learned Flight Master’s License.
For Horde: Once again you’ll also be heading for Orgrimmar and again it is preferred to have Hearthstone set to Orgrimmar. When you’re in Orgrimmar, go find Maztha and ask her to learn you Flight Master’s License, if you don’t have it already. Also you should seek out our favourite herbalism trainer Muraga to learn how to become an Illustrious Herbalist. Then find the portals that teleports you to the Cataclysm zones, and right-click the one teleporting you to Mount Hyjal.
For Alliance: You’ll be heading to Stormwind for this step, using Hearthstone to get to Stormwind is the quickest way. When you have reached Stormwind go seek Bralla Cloudwing and learn Flight Master’s License, if you haven’t already learned it. Go seek our kindly night elf friend Tannysa, for some gold she’ll teach you how to become an Illustrious Herbalist. Then you should find the portals that leads to the Cataclysm zones. Find the one to Mount Hyjal and right-click it.
If however you haven’t got the portal to Mount Hyjal open yet. Either fly the way there or get the Mount Hyjal starting quest for Horde or Alliance


Horde and Alliance

In this zone you will gather the following herbs: Stormvine, Cinderbloom and Azshara’s Veil when you reach skill level 450

Mount Hyjal

As you can see, and as I wrote above. It’s completely impossible to follow this route without a flying mount. This route will also make you meet some harder mobs then you’re used to, especially around Sethria’s Roost. Still it’s an efficient route and will bring you up to 500 faster than any other way.

Finally! The last step to skill level 525! It’s a short and quick route and it will bring you to skill level 525 in only a few minutes. It is actually the easiest route in whole of this guide, so if you’ve begun to get boring this takes no time! 🙂
For Horde: Once again go back to Orgrimmar using Hearthstone which you of course have set to Orgrimmar, find the portals to all of the Cataclysm zones, and right-click on the one to Uldum.
For Alliance: Once again we’re going to Stormwind, and of course you have your Hearthstone set to Stormwind. Find the portals that lead to the Cataclysm zones and right-click the one for Uldum.
If you haven’t unlocked the portal to Uldum you can choose to either take the quest that unlocks the zone for Horde or the Alliance quest if you’re on the other faction.


Horde and Alliance

In this zone you will gather the following herbs: Whiptail

Uldum

As said above, easy and simple route. Fly it for some minutes and you will hit 525!

CONGRATULATIONS You’ve reached max level for herbalism! You can be proud of yourself, now you’re ready to farm herbs to sell at auction house or increase your Alchemy or Inscription. Go brag to your friends and tell them how easy it was if you just follow the right routes.

I hope you enjoyed my guide for Herbalism, please feel free to comment if you have any suggestions to this guide or any future guide 🙂
Sincerely Yenoren.