Onyxia Attunement Guide – Alliance

This guide will walk you through getting attuned for Onyxia. The attunement process for Onyxia revolves around completing a fairly long quest chain.

Dragonkin Menace

For the Alliance the Onyxia attunement quest line starts in Burning Steppes. You first speak to the NPC Helendis Riverhorn who will give you the quest Dragonkin Menace. This quest will ask you to go around Burning Steppes killing black dragonkin. The Broodlings are pretty easy but you may not be able to solo the Black DragonspawnBlack Wyrmkin, and Black Drake which are all elites. You should probably bring a group for this quest.

messenger quests

Once you turn in Dragonkin Menace Helendis Riverhorn will give you Helendis Riverhorn’s Letter. This letter needs to be delivered to Magistrate Solomon. To complete this step you will have to travel to Redridge Mountains.
Magistrate Solomon in Redridge

Next you will speak with Highlord Bolvar Fordragon and ask for the aid of stormwind. After speaking with him you will then speak with Lady Katrana Prestor, after speaking with her you will have to speak with Highlord Bolvar Fordragon again. At this point you are an official deputy of stormwind. Next you return to Magistrate Solomon and hand him Bolvar’s Decree.

Magistrate Solomon doesn’t like what he reads and asks you to return to  Burning Steppes to speak with Marshal Maxwell.

Maxwell then asks you to travel north to the cave and visit Ragged John to learn about Marshal Windsor’s fate.
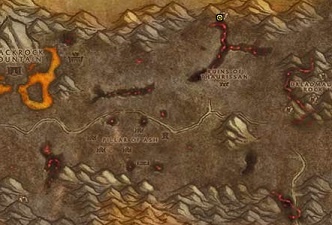
Ragged John’s Cave

Abandoned Hope

After speaking with Ragged John you will find out Marshal Windsor is being held in the prisons within Blackrock Depths. You will then have to join a group and travel into Blackrock Depths. Marshal Windsor  is being held in a cell down a corridor on the right side of the dungeon. He will then give you the quest Abandoned Hope, which requires you to head back to Marshal Maxwell and talk to him.

A Crumpled Up Note

Once you have turned in Abandoned Hope. A Crumpled Up Note will be able to drop off of any enemy inside of Blackrock Depths. The best way of finding the Note is to kill the dwarves located at the beginning of Blackrock Depths. Once you get A Crumpled Up Note head back to Marshal Windsor and turn it in.

A Shred of Hope

After Marshal Windsor reads the crumpled note he will give you the quest A Shred of Hope. This quest requires you to kill General Angerforge and Golem Lord Argelmach inside of Blackrock Depths.

Jail Break!

Once you return the lost pieces of information Marshal Windsor decides it’s time to report his findings and break out of jail. At this point he gives you the quest Jail Break!, be ready to complete an escort quest before accepting it because it starts immediately. Once you complete the escort mission you will report back to Marshal Maxwell to turn in the quest.

Onyxia in disguise

Marshal Maxwell then sends you to stormwind to meet with Reginald Windsor. He tells you that Lady Katrana Prestor is actually Onyxia in disguise.

The Great Masquerade

This quest has you march with Windsor up to Bolvar and the disguised Onyxia. When you arrive Onyxia will reveal her true form and summon elite dragonkin guards. You and the surrounding NPC’s will have to fend off the guards.

The surrounding NPC’s will tank the dragonkin Guards until they are all defeated. At this point you can turn in The Great Masquerade by talking with Highlord Bolvar Fordragon.

Onyxia

The Dragon’s Eye

Speak with Bolvar again to receive the quest The Dragon’s Eye, which requires you to find someone capable of restoring power to the Fragment of the Dragon’s Eye. You will need to speak with Haleh who is located in the southern part of Winterspring on a mountainside.

To get to Haleh you will have to travel deep inside the cave Mazthoril. At the very back of the cave you will find runes on the floor which teleport you to Haleh.

Haleh

Drakefire Amulet

Haleh asks you to venture into Blackrock Spire  (which is a 10 man raid) and defeat General Drakkisath to retrieve the Blood of the Black Dragon Champion.
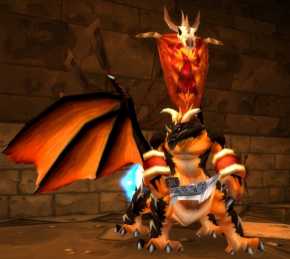
General Drakkisath

After you retrieve the Blood of the Black Dragon Champion  from General Drakkisath return to Haleh in Winterspring. Once you turn in your quest you will receive the Drakefire Amulet. This amulet must be carried with you whenever you want to enter Onyxia’s Lair.

Congratulations! You are now attuned for Onyxia’s Lair!

Onyxia Attunement Guide – Horde

This guide will walk you through getting attuned for Onyxia. The attunement process for Onyxia revolves around completing a fairly long quest chain.

Warlord’s Command

To start the attunement proccess pick up the quest Warlord’s Command from Warlord Goretooth  in Kargath. He will ask you to enter Blackrock Spire and kill Highlord OmokkWar Master VooneOverlord Wyrmthalak and also retrieve the Important Blackrock Documents which spawn behind one of these three bosses. Once you have completed the quest return to Warlord Goretooth in Kargath.

Important Blackrock Documents

Eitrigg’s Wisdom

Goretooth will give you the quest Eitrigg’s Wisdom. head to Orgrimmar and speak with Eitrigg who is found inside Throll’s Chambers. Once you have spoken with Eitrigg turn the quest into Thrall.

For The Horde!

Thrall then gives you the quest For The Horde! which requires you to enter upper Blackrock Spire and kill Warchief Rend Blackhand. Once you kill him collect the Head of Rend Blackhand and return to Thrall for the next quest.

What the Wind Carries

Once you return to Thrall he will give you What the Wind Carries, this quest just requires you to listen to his story. After listening to thrall’s tale he will give you the quest The Champion of the Horde.

The Champion of the Horde

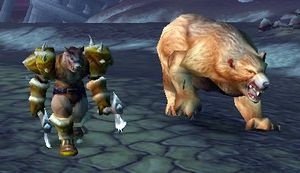
Rexxar

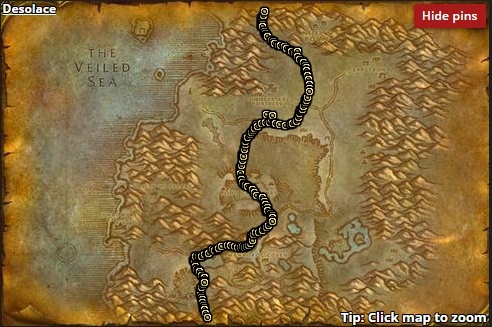
This quest will have you journey to Desolace and speak with Rokaro in Shadowprey Village. Rokaro will tell you all about Rexxar, thrall’s most loyal champion. Head to Rexxar to complete this quest, he can be found walking up and down the road in desolace. He travels from the very north part of Desolace all the way down to the entrance to Feralas.

Rexxar’s path

Rexxar’s Testament

Once you find and talk to Rexxar he will give you Rexxar’s Testament and ask you to turn it into Myranda the Hag in Western Plaguelands. She will then teach you to disguise yourself to fool the Black Dragonflight.

Myranda the Hag

Oculus Illusions

Myranda the Hag will give you the quest Oculus Illusions and ask you to collect 20 Black Dragonspawn Eye to help create the disguise. These eyes can only be obtained by killing black dragonkin located inside Blackrock Spire. This will require you to join or create a group to run the dungeon. Once you have collected 20 of the eyes return to Myranda to finish the quest and get your disguise.

Emberstrife

After you hand your quest in to Myranda she will give you an Amulet of Draconic Subversion which you can use to disguise yourself as a member of the black dragonflight.

You will then be required to travel to Emberstrife’s Den which is a cave located in Dustwallow Marsh. Once you arrive use your disguise and speak with Emberstrife near the back of the cave.

Emberstrife’s Cave

Test of Skulls

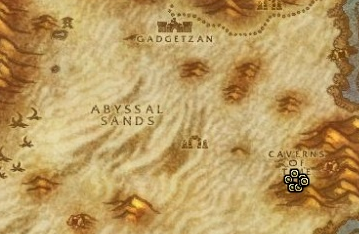
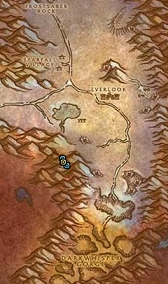
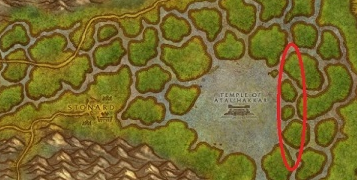
Emberstrife will give you three quests which require you to bring back the skulls of champions from the other Dragonflights. The quests are The Test of Skulls, Chronalis, The Test of Skulls, Scryer and The Test of Skulls, Somnus. You will need a group to kill each of these dragons as they are quite difficult. These quests can be completed in a raid group.

Chronalis
Scryer
Somnus

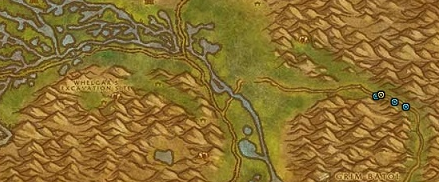
Once you return to Emberstrife with all 3 skulls he will send you on a final quest The Test of Skulls, Axtroz. This quest requires you to kill Axtroz the champion of the Red Dragonflight. He can be found near Grim Batol in the Wetlands.

Axtroz

Ascension

Once Emberstrife has all 3 skulls he will craft the Dull Drakefire Amulet. He will ask you to present this medallion to his leader General Drakkisath inside Blackrock Spire. The disguise will not work inside of Blackrock Spire so you will need to talk with Rexxar to find out what to do next. He is still walking up and down the road in Desolace.

Blood of the Black Dragon Champion

Rexxar will give you the quest Blood of the Black Dragon Champion, this quest requires you to form a 10 man group and enter Upper Blackrock Spire. You then need to find and defeat General Drakkisath who will drop Blood of the Black Dragon Champion.

General Drakkisath

Once you have the blood return to Rexxar and he will give you the Drakefire Amulet. You will have to carry this amulet any time you attempt to enter Onyxia’s Lair.

Congratulations! You are now attuned for Onyxia’s Lair!
Molten Core Attunement Guide

This guide will walk you through getting attuned for Molten Core. The attunement process for Molten Core is pretty simple actually.

Summary

Picking up Attunement to the Core

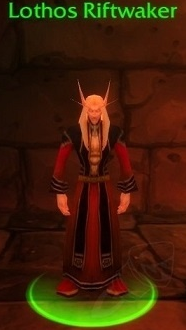
First you need to speak with Lothos Riftwaker and pick up the quest Attunement to the Core. He is located at the bottom of Blackrock Mountain on the path to Blackrock Depths. You have to be level 55 to accept the quest.

Lothos Riftwaker

Acquiring the Core Fragment

The quest Attunement to the Core requires you run Blackrock Depths and pick up the Core Fragment inside.

Core Fragment

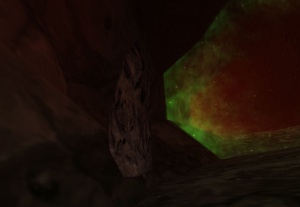
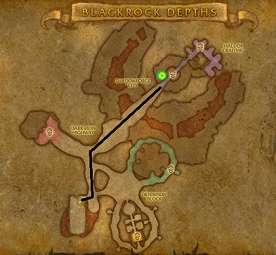
The core fragment is actually located at the very back of Blackrock Depths right before the Molten Core portal.

Map to the core

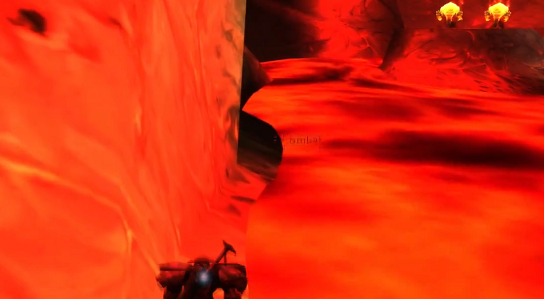
The quickest type of run to get to the core fragment is a “Lava run”, where you jump off the platform that Lord Incendius is on.

Lord Incendius’s platform

Lava run

  • Jump off Lord Incendius‘s platform
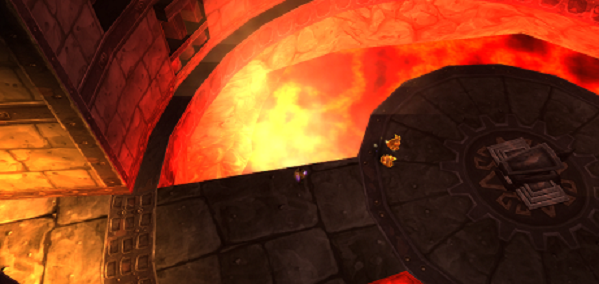
  • hug the left side of the cavern (pictured below)
  • Once the narrow path ends you will see a bridge leading to the Core Fragment
  • Swim across the lava and acquire the Core Fragment
Hug the left wall

Finishing Up

Once you have collected your Core Fragment head back to Lothos Riftwaker and turn in Attunement to the Core.

Congratulations! You are now attuned for Molten Core!

The Lothos Riftwaker shortcut

Once you have completed the attunement quest for Molten Core you will be able to teleport directly to Molten Core.

Simply talk to Lothos Riftwaker and he will teleport you into Molten Core.

Blackwing Lair Attunement Guide

This guide will walk you through getting attuned for Blackwing Lair. The attunement process for Blackwing Layer is actually surprisingly easy/fast.

Summary

Time needed: 4 hours

Quick Guide

  1. Loot Blackhand’s Command by killing Scarshield Quartermaster.

  2. Right click the Blackhand’s Command to activate the quest Blackhand’s Command.

  3. Kill General Drakkisath in Upper Blackrock Spire to access the Orb of Ascension.

  4. Congratulations! You are now Attuned for Blackwing Lair!

Acquire Blackhand’s Command

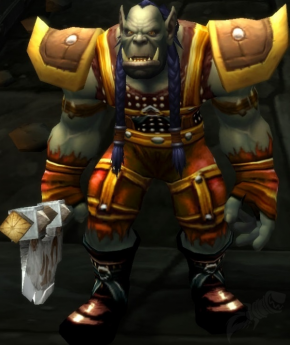
To start the quest you will need to first find Scarshield Quartermaster. He is located near the entrance of Blackrock Spire. Once you see the entrance to Blackrock Spire take a right and he should be down that hallway. You may have to walk down the hallway a little as he patrols the area.

Once you find him, kill him and he will drop Blackhand’s Command which you can then right click to start the quest Blackhand’s Command.

Scarshield Quartermaster

Find the Orb of Ascension

The quest Blackhand’s Command requires you to click on the Orb of Ascension which is located behind General Drakkisath.

General Drakkisath

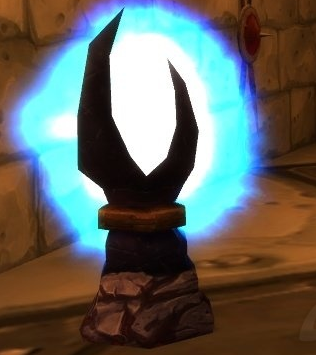
General Drakkisath is the final boss of Upper Blackrock Spire. Once you clear Upper Blackrock Spire and have defeated General Drakkisath you can click on the blue Orb of Ascension to complete the quest.

Congratulations! You are now attuned for Blackwing Lair!

Orb of Ascension

The Orb of Command shortcut

Once you have completed the attunement quest for Blackwing Lair you will be able to teleport straight to Blackwing Lair.

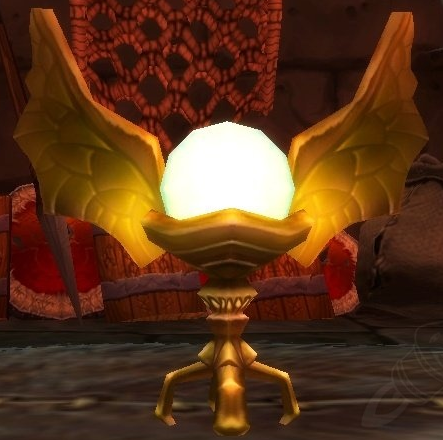
There is an Orb of Command located in the hallway where you killed the  Scarshield Quartermaster to get Blackhand’s Command. Touch the Orb of Command to teleport into Blackwing Lair.

Orb of Command

Check Attunement

You can run this macro to see if you are attuned or not.

/script print(IsQuestFlaggedCompleted(7761))

If the result is True, then you’ve completed this quest.

FAQ

How can you check if you are attuned for BWL?

/script print(IsQuestFlaggedCompleted(7761))

Can you Teleport to Blackwing Lair?

Once you have completed the attunement quest for Blackwing Lair you will be able to teleport straight to Blackwing Lair.

WotLK PVE Protection Warrior Tank Guide (Quick)

Welcome to our PVE Protection Warrior Tank guide for WoW WotLK. This guide will show you what you need to know to play the Warrior class as Protection Tank. If you follow this build you should have healers begging you to tank for them.

Talents

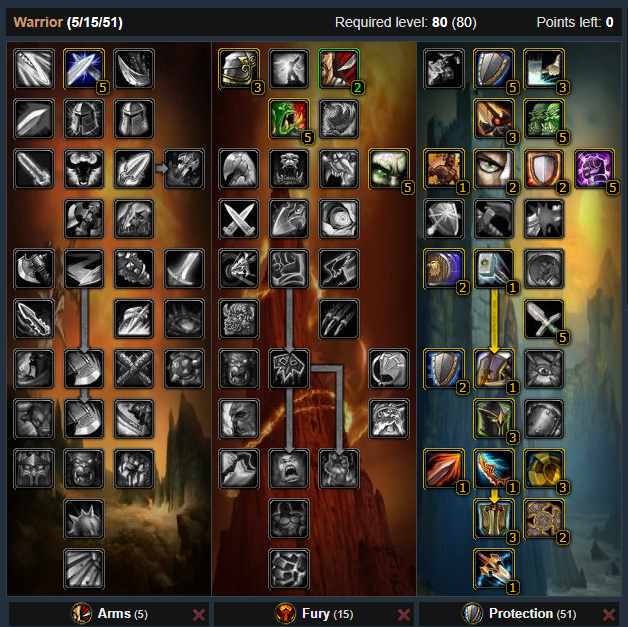
This first build is optimized for 5-man dungeons. It improves your shouts and reduces the cooldown of your defensive abilities.

Protection Build for 5-mans

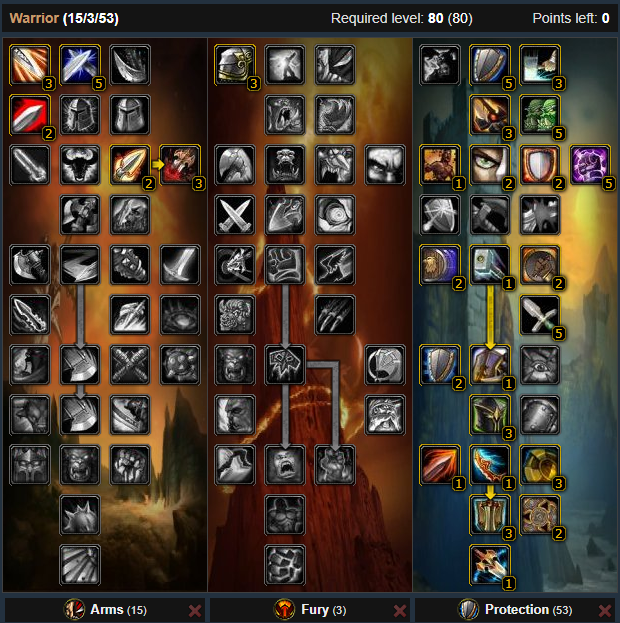
This second build is for raids. This build improves your threat generation but you lose the shout improvements. Your defensive cooldowns are shorter and so is your shield slam. Shield slam is a very high threat generating ability, so you should use it often.

Protection Build for Raids

Glyphs

Major Glyphs

Minor Glyphs

Gems

Gems can change based on your build, equipment and caps. You may need to adjust your gems to account for your gear.

Enchants

You may need to adjust your enchants based on your gear but these are the standard enchants.

Stat Priority

Survivability

  1. Defense (540 for raids, best avoidance stat)
  2. Effective Health (more is better)
  3. Dodge (second best avoidance stat)
  4. Parry (not worth getting vs dodge.)
  5. Block (not a pure avoidance stat)

Threat Generation

  • Weapon Speed (2.6, Slow means 5% more threat due to Devestate)
  • Expertise (26)
  • Hit (8% cap)

Rotation

Don’t forget to face the boss away from the raid. The raid needs to attack the boss from the back and not be hit by their frontal attacks. Dragons are the exception as they need to be hit from the side due to tail swipe.

Always use these:

(Sometimes other warriors will apply them for you.)

In a perfect world you will be able to replace every white attack with a Heroic Strike.

Shockwave can be used in emergency situations, if a lot of monsters aggro or aggro is lost.

WotLK PVP Protection Warrior Guide (Quick)

Welcome to our PVP Protection Warrior guide for WoW WotLK. This guide will show you what you need to know to play the Warrior class as Protection. If you follow this build you should be king of the arena in no time!

Talents

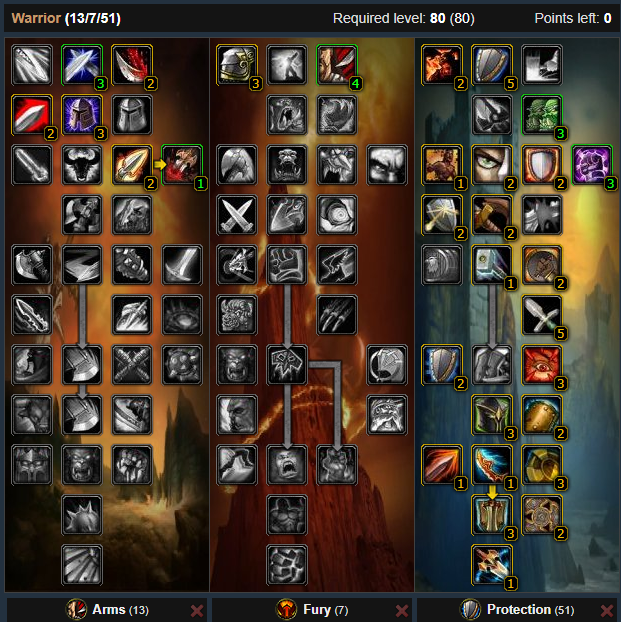
This is the standard Protection Warrior build when you have BiS gear and the required T-10 pieces.

Prot PVP Build

Glyphs

Major Glyphs

Optional replacements for Intervene

Minor Glyphs

Gems

Gems can change based on your build, equipment and caps. You may need to adjust your gems to account for your gear.

Enchants

You may need to adjust your enchants based on your gear but these are the standard enchants.

Armor

Weapons

Stat Priority

  1. Armor Penetration (50% minimum)
  2. Hit Rating (6%)
  3. Health (30k min)
  4. Critical strike (30%)
  5. Resilience (at most 500)

You want to keep your resilience low so you can gem/enchant for more damage. Your armor and defensive CD’s will keep you safe from most threats. Prot warriors use mostly PvE gear for PvP. Most good players use mostly PvE gear and double damage trinkets, so you can start with PvP items and work your way backwards.

You need 4 T-10 items.

  • Helmet and Chest – (Fury Warrior T-10)
  • Shoulders and Gloves – (Prot Warrior T-10)

These set bonuses grant a huge damage boost and are basically required for this build to work.

Rotation

You don’t really have a rotation, so here is a list of abilities and when to use them.

DPS Skills

  • Shield Slam  is your top priority ability. If you don’t have enough rage, wait for Sword and Board to proc.
  • Revenge does great damage to two targets.
  • Devastate when the first two are on cooldown. Spam this with Heroic Strike for solid damage.
  • Shockwave is an AOE stun for 4 seconds in a cone which also does nice damage.
  • Concussion Blow  is a 5 second single-target stun.
  • Rend  is a Damage over Time that is really useful against Rogues and Druids.
  • Thunderclap is not a top priority but it is useful when everything else is on cooldown.

Defensive Skills

  • Last Stand is a 30% Health increase. Great when you are about to die.
  • Shield Wall is a 60% Damage reduction but cannot be used while disarmed.
  • Shield Block is 10 seconds of 100% blocking physical attacks. This may just sound like a defensive ability but it gives you the ability to spam Revenge. This will result in proc’s of Sword and Board, which give you 10% Shield Slam damage, which is one of your top damaging abilities.
  • Enraged Regeneration  is our only self heal.
  • Intimidating Shout – Fears a target for 8 seconds, he is locked in place and can’t move or use abilities.

Utility Skills

  • Intervene  is a very useful ability when trying to save your partner. When talented it reduces the damage your partner will take by 30%. Best used when he is vulnerable or being focused down.
  • Charge rushes to the target and applies a 2 second stun while also generating rage.
  • Intercept rushes to the target and applies a 3 second stun and does a small amount of damage, doesn’t generate rage.

Here are some partners for 2s and 3s in arena.

  • Retribution Paladin
  • Holy Paladin
  • Arms Warrior
  • Mutilate Rogue
  • Enhancement Shaman
  • Elemental Shaman + Holy Paladin
  • Marksmanship Hunter + Holy Paladin
  • Arms Warrior + Holy Paladin

WotLK PVP Arms Warrior Guide (Quick)

Welcome to our PVP Arms Warrior guide for WoW WotLK. This guide will show you what you need to know to play the Warrior class as Arms. If you follow this build you should be king of the arena in no time!

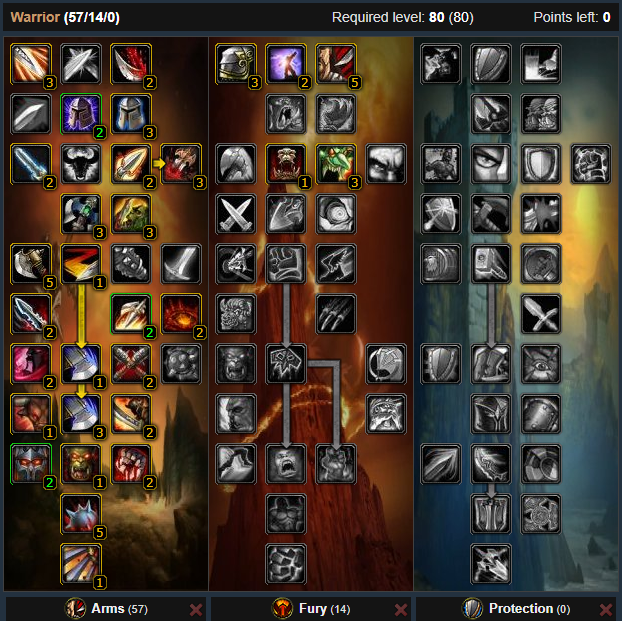
Talents

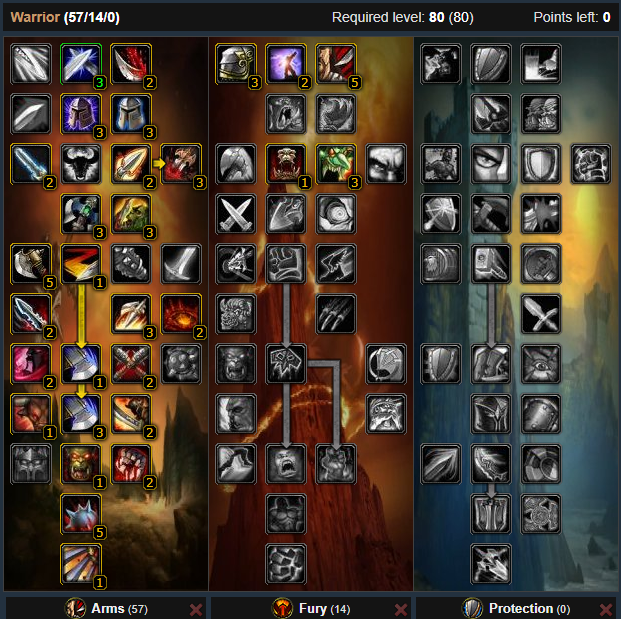
This is the standard Arms Warrior build. Optionally, Orcs can re-allocate the points you would normally put into Iron Will somewhere else due to their racial. This is primarily a 2v2 / dueling build.

Arms PVP 1

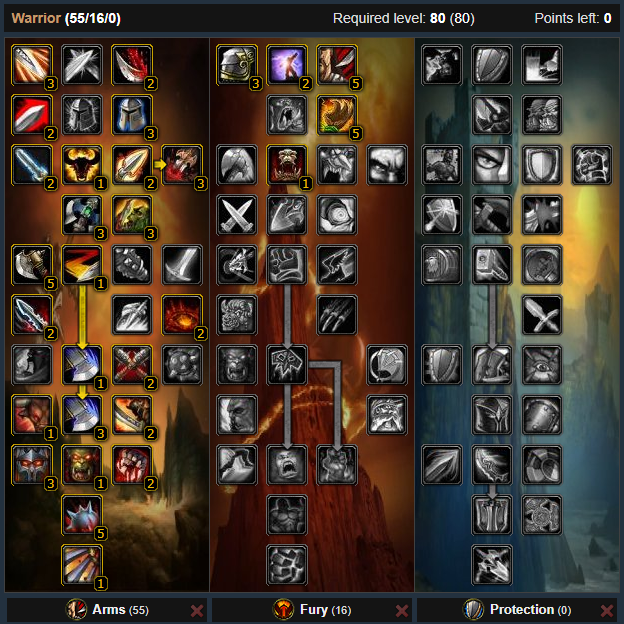
This second build sacrifices survivability for more damage. This build works better in 3v3 arenas and battlegrounds.

Glyphs

Major Glyphs

Minor Glyphs

Gems

Gems can change based on your build, equipment and caps. You may need to adjust your gems to account for your gear.

Enchants

You may need to adjust your enchants based on your gear but these are the standard enchants.

Armor

Weapons

Stat Priority

  1. Resilience (950-1050)
  2. Hit Rating (5%)
  3. Armor Penetration (60%)
  4. Strength

Tip

You should be using an AXE! It gives the biggest benefit of all 3 specs. Swords can be used for sudden one-shots or if you get kited often. Maces can be used when you don’t have other options…

Rotation

  1. Hamstring / Piercing Howl
  2. Rend
  3. Mortal Strike
  4. Overpower
  5. Mortal Strike
  6. Overpower

To fill space when your skills aare on cooldown you can use these filler abilities.

  • Heroic Throw
  • Heroic Strike
  • Thunderclap

Here are some partners for 2s and 3s in arena.

  • Discipline Priest
  • Holy Paladin
  • Restoration Shaman
  • Restoration Druid
  • Restoration Shaman + Holy Paladin
  • Discipline Priest + Holy Paladin
  • Elemental Shaman + Holy Paladin
  • Frost Mage + Holy Paladin
  • Destruction / Affliction Warlock + Holy Paladin
  • Frost / Unholy Death Knight + Holy Paladin

WotLK PVE Arms Warrior DPS Guide (Quick)

Welcome to our PVE Arms Warrior guide for WoW WotLK. This guide will show you what you need to know to play the Warrior class as Arms. If you follow this build you should be at the top of the DPS chart in no time!

Talents

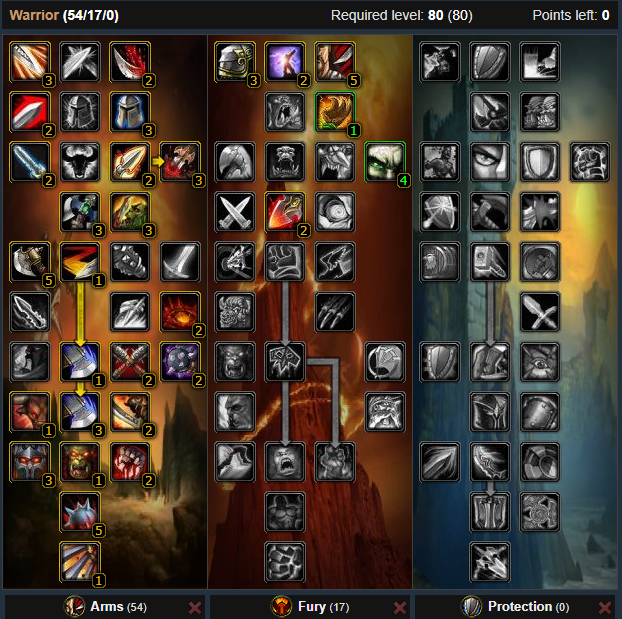
This first build is for newer players with low gear scores. It assumes you don’t have any of yours stats capped. This build focuses on rage generation with Unbridled Wrath and Anger Management. It also includes Weapon Mastery to make up for not being hit or expertise capped. Slam gets excluded from our rotation making us more mobile but capable of less damage.

Arms Build (Low Gear req)

This build does the most single target DPS. It also assumes you have hit your stat caps and have close to BiS gear.

Arms High DPS Build

Glyphs

Major Glyphs

Minor Glyphs

Gems

Gems can change based on your build, equipment and caps. You may need to adjust your gems to account for your gear.

Enchants

You may need to adjust your enchants based on your gear but these are the standard enchants.

Stat Priority

  1. Hit Rating (8%)
  2. Expertise (18+)
  3. Armor Penetration (1400 max)
  4. Critical strike
  5. Strength / AP
  6. Critical strike

You need 8% hit rating to be melee hit capped.

Expertise cap is 26, so if you have no expertise, it’s a very valuable stat. Some warriors don’t cap expertise to increase the number of Overpower procs. There is a point where having your main attacks dodged outweighs Overpower procs, so a safe bet is to stay above 18.

After you are hit capped and have the expertise you were aiming for, Armor penetration should be your next stat. You want to eventually reach 100% without a Proc but at first aim to get it to 100% while your trinket procs are up. Also keep in mind that battle stance increases your ArP by 10% and mace spec gives another 15%.

Here are a list of ArP caps:

  • 1400 rating without Battle stance & Mace Spec (Not relevant to Arms since you’ll spend most of your time in Battle Stance)
  • 1260 with Battle Stance
  • 1050 with Battle Stance + Mace spec
  • 1177 with 2p t9
  • 967 with 2p t9 + Mace Spec

Strength is always a nice DPS increase. Once you have your Armour pen sorted, you can gem for strength or strength + Crit (with a socket bonus of +6 str or more).

Rotation

Arms doesn’t really follow a rotation, you use abilities when proc’s happen.

Priority List

  1. Execute 
  2. Overpower
  3. Mortal Strike or Heroic Strike

WotLK PVE Fury Warrior DPS Guide (Quick)

Welcome to our PVE Fury Warrior guide for WoW WotLK. This guide will show you what you need to know to play the Warrior class as Fury. If you follow this build you should be at the top of the DPS chart in no time!

Talents

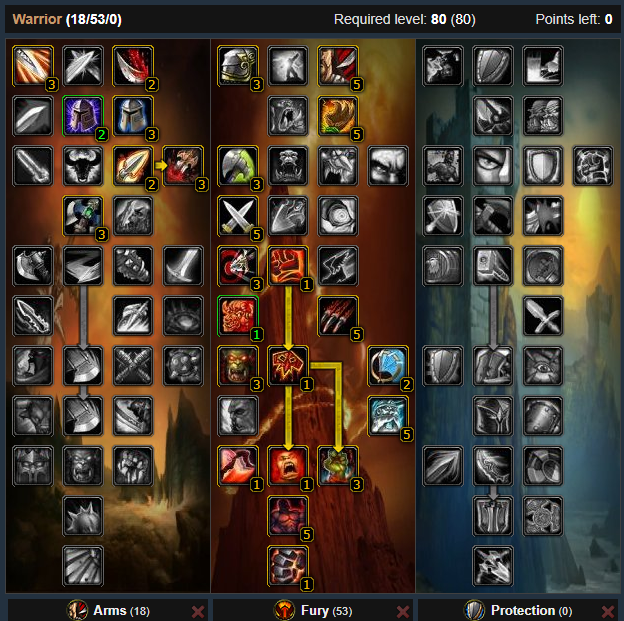
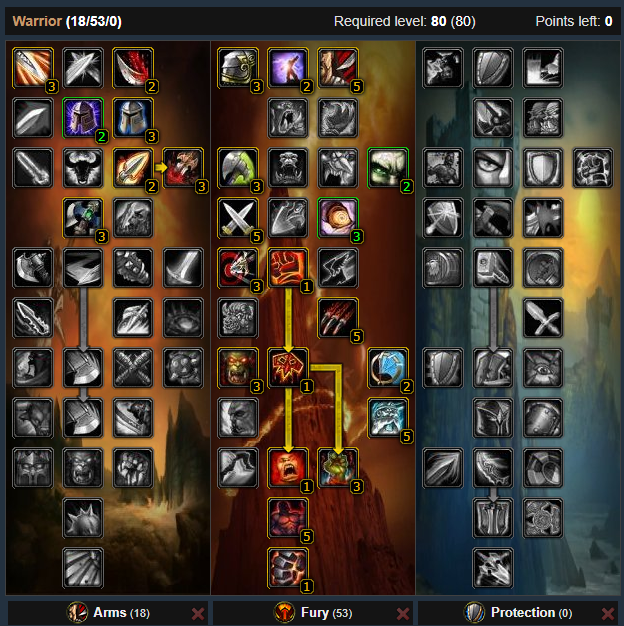
There are two viable specs for a fury warrior and both specs are 18/53/0. One has enrage and the other doesn’t.

Fury Cleave Build

This second build has less burst on the opening but more overall damage by 2% to 3% percent.

Enrage build Fury

Glyphs

Major Glyphs

Minor Glyphs

Gems

Gems can change based on your build, equipment and caps. You may need to adjust your gems to account for your gear.

Gem strength until you hit around 50% to 60% passive armor penetration. once you get to that point, gem the rest as armor penetration until you get to 1400 arp (100%).

At the point of arp cap, start gemming for strength or strength/crit or strength/hit.

Enchants

You may need to adjust your enchants based on your gear but these are the standard enchants.

Stat Priority

  1. Hit Rating (5%)
  2. Expertise (26)
  3. Armor Penetration (1400 max)
  4. Strength
  5. Critical strike
  6. Haste

Expertise cap is 26 and Armor Penetration cap is 1400 you should not go over these.

Never gem haste.

Rotation

Fury has a simple rotation:

The key to maximizing your DPS is not interrupting you main combo with global cooldowns from other abilities.

Macros

/equipslot 16 Glorenzelg, High-Blade of the Silver Hand (your mainhand)
/equipslot 17 Cryptmaker (your offhand)

Weapon Macro

/equip Bloodvenom Blade (your mainhand here)
/equip Icecrown Glacial Wall ( your shield here)
/cast Defensive Stance
/cast Shield Wall
/cast Battle Stance

Shield Wall Macro

/cast Heroic Strike(Rank 13)
/cancelaura Hand of Protection
/cancelaura Divine Intervention

Heroic Strike Macro (USE THIS TO DEAL WITH TROLLS)

/cast Defensive Stance
/cast Intervene
/cast Berserker Stance

Intervene Macro

#showtooltip Rend(Rank 10)
/cast Battle Stance
/cast Rend(Rank 10)
/cast Berserker Stance

Rend Macro

BIS Gear List

Misc

PVE WotLK Enhancement Shaman DPS Guide (Short)

Welcome to our PVE Enhancement Shaman guide for WoW WotLK. This guide will show you what you need to know to play the Shaman class as Enhancement. If you follow this build you should be at the top of the DPS chart in no time!

Talents

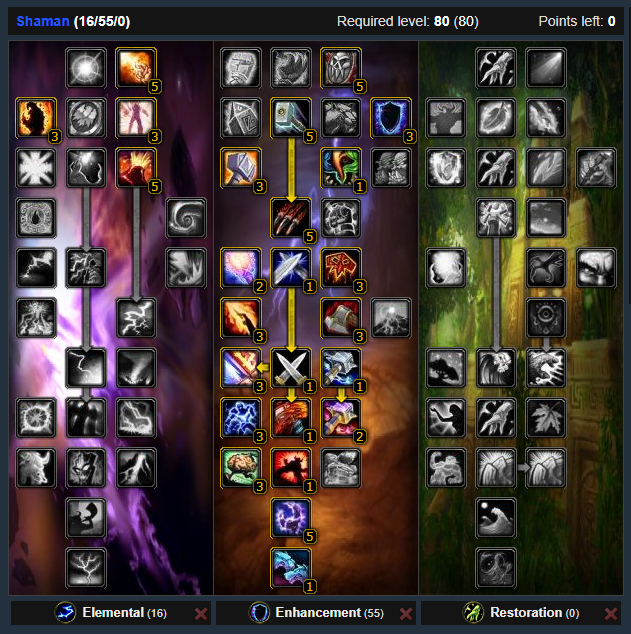
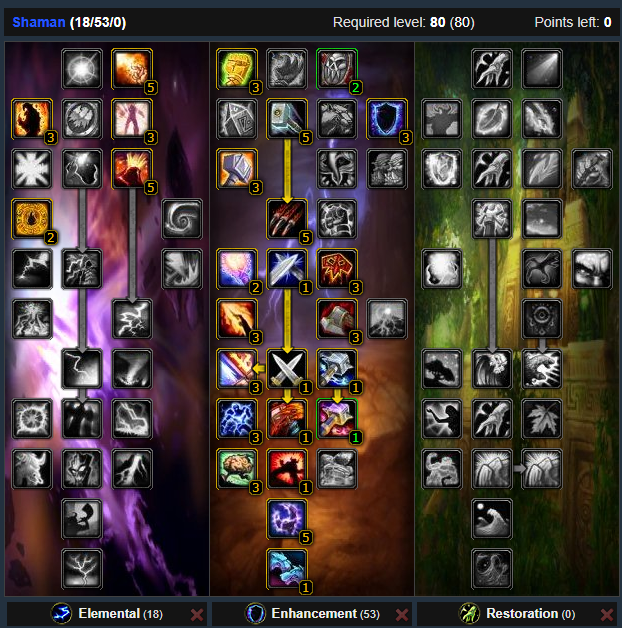
For a fresh 80 this build works a lot better. It has cheap shocks and you get mana regen from Stormstrike.

Enhancement build (Low Gear)

This build is for people with almost BiS gear. This build has less Mana regeneration, which is part of why you need the better gear. Your totems are also new better than a Death Knight’s Horn of winter at the cost of a little intellect.

Enhancement build (BiS Gear)

You can also optionally change Ancestral Knowledge to Enhancing Totems.

Glyphs

Major Glyphs

You could replace Windfury Weapon with one of these:

Minor Glyphs

Gems

Gems can change based on your build, equipment and caps. You may need to adjust your gems to account for your gear.

Enchants

You may need to adjust your enchants based on your gear but these are the standard enchants.

Stat Priority

  1. Hit Rating (8% soft cap) (17% desired) (27% hard cap)
  2. Expertise (26)
  3. Attack Power / Haste
  4. Critical strike
  5. Armor Penetration
  6. Agility

Hit rating soft cap is 8% and should be your first priority. This means your special abilities will not miss. Dual wielding has a hit cap of 27% but it’s not reasonable to actually hit the hard cap. You would give up too many useful stats to hit 27%.

Due to the build relying on Maelstrom Weapon and Lightning Bolt you need 17% spell hit.

Hast and attack power give about the same dps boost so it’s more or less a personal choice.

Rotation

You should be dual wielding, it’s much higher DPS.

Windfury Weapon should be on your main-hand and Flametongue Weapon on your off-hand.

Enhance has a very complicated rotation but after a while you get used to it.

Both Feral Spirit and Shamanistic Rage should be used every time they are off cooldown.